> For the complete documentation index, see [llms.txt](https://docs.oceanprotocol.com/llms.txt). Markdown versions of documentation pages are available by appending `.md` to page URLs; this page is available as [Markdown](https://docs.oceanprotocol.com/data-scientists/ocean.py/compute-flow.md).
# Compute Flow
In this page, we provide the steps for publishing algorithm asset, run it on Ocean environment for C2D and retrieve the result logs, using ocean.py.
We assumed that you have completed the installation part with the preferred setup.
Here are the steps:
1. Alice publishes dataset
2. Alice publishes algorithm
3. Alice allows the algorithm for C2D for that data asset
4. Bob acquires datatokens for data and algorithm
5. Bob starts a compute job using a free C2D environment (no provider fees)
6. Bob monitors logs / algorithm output
Let's go through each step.
### 1. Alice publishes dataset
In the same python console:
{% code overflow="wrap" %}
```python
# Publish data NFT, datatoken, and asset for dataset based on url
# ocean.py offers multiple file object types. A simple url file is enough for here
from ocean_lib.structures.file_objects import UrlFile
DATA_url_file = UrlFile(
url="https://raw.githubusercontent.com/oceanprotocol/c2d-examples/main/branin_and_gpr/branin.arff"
)
name = "Branin dataset"
(DATA_data_nft, DATA_datatoken, DATA_ddo) = ocean.assets.create_url_asset(name, DATA_url_file.url, {"from": alice}, with_compute=True, wait_for_aqua=True)
print(f"DATA_data_nft address = '{DATA_data_nft.address}'")
print(f"DATA_datatoken address = '{DATA_datatoken.address}'")
print(f"DATA_ddo did = '{DATA_ddo.did}'")
```
{% endcode %}
To customise the privacy and accessibility of your compute service, add the `compute_values` argument to `create_url_asset` to set values according to the [DDO specs](/developers/identifiers.md). The function assumes the documented defaults.
### 2. Alice publishes an algorithm
In the same Python console:
{% code overflow="wrap" %}
```python
# Publish data NFT & datatoken for algorithm
ALGO_url = "https://raw.githubusercontent.com/oceanprotocol/c2d-examples/main/branin_and_gpr/gpr.py"
name = "grp"
(ALGO_data_nft, ALGO_datatoken, ALGO_ddo) = ocean.assets.create_algo_asset(name, ALGO_url, {"from": alice}, wait_for_aqua=True)
print(f"ALGO_data_nft address = '{ALGO_data_nft.address}'")
print(f"ALGO_datatoken address = '{ALGO_datatoken.address}'")
print(f"ALGO_ddo did = '{ALGO_ddo.did}'")
```
{% endcode %}
### 3. Alice allows the algorithm for C2D for that data asset
In the same Python console:
{% code overflow="wrap" %}
```python
compute_service = DATA_ddo.services[1]
compute_service.add_publisher_trusted_algorithm(ALGO_ddo)
DATA_ddo = ocean.assets.update(DATA_ddo, {"from": alice})
```
{% endcode %}
### 4. Bob acquires datatokens for data and algorithm
In the same Python console:
```python
# Alice mints DATA datatokens and ALGO datatokens to Bob.
# Alternatively, Bob might have bought these in a market.
from ocean_lib.ocean.util import to_wei
DATA_datatoken.mint(bob, to_wei(5), {"from": alice})
ALGO_datatoken.mint(bob, to_wei(5), {"from": alice})
```
You can choose each method for getting access from[ consume flow approaches](/data-scientists/ocean.py/consume-flow.md).
### 5. Bob starts a compute job using a free C2D environment
Only inputs needed: DATA\_did, ALGO\_did. Everything else can get computed as needed. For demo purposes, we will use the free C2D environment, which requires no provider fees.
In the same Python console:
{% code overflow="wrap" %}
```python
# Convenience variables
DATA_did = DATA_ddo.did
ALGO_did = ALGO_ddo.did
# Operate on updated and indexed assets
DATA_ddo = ocean.assets.resolve(DATA_did)
ALGO_ddo = ocean.assets.resolve(ALGO_did)
compute_service = DATA_ddo.services[1]
algo_service = ALGO_ddo.services[0]
free_c2d_env = ocean.compute.get_free_c2d_environment(compute_service.service_endpoint, DATA_ddo.chain_id)
from datetime import datetime, timedelta, timezone
from ocean_lib.models.compute_input import ComputeInput
DATA_compute_input = ComputeInput(DATA_ddo, compute_service)
ALGO_compute_input = ComputeInput(ALGO_ddo, algo_service)
# Pay for dataset and algo for 1 day
datasets, algorithm = ocean.assets.pay_for_compute_service(
datasets=[DATA_compute_input],
algorithm_data=ALGO_compute_input,
consume_market_order_fee_address=bob.address,
tx_dict={"from": bob},
compute_environment=free_c2d_env["id"],
valid_until=int((datetime.now(timezone.utc) + timedelta(days=1)).timestamp()),
consumer_address=free_c2d_env["consumerAddress"],
)
assert datasets, "pay for dataset unsuccessful"
assert algorithm, "pay for algorithm unsuccessful"
# Start compute job
job_id = ocean.compute.start(
consumer_wallet=bob,
dataset=datasets[0],
compute_environment=free_c2d_env["id"],
algorithm=algorithm,
)
print(f"Started compute job with id: {job_id}")
```
{% endcode %}
### 6. Bob monitors logs / algorithm output
In the same Python console, you can check the job status as many times as needed:
```python
# Wait until job is done
import time
from decimal import Decimal
succeeded = False
for _ in range(0, 200):
status = ocean.compute.status(DATA_ddo, compute_service, job_id, bob)
if status.get("dateFinished") and Decimal(status["dateFinished"]) > 0:
succeeded = True
break
time.sleep(5)
```
This will output the status of the current job. Here is a list of possible results: [Operator Service Status description](https://github.com/oceanprotocol/operator-service/blob/main/API.md#status-description).
Once the returned status dictionary contains the `dateFinished` key, Bob can retrieve the job results using ocean.compute.result or, more specifically, just the output if the job was successful. For the purpose of this tutorial, let's choose the second option.
```python
# Retrieve algorithm output and log files
output = ocean.compute.compute_job_result_logs(
DATA_ddo, compute_service, job_id, bob
)[0]
import pickle
model = pickle.loads(output) # the gaussian model result
assert len(model) > 0, "unpickle result unsuccessful"
```
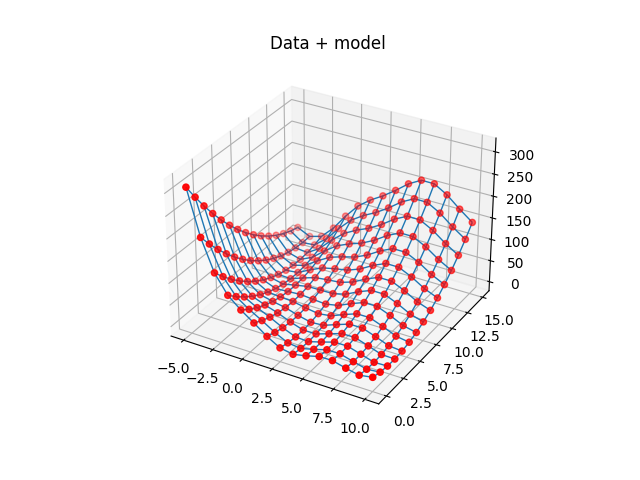
You can use the result however you like. For the purpose of this example, let's plot it.
Make sure you have `matplotlib` package installed in your virtual environment.
{% code overflow="wrap" %}
```python
import numpy
from matplotlib import pyplot
X0_vec = numpy.linspace(-5., 10., 15)
X1_vec = numpy.linspace(0., 15., 15)
X0, X1 = numpy.meshgrid(X0_vec, X1_vec)
b, c, t = 0.12918450914398066, 1.5915494309189535, 0.039788735772973836
u = X1 - b * X0 ** 2 + c * X0 - 6
r = 10. * (1. - t) * numpy.cos(X0) + 10
Z = u ** 2 + r
fig, ax = pyplot.subplots(subplot_kw={"projection": "3d"})
ax.scatter(X0, X1, model, c="r", label="model")
pyplot.title("Data + model")
pyplot.show() # or pyplot.savefig("test.png") to save the plot as a .png file instead
```
{% endcode %}
You should see something like this:
### Appendix. Tips & tricks
This README has a simple ML algorithm. However, Ocean C2D is not limited to usage in ML. The file [c2d-flow-more-examples.md](https://github.com/oceanprotocol/ocean.py/blob/main/READMEs/c2d-flow-more-examples.md) has examples from vision and other fields.
In the "publish algorithm" step, to replace the sample algorithm with another one:
* Use one of the standard [Ocean algo\_dockers images](https://github.com/oceanprotocol/algo_dockers) or publish a custom docker image.
* Use the image name and tag in the `container` part of the algorithm metadata.
* The image must have basic support for installing dependencies. E.g. "pip" for the case of Python. You can use other languages, of course.
* More info is available on the [algorithms page](broken://pages/SINXnxYOjwiorbkVpjXl)
The function to `pay_for_compute_service` automates order starting, order reusing and performs all the necessary Provider and on-chain requests. It modifies the contents of the given ComputeInput as follows:
* If the dataset/algorithm contains a `transfer_tx_id` property, it will try to reuse that previous transfer id. If provider fees have expired but the order is still valid, then the order is reused on-chain.
* If the dataset/algorithm does not contain a `transfer_tx_id` or the order has expired (based on the Provider's response), then one new order will be created.
This means you can reuse the same ComputeInput and you don't need to regenerate it everytime it is sent to `pay_for_compute_service`. This step makes sure you are not paying unnecessary or duplicated fees.
If you wish to upgrade the compute resources, you can use any (paid) C2D environment. Inspect the results of `ocean.ocean_compute.get_c2d_environments(service.service_endpoint, DATA_ddo.chain_id)` and `ocean.retrieve_provider_fees_for_compute(datasets, algorithm_data, consumer_address, compute_environment, duration)` for a preview of what you will pay. Don't forget to handle any minting, allowance or approvals on the desired token to ensure transactions pass.
---
# Agent Instructions
This documentation is published with GitBook. GitBook is the documentation platform designed so that both humans and AI agents can read, navigate, and reason over technical content effectively. Learn more at gitbook.com.
## Querying This Documentation
If you need additional information that is not directly available in this page, you can query the documentation dynamically by asking a question.
Perform an HTTP GET request on the current page URL with the `ask` query parameter, and the optional `goal` query parameter:
```
GET https://docs.oceanprotocol.com/data-scientists/ocean.py/compute-flow.md?ask=&goal=
```
`ask` is the immediate question: it should be specific, self-contained, and written in natural language.
`goal` is optional and describes the broader end goal you are ultimately trying to accomplish on behalf of the user. GitBook uses it to tailor the answer towards what is most useful for that goal.
The response will contain a direct answer to the question and relevant excerpts and sources from the documentation.
Use this mechanism when the answer is not explicitly present in the current page, you need clarification or additional context, or you want to retrieve related documentation sections.