Google Cloud Storage is a scalable and reliable object storage service provided by Google Cloud. It allows you to store and retrieve large amounts of unstructured data, such as files, with high availability and durability. You can organize your data in buckets and benefit from features like access control, encryption, and lifecycle management. With various storage classes available, you can optimize cost and performance based on your data needs. Google Cloud Storage integrates seamlessly with other Google Cloud services and provides APIs for easy integration and management.
Prerequisite
Create an account on Google Cloud. Users might also be asked to provide payment details and billing addresses that are out of this tutorial's scope.
Step 1 - Create a storage account
Go to
In the Google Cloud console, go to the Cloud Storage Buckets page
Create a new bucket
Fill in the details
Allow access to your recently created Bucket
Step 2 - Upload a file
Step 3 - Change your file's access (optional)
If your bucket's access policy is restricted, on the menu on the right click on Edit access (skip this step if your bucket is publicly accessible)
Step 4 - Share the file
Open the file and copy the generated link
Step 5 - Publish the asset using the generated link
Now, copy and paste the link into the Publish page in the Ocean Marketplace.
User Guides
Guides to use Ocean, with no coding needed.
Contents:
Basic concepts
Using wallets
Uploader
How to use Ocean Uploader
Uploader is designed to simplify the process of storing your assets on decentralized networks (such as and ). It provides access to multiple secure, reliable, and cost-effective storage solutions in an easy-to-use UI and JavaScript library.
Currently, we support Arweave and IPFS. We may support other storage options in the future.
Ready to dive into the world of decentralized storage with ? Let's get started:
Woohoo 🎉 You did it! You now have an IPFS CID for your asset. Pop over to https://ipfs.oceanprotocol.com/ipfs/{CID} to admire your handiwork, you'll be able to access your file at that link. You can use it to publish your asset on .
Host Assets
How to host your data and algorithm NFT assets like a champ 🏆 😎
The most important thing to remember is that wherever you host your asset... it needs to be reachable & downloadable. It cannot live behind a private firewall such as a private Github repo. You need to use a proper hosting service!
The URL to your asset is encrypted in the publishing process!
If you want to publish cool things on the Ocean Marketplace, then you'll first need a place to host your assets as Ocean doesn't store data; you're responsible for hosting it on your chosen service and providing the necessary details for publication. You have SO many options where to host your asset including centralized and decentralized storage systems. Places to host may include: Github, IPFS, Arweave, AWS, Azure, Google Cloud, and your own personal home server (if that's you, then you probably don't need a tutorial on hosting assets). Really, anywhere with a downloadable link to your asset is fine.
In this section, we'll walk you through three options to store your assets: Arweave (decentralized storage), AWS (centralized storage), and Azure (centralized storage). Let's goooooo!
Azure Cloud
How to use centralized hosting with Azure Cloud for your NFT assets
Azure provides various options to host data and multiple configuration possibilities. Publishers are required to do their research and decide what would be the right choice. The below steps provide one of the possible ways to host data using Azure storage and publish it on Ocean Marketplace.
Prerequisite
Create an account on . Users might also be asked to provide payment details and billing addresses that are out of this tutorial's scope.
Step 1 - Create a storage account
Go to Azure portal
Go to the Azure portal: https://portal.azure.com/#home and select Storage accounts
Fractional Ownership
Exploring fractional ownership in Web3, combining NFTs and DeFi for co-ownership of data IP and tokenized DAOs for collective data management.
Fractional ownership represents an exciting subset within the realm of Web3, combining the realms of NFTs and DeFi. It introduces the concept of co-owning data intellectual property (IP).
Ocean offers two approaches to facilitate fractional ownership:
Sharded Holding of ERC20 Datatokens: Under this approach, each holder of ERC20 tokens possesses the typical datatoken rights outlined earlier. For instance, owning 1.0 datatoken allows consumption of a particular asset. Ocean conveniently provides this feature out of the box.
Publish Flow Overview
Let's remember the interaction with Ocean's stack components for DDO publishing flow!
For this particular flow, we selected as consumer - Ocean CLI.
To explore more details regarding Ocean CLI usage, kindly check .
In this context, we address the following sequence diagram along with the explanations.
Asset Creation Begins
Identifiers (DIDs)
Specification of decentralized identifiers for assets in Ocean Protocol using the DID & DDO standards.
In Ocean, we use decentralized identifiers (DIDs) to identify your asset within the network. Decentralized identifiers (DIDs) are a type of identifier that enables verifiable, decentralized digital identity. In contrast to typical, centralized identifiers, DIDs have been designed so that they may be decoupled from centralized registries, identity providers, and certificate authorities. Specifically, while other parties might be used to help enable the discovery of information related to a DID, the design enables the controller of a DID to prove control over it without requiring permission from any other party. DIDs are URIs that associate a DID subject with a DID document allowing trustable interactions associated with that subject.
DIDs in Ocean follow , they look like this:
The part after did:op: is the ERC721 contract address(in checksum format) and the chainId (expressed to 10 decimal places). The following javascript example shows how to calculate the DID for the asset:
Before creating a DID you should first publish a data NFT, we suggest reading the following sections so you are familiar with the process:
OCEAN: The Ocean token
Since Ocean’s departure from the ASI Alliance, the $OCEAN token is an ERC20 token solely representing the ideals of decentralized AI and data.
It has no intended utility value nor is it a staking, platform, governance, payment, NFT, DeFi, meme, reward, or security token.
Its supply is capped at approximately 270,000,000. With buybacks and burns, the supply of $OCEAN will be decreasing over time.
Acquirors can currently exchange for $OCEAN on Coinbase, Kraken, UpBit, Binance US, Uniswap and SushiSwap. Until 2024, the Ocean Token ($OCEAN) was the utility token powering the Ocean Protocol ecosystem, used for staking, governance, and purchasing data services, enabling secure, transparent, and decentralized data exchange and monetization.
For more info, navigate to this of our official website.
Next:
Ocean CLI
CLI tool to interact with the oceanprotocol's JavaScript library to privately & securely publish, consume and run compute on data.
Welcome to the Ocean CLI, your powerful command-line tool for seamless interaction with Ocean Protocol's data-sharing capabilities. 🚀
The Ocean CLI offers a wide range of functionalities, enabling you to:
📤 data services: downloadable files or compute-to-data.
Edit
To make changes to a dataset, you'll need to start by retrieving the asset's (DDO).
Obtaining the DDO of an asset is a straightforward process. You can accomplish this task by executing the following command:
After retrieving the asset's DDO and saving it as a JSON file, you can proceed to edit the metadata as needed. Once you've made the necessary changes, you can utilize the following command to apply the updated metadata:
Consume
The process of consuming an asset is straightforward. To achieve this, you only need to execute a single command:
In this command, replace assetDID with the specific DID of the asset you want to consume, and download-location-path with the desired path where you wish to store the downloaded asset content
Once executed, this command orchestrates both the ordering of a and the subsequent download operation. The asset's content will be automatically retrieved and saved at the specified location, simplifying the consumption process for users.
Old Infrastructure
Ocean Protocol is now using Ocean Nodes for all backend infrastructure. Previously we used these three components:
: Aquarius is a metadata cache used to enhance search efficiency by caching on-chain data into Elasticsearch. By accelerating metadata retrieval, Aquarius enables faster and more efficient data discovery.
: The Provider component was used to facilitate various operations within the ecosystem. It assists in asset downloading, handles (Decentralized Data Object) encryption, and establishes communication with the operator-service for Compute-to-Data jobs. This ensures secure and streamlined interactions between different participants.
Uploader UI to Market
With the Uploader UI, users can effortlessly upload their files and obtain a unique hash or CID (Content Identifier) for each uploaded asset to use on the Marketplace.
Step 1: Copy the hash or CID from your upload.
Step 2: Open the Ocean Marketplace. Go to publish and fill in all the information for your dataset.
Step 3: When selecting the file to publish, open the hosting provider (e.g. "Arweave" tab)
Subgraph: The Subgraph is an off-chain service that utilizes GraphQL to offer efficient access to information related to datatokens, users, and balances. By leveraging the subgraph, data retrieval becomes faster compared to an on-chain query. This enhances the overall performance and responsiveness of applications that rely on accessing this information.
Compute-to-Data introduces a paradigm where datasets remain securely within the premises of the data holder, ensuring strict data privacy and control. Only authorized algorithms are granted access to operate on these datasets, subject to specific conditions, within a secure and isolated environment. In this context, algorithms are treated as valuable assets, comparable to datasets, and can be priced accordingly. This approach enables data holders to maintain control over their sensitive data while allowing for valuable computations to be performed on them, fostering a balanced and secure data ecosystem.
To define the accessibility of algorithms, their classification as either public or private can be specified by setting the attributes.main.type value in the Decentralized Data Object (DDO):
"access" - public. The algorithm can be downloaded, given appropriate datatoken.
"compute" - private. The algorithm is only available to use as part of a compute job without any way to download it. The Algorithm must be published on the same Ocean Provider as the dataset it's targeted to run on.
This flexibility allows for fine-grained control over algorithm usage, ensuring data privacy and enabling fair pricing mechanisms within the Compute-to-Data framework.
For each dataset, Publishers have the flexibility to define permission levels for algorithms to execute on their datasets, offering granular control over data access.
There are several options available for publishers to configure these permissions:
allow selected algorithms, referenced by their DID
allow all algorithms published within a network or marketplace
allow raw algorithms, for advanced use cases circumventing algorithm as an asset type, but most prone to data escape
All implementations default to private, meaning that no algorithms are allowed to run on a compute dataset upon publishing. This precautionary measure helps prevent data leakage by thwarting rogue algorithms that could be designed to extract all data from a dataset. By establishing private permissions as the default setting, publishers ensure a robust level of protection for their data assets and mitigate the risk of unauthorized data access.
The End User initiates the process by running the command: npm run publish .
This redirects to Ocean CLI (Consumer) to start publishing the dataset with the selected file.
The Consumer then calls ocean.js, which handles the asset creation logic.
Smart Contract Deployment
Ocean.js interacts with the Smart Contracts to deploy:
Data NFT, Datatoken, pricing schema such as Dispenser
from free assets and Fixed Rate Exchange for priced assets.
Once deployed, the smart contracts emit the NFTCreated and DatatokenCreated events (and additionally DispenserCreated and FixedRateCreated for pricing schema deployments).
Ocean.js listens to these events and checks the datatoken template. If it is template 4, then no encryption is needed for service files, because template 4 contract of ERC20 is used on top of credential EVM chains, which already encrypt the information on-chain, e.g. Sapphire Testnet. Otherwise, service files need to be encrypted by Ocean Node's dedicated handler.
DDO Validation
Ocean.js requests Ocean Node to validate the DDO structure against the SHACL schemas, depending on DDO version. For this task, Ocean Node uses util functions from DDO.js library which is out dedicated tool for DDO interactions.
✅ If Validation Succeeds:
Ocean.js can call setMetadata on-chain and then returns the DID to the Consumer, which is passed back to the End User. The DID gets indexed in parallel, because Ocean Node listens through Indexer to blockchain events, including MetadataCreated and the DDO will be processed and stored within Ocean Node's Database.
❌ If Validation Fails:
Ocean Node logs the issue and responds to Ocean.js with an error status and asset creation halts here.
Regarding publishing new datasets through consumer, Ocean CLI, please consult this dedicated section.
Consume 📥 data services, ordering datatokens and downloading data.
Compute to Data 💻 on public available datasets using a published algorithm. Free version of compute-to-data feature is available
The Ocean CLI is powered by the ocean.js JavaScript library, an integral part of the Ocean Protocol toolset. 🌐
Let's dive into the CLI's capabilities and unlock the full potential of Ocean Protocol together! If you're ready to explore each functionality in detail, simply go through the next pages.
npm run cli editAsset 'DATASET_DID' 'PATH_TO_UPDATED_FILE`
Read on, if you are interested in the security details!
When you publish your asset as an NFT, then the URL/TX ID/CID required to access the asset is encrypted and stored as a part of the NFT's DDO on the blockchain. Buyers don't have access directly to this information, but they interact with the Provider, which decrypts the DDO and acts as a proxy to serve the asset.
We recommend implementing a security policy that allows only the Provider's IP address to access the file and blocks requests from other unauthorized actors is recommended. Since not all hosting services provide this feature, you must carefully consider the security features while choosing a hosting service.
Publish. Cool. Things.
Security Considerations
Please use a proper hosting solution to keep your files. Systems like Google Drive are not specifically designed for this use case. They include various virus checks and rate limiters that prevent the downloading the asset once it was purchased.
as shown below.
Select storage accounts
Create a new storage account
Create a storage account
Fill in the details
Add details
Storage account created
Storage account created
Step 2 - Create a blob container
Create a blob container
Step 3 - Upload a file
Upload a file
Step 4 - Share the file
Select the file to be published and click Generate SAS
Click generate SAS
Configure the SAS details and click Generate SAS token and URL
Generate link to file
Copy the generated link
Copy the link
Step 5 - Publish the asset using the generated link
Now, copy and paste the link into the Publish page in the Ocean Marketplace.
Sharding ERC721 Data NFT: This method involves dividing the ownership of an ERC721 data NFT among multiple individuals, granting each co-owner the right to a portion of the earnings generated from the underlying IP. Moreover, these co-owners collectively control the data NFT. For instance, a dedicated DAO may be established to hold the data NFT, featuring its own ERC20 token. DAO members utilize their tokens to vote on updates to data NFT roles or the deployment of ERC20 datatokens associated with the ERC721.
It's worth noting that for the second approach, one might consider utilizing platforms like Niftex for sharding. However, important questions arise in this context:
What specific rights do shard-holders possess?
It's possible that they have limited rights, just as Amazon shareholders don't have the authority to roam the hallways of Amazon's offices simply because they own shares
Additionally, how do shard-holders exercise control over the data NFT?
These concerns are effectively addressed by employing a tokenized DAO, as previously described.
DAO
Data DAOs present a fascinating use case whenever a group of individuals desires to collectively manage data or consolidate data for increased bargaining power. Such DAOs can take the form of unions, cooperatives, or trusts.
Consider the following example involving a mobile app: You install the app, which includes an integrated crypto wallet. After granting permission for the app to access your location data, it leverages the DAO to sell your anonymized location data on your behalf. The DAO bundles your data with that of thousands of other DAO members, and as a member, you receive a portion of the generated profits.
This use case can manifest in several variations. Each member's data feed could be represented by their own data NFT, accompanied by corresponding datatokens. Alternatively, a single data NFT could aggregate data feeds from all members into a unified feed, which is then fractionally owned through sharded ERC20 tokens (as described in approach 1) or by sharding the ERC721 data NFT (as explained in approach 2). If you're interested in establishing a data union, we recommend reaching out to our associates at Data Union.
Step 5: Click on "VALIDATE" to ensure that your file gets validated correctly.
This feature not only simplifies the process of storing and managing files but also seamlessly integrates with the Ocean Marketplace. Once your file is uploaded via Uploader UI, you can conveniently use the generated hash or CID to interact with your assets on the Ocean Marketplace, streamlining the process of sharing, validating, and trading your digital content.
Ocean's mission is to level the playing field for AI and data.
How? By helping you monetize AI models, compute and data, while preserving privacy.
Ocean is a decentralized data & compute protocol built to scale AI. Its core tech is:
Data NFTs & datatokens, to enable token-gated access control, data wallets, data DAOs, and more.
Compute-to-data: buy & sell private data, while preserving privacy
Ocean Nodes: Monetizing globalized idle compute & turning it into a decentralized network, turning unused computing resources into a secure, scalable, and privacy-preserving infrastructure for AI training, inference, and data processing.
. Build token-gated AI dApps, or run an Ocean Node.
. Earn via predictions, annotations & challenges
and
Next:
Back:
Arweave
How to use decentralized hosting for your NFT assets
Using Arweave with Uploader
Enhance the efficiency of your file uploads by leveraging the simplicity of the Ocean Uploader storage system for Arweave. Dive into our comprehensive guide here to discover detailed steps and tips, ensuring a smooth and hassle-free uploading process. Your experience matters, and we're here to make it as straightforward as possible.
Arweave
Arweave is a global, permanent, and decentralized data storage layer that allows you to store documents and applications forever. Arweave is different from other decentralized storage solutions in that there is only one up-front cost to upload each file.
Step 1 - Get a new wallet and AR tokens
Download & save a new wallet (JSON key file) and receive a small amount of AR tokens for free using the Arweave faucet. If you already have an Arweave browser wallet, you can skip to Step 3.
At the time of writing, the faucet provides 0.02 AR which is more than enough to upload a file.
If at any point you need more AR tokens, you can fund your wallet from one of Arweave's .
Step 2 - Load the key file into the arweave.app web wallet
Open in a browser. Select the '+' icon in the bottom left corner of the screen. Import the JSON key file from step 1.
Step 3 - Upload file
Select the newly imported wallet by clicking the "blockies" style icon in the top left corner of the screen. Select Send. Click the Data field and select the file you wish to upload.
The fee in AR tokens will be calculated based on the size of the file and displayed near the bottom middle part of the screen. Select Submit to submit the transaction.
After submitting the transaction, select Transactions and wait until the transaction appears and eventually finalizes. This can take over 5 minutes so please be patient.
Step 4 - Copy the transaction ID
Once the transaction finalizes, select it, and copy the transaction ID.
Step 5 - Publish the asset with the transaction ID
Basic concepts
Learn the blockchain concepts behind Ocean
You'll need to know a thing or two about blockchains to understand Ocean Protocol's tech... Let's get started with the basics 🧑🏫
Prepare yourself, my friend
Blockchain: The backbone of Ocean
Blockchain is a revolutionary technology that enables the decentralized nature of Ocean. At its core, blockchain is a distributed ledger that securely records and verifies transactions across a network of computers. It operates on the following key concepts that ensure trust and immutability:
Decentralization: Blockchain eliminates the need for intermediaries by enabling a peer-to-peer network where transactions are validated collectively. This decentralized structure reduces reliance on centralized authorities, enhances transparency, and promotes a more inclusive data economy.
Immutability: Once a transaction is recorded on the blockchain, it becomes virtually impossible to alter or tamper with. The data is stored in blocks, which are cryptographically linked together, forming an unchangeable chain of information. Immutability ensures the integrity and reliability of data, providing a foundation of trust in the Ocean ecosystem. Furthermore, it enables reliable traceability of historical transactions.
Consensus Mechanisms: Blockchain networks employ consensus mechanisms to validate and agree upon the state of the ledger. These mechanisms ensure that all participants validate transactions without relying on a central authority, crucially maintaining a reliable view of the blockchain's history. The consensus mechanisms make it difficult for malicious actors to manipulate the blockchain's history or conduct fraudulent transactions. Popular consensus mechanisms include Proof of Work (PoW) and Proof of Stake (PoS).
Ocean harnesses the power of blockchain to facilitate secure and auditable data exchange. This ensures that data transactions are transparent, verifiable, and tamper-proof. Here's how Ocean uses blockchains:
Data Asset Representation: Data assets in Ocean are represented as non-fungible tokens (NFTs) on the blockchain. NFTs provide a unique identifier for each data asset, allowing for seamless tracking, ownership verification, and access control. Through NFTs and datatokens, data assets become easily tradable and interoperable within the Ocean ecosystem.
Smart Contracts: Ocean uses smart contracts to automate and enforce the terms of data exchange. Smart contracts act as self-executing agreements that facilitate the transfer of data assets between parties based on predefined conditions - they are the exact mechanisms of decentralization. This enables cyber-secure data transactions and eliminates the need for intermediaries.
By integrating blockchain technology, Ocean establishes a trusted infrastructure for data exchange. It empowers individuals and organizations to securely share, monetize, and leverage data assets while maintaining control and privacy.
Using Wallets
Fundamental knowledge of using ERC-20 crypto wallets.
Ocean Protocol users require an ERC-20 compatible wallet to manage their OCEAN and ETH tokens. In this guide, we will provide some recommendations for different wallet options.
What is a wallet?
In the blockchain world, a wallet is a software program that stores cryptocurrencies secured by private keys to allow users to interact with the blockchain network. Private keys are used to sign transactions and provide proof of ownership for the digital assets stored on the blockchain. Wallets can be used to send and receive digital currencies, view account balances, and monitor transaction history. There are several types of wallets, including desktop wallets, mobile wallets, hardware wallets, and web-based wallets. Each type of wallet has its own unique features, advantages, and security considerations.
Still easy, but more secure: Get a or hardware wallet, and use MetaMask to interact with it.
The at oceanprotocol.com lists some other possible wallets.
When you set up a new wallet, it might generate a seed phrase for you. Store that seed phrase somewhere secure and non-digital (e.g. on paper in a safe). It's extremely secret and sensitive. Anyone with your wallet's seed phrase could spend all tokens of all the accounts in your wallet.
Once your wallet is set up, it will have one or more accounts.
Each account has several balances, e.g. an Ether balance, an OCEAN balance, and maybe other balances. All balances start at zero.
An account's Ether balance might be 7.1 ETH in the Ethereum Mainnet, 2.39 ETH in Görli testnet. You can move ETH from one network to another only with a special setup exchange or bridge. Also, you can't transfer tokens from networks holding value such as Ethereum mainnet to networks not holding value, i.e., testnets like Görli. The same is true of the OCEAN balances.
Each account has one private key and one address. The address can be calculated from the private key. You must keep the private key secret because it's what's needed to spend/transfer ETH and OCEAN (or to sign transactions of any kind). You can share the address with others. In fact, if you want someone to send some ETH or OCEAN to an account, you give them the account's address.
Liquidity Pools [deprecated]
Liquidity pools and dynamic pricing used to be supported in previous versions of the Ocean Market. However, these features have been deprecated and now we advise everyone to remove their liquidity from the remaining pools. It is no longer possible to do this via Ocean Market, so please follow this guide to remove your liquidity via etherscan.
Remove liquidity using Etherscan
Get your balance of pool share tokens
Go to the pool's Etherscan/Polygonscan page. You can find it by inspecting your transactions on your account's Etherscan page under Erc20 Token Txns.
Click View All and look for Ocean Pool Token (OPT) transfers. Those transactions always come from the pool contract, which you can click on.
On the pool contract page, go to Contract -> Read Contract.
4. Go to field 20. balanceOf and insert your ETH address. This will retrieve your pool share token balance in wei.
5. Copy this number as later you will use it as the poolAmountIn parameter.
6. Go to field 55. totalSupply to get the total amount of pool shares, in wei.
7. Divide the number by 2 to get the maximum of pool shares you can send in one pool exit transaction. If your number retrieved in former step is bigger, you have to send multiple transactions.
8. Go to Contract -> Write Contract and connect your wallet. Be sure to have your wallet connected to network of the pool.
9. Go to the field 5. exitswapPoolAmountIn
For poolAmountIn add your pool shares in wei
For minAmountOut use anything, like 1
10. Confirm transaction in Metamask
Retrieve datatoken/data NFT addresses & Chain ID
Use these steps to reveal the information contained within an asset's DID and list the buyers of a datatoken
How to find the network, datatoken address, and data NFT address from an Ocean Market link?
If you are given an Ocean Market link, then the network and datatoken address for the asset is visible on the Ocean Market webpage. For example, given this asset's Ocean Market link: https://odc.oceanprotocol.com/asset/did:op:1b26eda361c6b6d307c8a139c4aaf36aa74411215c31b751cad42e59881f92c1 the webpage shows that this asset is hosted on the Mumbai network, and one simply clicks the datatoken's hyperlink to reveal the datatoken's address as shown in the screenshot below:
See the Network and Datatoken Address for an Ocean Market asset by visiting the asset's Ocean Market page.
More Detailed Info:
You can access all the information for the Ocean Market asset also by enabling Debug mode. To do this, follow these steps:
Step 1 - Click the Settings button in the top right corner of the Ocean Market
Click the Settings button
Step 2 - Check the Activate Debug Mode box in the dropdown menu
Check 'Active Debug Mode'
Step 3 - Go to the page for the asset you would like to examine, and scroll through the DDO information to find the NFT address, datatoken address, chain ID, and other information.
If you know the DID:op but you don't know the source link, then you can use Ocean Aquarius to resolve the metadata for the DID:op to find the chainId+ datatoken address of the asset. Simply enter in your browser "<your did:op:XXX>" to fetch the metadata.
For example, for the following DID:op: "did:op:1b26eda361c6b6d307c8a139c4aaf36aa74411215c31b751cad42e59881f92c1" the Ocean Aquarius URL can be modified to add the DID:op and resolve its metadata. Simply add "" to the beginning of the DID:op and enter the link in your browser like this:
Here are the networks and their corresponding chain IDs:
Datatokens
ERC20 datatokens represent licenses to access the assets.
Fungible tokens are a type of digital asset that are identical and interchangeable with each other. Each unit of a fungible token holds the same value and can be exchanged on a one-to-one basis. This means that one unit of a fungible token is indistinguishable from another unit of the same token. Examples of fungible tokens include cryptocurrencies like Bitcoin (BTC) and Ethereum (ETH), where each unit of the token is equivalent to any other unit of the same token. Fungible tokens are widely used for transactions, trading, and as a means of representing value within blockchain-based ecosystems.
What is a Datatoken?
Datatokens are fundamental within Ocean Protocol, representing a key mechanism to access data assets in a decentralized manner. In simple terms, a datatoken is an ERC20-compliant token that serves as access control for a data/service represented by a data NFT.
Datatokens enable data assets to be tokenized, allowing them to be easily traded, shared, and accessed within the Ocean Protocol ecosystem. Each datatoken is associated with a particular data asset, and its value is derived from the underlying dataset's availability, scarcity, and demand.
By using datatokens, data owners can retain ownership and control over their data while still enabling others to access and utilize it based on predefined license terms. These license terms define the conditions under which the data can be accessed, used, and potentially shared by data consumers.
Each datatoken represents a from the base intellectual property (IP) owner, enabling users to access and consume the associated dataset. The license terms can be set by the data NFT owner or default to a predefined "good default" license. The fungible nature of ERC20 tokens aligns perfectly with the fungibility of licenses, facilitating seamless exchangeability and interoperability between different datatokens.
By adopting the ERC20 standard for datatokens, Ocean Protocol ensures compatibility and interoperability with a wide array of ERC20-based wallets, , decentralized autonomous organizations (DAOs), and other blockchain-based platforms. This standardized approach enables users to effortlessly transfer, purchase, exchange, or receive datatokens through various means such as marketplaces, exchanges, or airdrops.
Data owners and consumers can engage with datatokens in numerous ways. Datatokens can be acquired through transfers or obtained by purchasing them on dedicated marketplaces or exchanges. Once in possession of the datatokens, users gain access to the corresponding dataset, enabling them to utilize the data within the boundaries set by the associated license terms.
Once someone has generated datatokens, they can be used in any ERC20 exchange, centralized or decentralized. In addition, Ocean provides a convenient default marketplace that is tuned for data: . It’s a vendor-neutral reference data marketplace for use by the Ocean community.
You can publish a initially with no ERC20 datatoken contracts. This means you simply aren’t ready to grant access to your data asset yet (sub-license it). Then, you can publish one or more ERC20 datatoken contracts against the data NFT. One datatoken contract might grant consume rights for 1 day, another for 1 week, etc. Each different datatoken contract is for different license terms.
Install
To get started with the Ocean CLI, follow these steps for a seamless setup:
Clone the Repository
Begin by cloning the repository. You can achieve this by executing the following command in your terminal:
Cloning the repository will create a local copy on your machine, allowing you to access and work with its contents.
Install NPM Dependencies
After successfully cloning the repository, you should install the necessary npm dependencies to ensure that the project functions correctly. This can be done with the following command:
npm install
Build the TypeScript code
To compile the TypeScript code and prepare the CLI for use, execute the following command:
npm run build
Now, let's configure the environment variables required for the CLI to function effectively. 🚀
Setting Environment Variables 🌐
To successfully configure the CLI tool, two essential steps must be undertaken: the setting of the account's private key and the definition of the desired RPC endpoint. These actions are pivotal in enabling the CLI tool to function effectively.
The CLI tool requires the configuration of the account's 'private key'(by exporting env "PRIVATE_KEY") or a 'mnemonic'(by exporting env "MNEMONIC"). Both serve as the means by which the CLI tool establishes a connection to the associated wallet. It plays a crucial role in authenticating and authorizing operations performed by the tool. You must choose either one option or the other. The tool will not utilize both simultaneously.
or
Additionally, it is imperative to specify the RPC endpoint that corresponds to the desired network for executing operations. The CLI tool relies on this user-provided RPC endpoint to connect to the network required for its functions. This connection to the network is vital as it enables the CLI tool to interact with the blockchain and execute operations seamlessly.
Furthermore, there are additional environment variables that can be configured to enhance the flexibility and customization of the environment. These variables include options such as the metadataCache URL and Provider URL, which can be specified if you prefer to utilize a custom deployment of Aquarius or Provider in contrast to the default settings. Moreover, you have the option to provide a custom address file path if you wish to use customized smart contracts or deployments for your specific use case. Remember setting the next environment variables is optional.
To explore the commands and option flags available in the Ocean CLI, simply run the following command:
With the Ocean CLI successfully installed and configured, you're ready to dive into its capabilities and unlock the full potential of Ocean Protocol. If you encounter any issues during the setup process or have questions, feel free to seek assistance from the team. 🌊
Barge
🧑🏽💻 Local Development Environment for Ocean Protocol
The Barge component of Ocean Protocol is a powerful tool designed to simplify the development process by providing Docker Compose files for running the full Ocean Protocol stack locally. It allows developers to set up and configure the various services required by Ocean Protocol for local testing and development purposes.
By using the Barge component, developers can spin up an environment that includes default versions of Aquarius, Provider, Subgraph, and Compute-to-Data. Additionally, it deploys all the smart contracts from the ocean-contracts repository, ensuring a complete and functional local setup. Barge component also starts additional services like Ganache, which is a local blockchain simulator used for smart contract development, and Elasticsearch, a powerful search and analytics engine required by Aquarius for efficient indexing and querying of data sets. A full list of components and exposed ports is available in the GitHub repository.
Load Ocean components locally by using Barge
To explore all the available options and gain a deeper understanding of how to utilize the Barge component, you can visit the official GitHub repository of Ocean Protocol.
By utilizing the Barge component, developers gain the freedom to conduct experiments, customize, and fine-tune their local development environment, and offers the flexibility to override the Docker image tag associated with specific components. By setting the appropriate environment variable before executing the start_ocean.sh command, developers can customize the versions of various components according to their requirements. For instance, developers can modify the: AQUARIUS_VERSION, PROVIDER_VERSION, CONTRACTS_VERSION, RBAC_VERSION, and ELASTICSEARCH_VERSION environment variables to specify the desired Docker image tags for each respective component.
Get API Keys for Blockchain Access
🧑🏽💻 Remote Development Environment for Ocean Protocol
This article points out an alternative for configuring remote networks on Ocean Protocol components: the libraries, Provider, Aquarius, Subgraph, without using Barge services.
Get API key for Ethereum node provider
Ocean Protocol's smart contracts are deployed on EVM-compatible networks. Using an API key provided by a third-party Ethereum node provider allows you to interact with the Ocean Protocol's smart contracts on the supported networks without requiring you to host a local node.
Choose any API provider of your choice. Some of the commonly used are:
Let's configure the remote setup for the mentioned components in the following sections.
Edit DDO Fields
To edit fields in the DDO structure, DDO instance from DDOManager is required to call updateFields method which is present for all types of DDOs, but targets specific DDO fields, according to DDO's version.
NOTE: There are some restrictions that need to be taken care of before updating fields which do not exist for certain DDO.
For e.g. deprecatedDDO, the update on services key is not supported, because a deprecatedDDO is not supposed to store services information. It is design to support only: id, nftAddress, chainId, indexedMetadata.nft.state.
Supported fields to be updated are:
Now let's use , DDOExampleV4 into the following javascript code, assuming @oceanprotocol/ddo-js has been installed as dependency before:
Execute script
DDO.js
Ocean Protocol's JavaScript library to manipulate with DDO and Asset fields and to validate DDO structures depending on version.
Welcome to the DDO.js! Your utility library for working with DDOs and Assets like a pro. 🚀
The DDO.js offers a wide range of functionalities, enabling you to:
The above diagram depicts the high level flow of Ocean core stack interaction for DDO validation using DDO.js, which will be called by Ocean Node whenever a new DDO is to be published.
Based on the DDO version, ddo.js will apply the corresponding SHACL schema to validate DDO fields against it.
NOTE: For DDO validation, indexedMetadata will not be taken in consideration in this process.
Now let's use , DDOExampleV4 into the following javascript code, assuming @oceanprotocol/ddo-js has been installed as dependency before:
Execute script
Aquarius
What is Aquarius?
Aquarius is a tool that tracks and caches the metadata from each chain where the Ocean Protocol smart contracts are deployed. It operates off-chain, running an Elasticsearch database. This makes it easy to query the metadata generated on-chain.
The core job of Aquarius is to continually look out for new metadata being created or updated on the blockchain. Whenever such events occur, Aquarius takes note of them, processes this information, and adds it to its database. This allows it to keep an up-to-date record of the metadata activity on the chains.
Aquarius has its own interface (API) that allows you to easily query this metadata. With Aquarius, you don't need to do the time-consuming task of scanning the data chains yourself. It offers you a convenient shortcut to the information you need. It's ideal for when you need a search feature within your dApp.
Aquarius high level overview
What does Aquarius do?
Acts as a cache: It stores metadata from multiple blockchains in off-chain in an Elasticsearch database.
Monitors events: It continually checks for MetadataCreated and MetadataUpdated events, processing these events and updating them in the database.
Offers easy query access: The Aquarius API provides a convenient method to access metadata without needing to scan the blockchain.
Serves as an API: It provides a REST API that fetches data from the off-chain datastore.
Features an EventsMonitor: This component runs continually to retrieve and index chain Metadata, saving results into an Elasticsearch database.
Configurable components: The EventsMonitor has customizable features like the MetadataContract, Decryptor class, allowed publishers, purgatory settings, VeAllocate, start blocks, and more.
We recommend checking the README in the for the steps to run the Aquarius. If you see any errors in the instructions, please open an issue within the GitHub repository.
Python: This is the main programming language used in Aquarius.
Flask: This Python framework is used to construct the Aquarius API.
Elasticsearch: This is a search and analytics engine used for efficient data indexing and retrieval.
Click to explore the documentation and more examples in postman.
Set Up MetaMask
How to set up a MetaMask wallet on Chrome
Before you can publish or purchase assets, you will need a crypto wallet. As Metamask is one of the most popular crypto wallets around, we made a tutorial to show you how to get started with Metamask to use Ocean's tech.
MetaMask can be connected with a TREZOR or Ledger hardware wallet but we don't cover those options below; see .
Go to the and search for MetaMask.
Github
How to use Github for your NFT assets
GitHub can be used to host and share files. This allows you to easily share and collaborate on files, track changes using commits, and keep a history of updates. GitHub's hosting capabilities enable you make your content accessible on the web.
Create an account on . Users might also be asked to provide details and billing addresses that are outside of this tutorial's scope.
Step 1 - Create a new repository on GitHub or navigate to an existing repository where you want to host your files.
Fill in the repository details. Make sure your Repo is public.
Step 2 - Upload a file
Revenue
Explore and manage the revenue generated from your data NFTs.
Having a that generates revenue continuously, even when you're not actively involved, is an excellent source of income. This revenue stream allows you to earn consistently without actively dedicating your time and effort. Each time someone buys access to your NFT, you receive money, further enhancing the financial benefits. This steady income allows you to enjoy the rewards of your asset while minimizing the need for constant engagement💰
By default, the revenue generated from a is directed to the of the NFT. This arrangement automatically updates whenever the data NFT is transferred to a new owner.
However, there are scenarios where you may prefer the revenue to be sent to a different account instead of the owner. This can be accomplished by designating a new payment collector. This feature becomes particularly beneficial when the data NFT is owned by an organization or enterprise rather than an individual.
There are several methods available for establishing a new
Local Setup
🧑🏽💻 Your Local Development Environment for Ocean Protocol
Functionalities of Barge
Barge offers several functionalities that enable developers to create and test the Ocean Protocol infrastructure efficiently. Here are its key components:
Functionality
Description
Compute to data
Compute to data version 2 (C2dv2)
Certain datasets, such as health records and personal information, are too sensitive to be directly sold. However, Compute-to-Data offers a solution that allows you to monetize these datasets while keeping the data private. Instead of selling the raw data itself, you can offer compute access to the private data. This means you have control over which algorithms can be run on your dataset. For instance, if you possess sensitive health records, you can permit an algorithm to calculate the average age of a patient without revealing any other details.
Compute-to-Data effectively resolves the tradeoff between leveraging the benefits of private data and mitigating the risks associated with data exposure. It enables the data to remain on-premise while granting third parties the ability to perform specific compute tasks on it, yielding valuable results like statistical analysis or AI model development.
Private data holds immense value as it can significantly enhance research and business outcomes. However, concerns regarding privacy and control often impede its accessibility. Compute-to-Data addresses this challenge by granting specific access to the private data without directly sharing it. This approach finds utility in various domains, including scientific research, technological advancements, and marketplaces where private data can be securely sold while preserving privacy. Companies can seize the opportunity to monetize their data assets while ensuring the utmost protection of sensitive information.
VSCode Extension
Run compute jobs on Ocean Protocol directly from VS Code. The extension automatically detects your active algorithm file and streamlines job submission, monitoring, and results retrieval. Simply open a python or javascript file and click Start Compute Job. You can install the extension from
Once installed, the extension adds an Ocean Protocol section to your VSCode workspace. Here you can configure your compute settings and run compute jobs using the currently active algorithm file.
Install the extension from the VS Code Marketplace
Data Scientists
Earn $, track data & compute provenance, and get more data
It offers three main benefits:
Earn. You can earn $ by doing crypto price predictions via , by curating data in , competing in a , and by selling data & models.
More Data. Use to access private data to run your AI modeling algorithms against, data which was previously inaccessible. Browse and other Ocean-powered markets to find more data to improve your AI models.
Provider
An integral part of the Ocean Protocol stack
It is a REST API designed specifically for the provision of data services. It essentially acts as a proxy that encrypts and decrypts the metadata and access information for the data asset.
Constructed using the Python Flask HTTP server, the Provider service is the only component in the Ocean Protocol stack with the ability to access your data, it is an important layer of security for your information.
The Provider service has several key functions. Firstly, it performs on-chain checks to ensure the buyer has permission to access the asset. Secondly, it encrypts the URL and metadata during the publication phase, providing security for your data during the initial upload.
The Provider decrypts the URL when a dataset is downloaded and it streams the data directly to the buyer, it never reveals the asset URL to the buyer. This provides a layer of security and ensures that access is only provided when necessary.
Additionally, the Provider service offers compute services by establishing a connection to the C2D environment. This enables users to compute and manipulate data within the Ocean Protocol stack, adding a new level of utility and function to this data services platform.
Chain Requests
The universal Aquarius Endpoint is .
Retrieves a list of chains that are currently supported or recognized by the Aquarius service.
Endpoint: GET /api/aquarius/chains/list
Purpose
Other Requests
The universal Aquarius Endpoint is .
Retrieves version, plugin, and software information from the Aquarius service.
Endpoint: GET /
Purpose: This endpoint is used to fetch key information about the Aquarius service, including its current version, the plugin it's using, and the name of the software itself.
Ocean Market - Publish with arweave transaction ID
Hit
Write
Read Contract
Balance Of
Total Supply
Write Contract
Remove Liquidity
Confirm transaction
Tamper-Proof Audit Trail: Every data transaction on Ocean is recorded on the blockchain, creating an immutable and tamper-proof audit trail. This ensures the transparency and traceability of data usage, providing data scientists with a verifiable record of the data transaction history. Data scientists can query addresses of data transfers on-chain to understand data usage.
Related Terminology
Unlike traditional pocket wallets, crypto wallets don't actually store ETH or OCEAN. They store private keys.
⚠️ We've got an important heads-up about Barge that we want to share with you. Brace yourself, because Barge is not for the faint-hearted! Here's the deal: the barge works great on Linux, but we need to be honest about its limitations on macOS. And, well, it doesn't work at all on Windows. Sorry, Windows users!
To make things easier for everyone, we strongly recommend giving a try first on a testnet. Everything is configured already so it should be sufficient for your needs as well. Visit the networks page to have clarity on the available test networks. ⚠️
REST API: Aquarius uses this software architectural style for providing interoperability between computer systems on the internet.
A service that facilitates interaction between users and the Ocean Protocol network.
Ganache
A local Ethereum blockchain network for testing and development purposes.
TheGraph
A decentralized indexing and querying protocol used for building subgraphs in Ocean Protocol.
ocean-contracts
Smart contracts repository for Ocean Protocol. Deploys and manages the necessary contracts for local development.
Customization and Options
Barge provides various options to customize component versions, log levels, and enable/disable specific blocks.
Barge helps developers to get started with Ocean Protocol by providing a local development environment. With its modular and user-friendly design, developers can focus on building and testing their applications without worrying about the intricacies of the underlying infrastructure.
To use Barge, you can follow the instructions in the Barge repository.
Before getting started, make sure you have the following prerequisites:
Linux or macOS operating system. Barge does not currently support Windows, but you can run it inside a Linux virtual machine or use the Windows Subsystem for Linux (WSL).
Docker installed on your system. You can download and install Docker from the Docker website. On Linux, you may need to allow non-root users to run Docker. On Windows or macOS, it is recommended to increase the memory allocated to Docker to 4 GB (default is 2 GB).
Docker Compose, which is used to manage the Docker containers. You can find installation instructions in the Docker Compose documentation.
Once you have the prerequisites set up, you can clone the Barge repository and navigate to the repository folder using the command line:
The repository contains a shell script called start_ocean.sh that you can run to start the Ocean Protocol stack locally for development. To start Barge with the default configurations, simply run the following command:
This command will start the default versions of Aquarius, Provider, and Ganache, along with the Ocean contracts deployed to Ganache.
For more advanced options and customization, you can refer to the README file in the Barge repository. It provides detailed information about the available startup options, component versions, log levels, and more.
To clean up your environment and stop all the Barge-related containers, volumes, and networks, you can run the following command:
Please refer to the Barge repository's README for more comprehensive instructions, examples, and details on how to use Barge for local development with the Ocean Protocol stack.
Aquarius
A metadata storage and retrieval service for Ocean Protocol. Allows indexing and querying of metadata.
const { DDOManager } = require ('@oceanprotocol/ddo-js');
const ddoInstance = DDOManager.getDDOClass(DDOExampleV4);
const nftAddressToUpdate = "0xfF4AE9869Cafb5Ff725f962F3Bbc22Fb303A8aD8"
ddoInstance.updateFields({ nftAddress: nftAddressToUpdate }) // It supports update on multiple fields
// The same script can be applied on DDO V5 and deprecated DDO from `Instantiate DDO section`.
Install MetaMask. The wallet provides a friendly user interface that will help you through each step. MetaMask gives you two options: importing an existing wallet or creating a new one. Choose to Create a Wallet:
Create a wallet
In the next step create a new password for your wallet. Read through and accept the terms and conditions. After that, MetaMask will generate Secret Backup Phrase for you. Write it down and store it in a safe place.
Secret Backup Phrase
Continue forward. On the next page, MetaMask will ask you to confirm the backup phrase. Select the words in the correct sequence:
Confirm secret backup phrase
Voila! Your account is now created. You can access MetaMask via the browser extension in the top right corner of your browser.
MetaMask browser extension
You can now manage ETH and OCEAN with your wallet. You can copy your account address to the clipboard from the options. When you want someone to send ETH or OCEAN to you, you will have to give them that address. It's not a secret.
Manage tokens
You can also watch this video tutorial if you want more help setting up MetaMask.
Sometimes it is required to use custom or external networks in MetaMask. We can add a new one through MetaMask's Settings.
Open the Settings menu and find the Networks option. When you open it, you'll be able to see all available networks your MetaMask wallet currently use. Click the Add Network button.
Add custom/external network
There are a few empty inputs we need to fill in:
Network Name: this is the name that MetaMask is going to use to differentiate your network from the rest.
New RPC URL: to operate with a network we need an endpoint (RPC). This can be a public or private URL.
Chain Id: each chain has an Id
Currency Symbol: it's the currency symbol MetaMask uses for your network
Block Explorer URL: MetaMask uses this to provide a direct link to the network block explorer when a new transaction happens
When all the inputs are filled just click Save. MetaMask will automatically switch to the new network.
Go to your repo in Github and above the list of files, select the Add file dropdown menu and click Upload files. Alternatively, you can use version control to push your file to the repo.
Upload file on Github
To select the files you want to upload, drag and drop the file or folder, or click 'choose your files'.
Drag and drop new files on your GitHub repo
In the "Commit message" field, type a short, meaningful commit message that describes the change you made.
Commit changes
Below the commit message field, decide whether to add your commit to the current branch or to a new branch. If your current branch is the default branch, then you should choose to create a new branch for your commit and then create a pull request.
After you make your commit (and merge your pull request, if applicable), then click on the file.
Upload successful
Step 3 - Get the RAW version of your file
To use your file on the Market you need to use the raw url of the asset. Also, make sure your Repo is publicly accessible to allow the market to use that file.
Open the File and click on the "Raw" button on the right side of the page.
Click the Raw button
Copy the link in your browser's URL - it should begin with "https://raw.githubusercontent.com/...." like in the image below.
Grab the RAW github URL from your browser's URL bar
Copy paste the raw url
Step 4 - Publish the asset using the Raw link
Now, copy and paste the Raw Github URL into the File field of the Access page in the Ocean Market.
Upload on the Ocean Market
Et voilà! You have now successfully hosted your asset on Github and properly linked it on the Ocean Market.
Go to the asset detail page and then click on “Edit Asset” and then scroll down to the field called “Payment Collector Address”. Add the new Ethereum address in this field and then click “Submit“. Finally, you will then need to sign two transactions to finalize the update.
In the case of ERC20TemplateEnterprise, when you deploy a fixed rate exchange, the funds generated as revenue are automatically sent to the owner's address. The owner receives the revenue without any manual intervention.
On the other hand, with ERC20Template, for a fixed rate exchange, the revenue is available at the fixed rate exchange level. The owner or the payment collector has the authority to manually retrieve the revenue.
Private data has the potential to drive groundbreaking discoveries in science and technology, with increased data improving the predictive accuracy of modern AI models. Due to its scarcity and the challenges associated with accessing it, private data is often regarded as the most valuable. By utilizing private data through Compute-to-Data, significant rewards can be reaped, leading to transformative advancements and innovative breakthroughs.
We suggest reading these guides to get an understanding of how compute-to-data works:
The Ocean Protocol provides a compute environment that you can access at the following . Feel free to explore and utilize this platform for your needs.
Architecture & Overview Guides
User Guides
Developer Guides
Infrastructure Deployment Guides
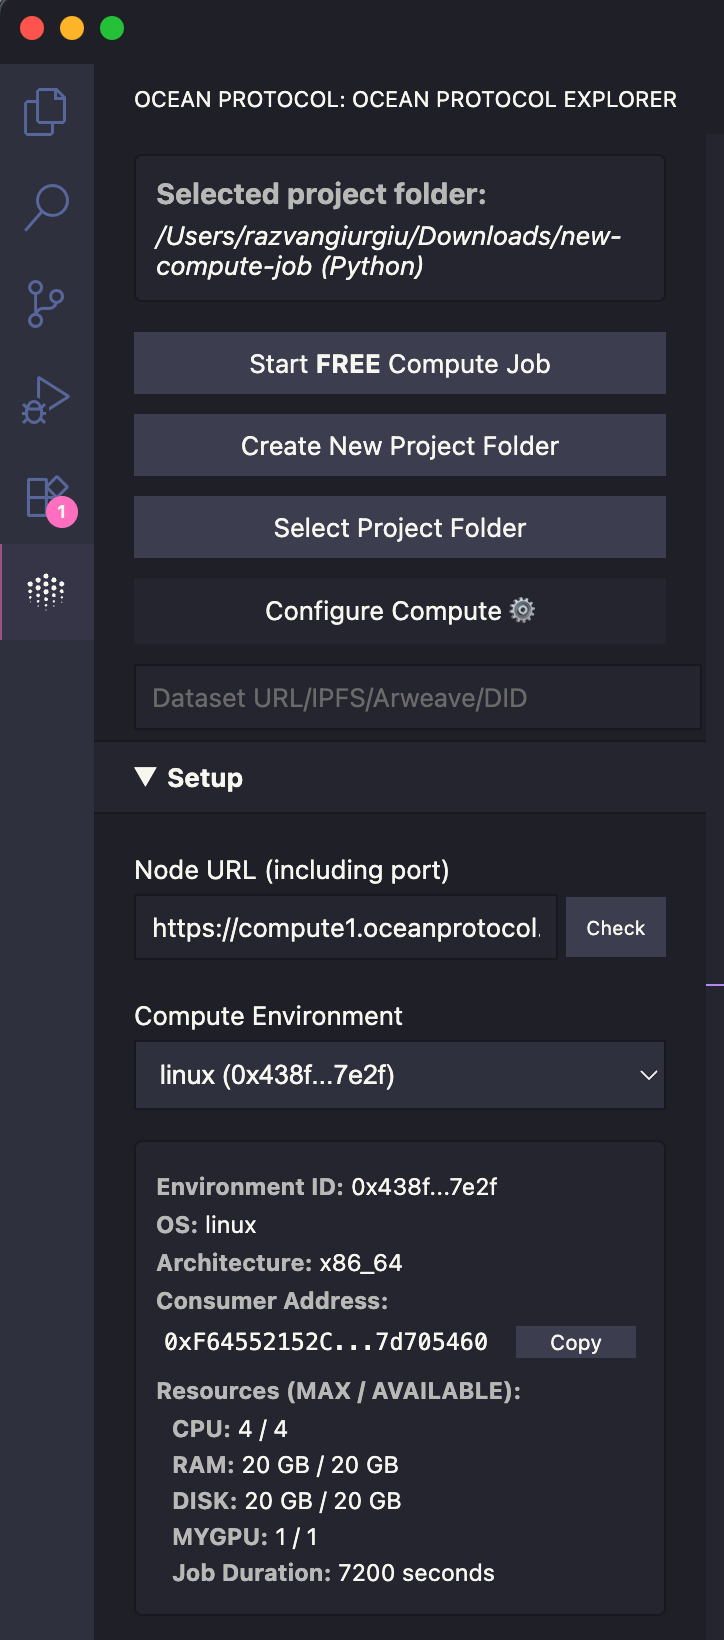
Open the Ocean Protocol panel from the activity bar
Configure your compute settings:
Node URL (pre-filled with default Ocean compute node)
Optional private key for your wallet
Select your files:
Algorithm file (JS or Python)
Optional dataset file (JSON)
Results folder location
Click Start Compute Job
Monitor the job status and logs in the output panel
Once completed, the results file will automatically open in VSCode
Verify your RPC URL, Ocean Node URL, and Compute Environment URL if connections fail.
Check the output channels for detailed logs.
For further assistance, refer to the Ocean Protocol documentation or join the Discord community.
Custom Compute Node: Enter your own node URL or use the default Ocean Protocol node
Wallet Integration: Use auto-generated wallet or enter private key for your own wallet
Custom Docker Images. If you need a custom environment with your own dependencies installed, you can use a custom docker image. Default is oceanprotocol/algo_dockers (Python) or node (JavaScript)
Docker Tags: Specify version tags for your docker image (like python-branin or latest)
Algorithm: The vscode extension automatically detects open JavaScript or Python files. Or alternatively you can specify the algorithm file manually here.
Dataset: Optional JSON file for input data
Results Folder: Where computation results will be saved
Optional Setup Configuration
Your contributions are welcomed! Please check our GitHub repository for the contribution guidelines.
Provenance. The acts of publishing data, purchasing data, and consuming data are all recorded on the blockchain to make a tamper-proof audit trail. Know where your AI training data came from!
Here are the most relevant Ocean tools to work with:
The ocean.py library is built for the key environment of data scientists: Python. It can simply be imported alongside other Python data science tools like numpy, matplotlib, scikit-learn and tensorflow. You can use it to publish & sell data assets, buy assets, transfer ownership, and more.
Predictoor's pdr-backend repo has Python-based tools to run bots for crypto prediction or trading.
Performs checks on-chain for buyer permissions and payments
Encrypts the URL and metadata during publish
Decrypts the URL when the dataset is downloaded or a compute job is started
Provides access to data assets by streaming data (and never the URL)
Provides compute services (connects to C2D environment)
Typically run by the Data owner
Ocean Provider - publish & consume
In the publishing process, the provider plays a crucial role by encrypting the DDO using its private key. Then, the encrypted DDO is stored on the blockchain.
During the consumption flow, after a consumer obtains access to the asset by purchasing a datatoken, the provider takes responsibility for decrypting the DDO and fetching data from the source used by the data publisher.
Python: This is the main programming language used in Provider.
Flask: This Python framework is used to construct the Provider API.
HTTP Server: Provider responds to HTTP requests from clients (like web browsers), facilitating the exchange of data and information over the internet.
We recommend checking the README in the Provider GitHub repository for the steps to run the Provider. If you see any errors in the instructions, please open an issue within the GitHub repository.
The following pages in this section specify the endpoints for Ocean Provider that have been implemented by the core developers.
For inspecting the errors received from Provider and their reasons, please revise this document.
What is Provider?
What does the Provider do?
What technology is used?
How to run the provider?
Ocean Provider Endpoints Specification
: This endpoint provides a list of the chain IDs that are recognized by the Aquarius service. Each chain ID represents a different blockchain network, and the boolean value indicates if the chain is currently active (true) or not (false).
Parameters: This endpoint does not require any parameters. You simply send a GET request to it.
Here are some typical responses you might receive from the API:
200: This is a successful HTTP response code. It means the server has successfully processed the request and returns a JSON object containing chain IDs as keys and their active status as values.
Example response:
Retrieves the index status for a specific chain_id from the Aquarius service.
Endpoint: GET /api/aquarius/chains/status/{chain_id}
Purpose: This endpoint is used to fetch the index status for a specific blockchain chain, identified by its chain_id. The status, expressed as the "last_block", gives the most recent block that Aquarius has processed on this chain.
Parameters: This endpoint requires a chain_id as a parameter in the path. This chain_id represents the specific chain you want to get the index status for.
Here are some typical responses you might receive from the API:
200: This is a successful HTTP response code. It means the server has successfully processed the request and returns a JSON object containing the "last_block", which is the most recent block that Aquarius has processed on this chain. In the response example you provided, "25198729" is the last block processed on the chain with the chain_id "137".
curl --location --request GET 'https://v4.aquarius.oceanprotocol.com/api/aquarius/chains/list'
{"last_block": 25198729}
curl --location --request GET 'https://v4.aquarius.oceanprotocol.com/api/aquarius/chains/status/137'
Curl Example
Javascript Example
Chain Status
Curl Example
Javascript Example
Here are some typical responses you might receive from the API:
200: This is a successful HTTP response code. It means the server has successfully processed the request and returns a JSON object containing the plugin, software, and version.
Example response:
Retrieves the health status of the Aquarius service.
Endpoint: GET /health
Purpose: This endpoint is used to fetch the current health status of the Aquarius service. This can be helpful for monitoring and ensuring that the service is running properly.
Here are some typical responses you might receive from the API:
200: This is a successful HTTP response code. It means the server has successfully processed the request and returns a message indicating the health status. For example, "Elasticsearch connected" indicates that the Aquarius service is able to connect to Elasticsearch, which is a good sign of its health.
Curl Example
Retrieves the Swagger specification for the Aquarius service.
Endpoint: GET /spec
Purpose: This endpoint is used to fetch the Swagger specification of the Aquarius service. Swagger is a set of rules (in other words, a specification) for a format describing REST APIs. This endpoint returns a document that describes the entire API, including the available endpoints, their methods, parameters, and responses.
Here are some typical responses you might receive from the API:
200: This is a successful HTTP response code. It means the server has successfully processed the request and returns the Swagger specification.
Ocean Nodes are a vital part of the Ocean Protocol core technology stack. The Ocean Nodes monorepo that replaces the three previous components: Provider, Aquarius and subgraph. It has been designed to significantly simplify the process of starting the Ocean stack - it runs everything you need with one simple command.
It integrates multiple services for secure and efficient data operations, utilizing technologies like libp2p for peer-to-peer communication. Its modular and scalable architecture supports various use cases, from simple data retrieval to complex compute-to-data (C2D) tasks.
The node is structured into separate layers, including the network layer for communication, and the components layer for core services like the Indexer and Provider. This layered architecture ensures efficient data management and high security.
Flexibility and extensibility are key features of Ocean Node, allowing multiple compute engines, such as Docker and Kubernetes, to be managed within the same framework. The orchestration layer coordinates interactions between the core node and execution environments, ensuring the smooth operation of compute tasks.
For details on how to run a node see the readme in the GitHub repository.
However, your nodes must meet specific criteria in order to be eligible for incentives. Here’s what’s required:
Public Accessibility: Nodes must have a public IP address
API and P2P Ports: Nodes must expose both HTTP API and P2P ports to facilitate seamless communication within the network
You can easily check the eligibility of the nodes by connecting to the and looking for the green status indicator next to your IP address
Follow the steps to install the Node and be eligible for rewards-
Find your public IP: You’ll need this for the configuration. You can easily find it by googling “my IP”
Run the : If you’ve already deployed a node, we recommend either redeploying with the guide or ensuring that your environment variables are correct and you’re running the latest version
Get your Node ID: After starting the node, you can retrieve the ID from the console
Expose Your Node to the Internet: From a different device, check if your node is accessible by running - telnet{your ip}{P2P_ipV4BindTcpPort}
To forward the node port, please follow the instructions provided by your router manufacturer — ex: , , , etc.
Verify eligibility on the Ocean Node Dashboard: Check https://nodes.oceanprotocol.com/ and search for your peerID to ensure your node is correctly configured.
The Node is the only component that can access your data
It performs checks on-chain for buyer permissions and payments
Encrypts the URL and metadata during publish
Decrypts the URL when the dataset is downloaded or a compute job is started
A new component called Indexer replaces the functionality of Aquarius.
The indexer acts as a cache for on-chain data. It stores the metadata from the smart contract events off-chain in a Typesense database.
It monitors events: It continually checks for MetadataCreated and MetadataUpdated events, processing these events and updating them in the database.
Ocean Nodes replace the Subgraph:
Indexing the data from the smart contact events.
The data is indexed and updated in real-time.
Providing an API which receives and responds to queries.
Simplifying the development experience for anyone building on Ocean.
For details on all of the HTTP endpoints exposed by the Ocean Nodes API, refer to the API.md file in the github repository.
The Ocean nodes provide a convenient and easy way to run a compute-to-data environment. This gives you the opportunity to monetize your node as you can charge fees for using the C2D environment and there are also additional incentives provided Ocean Protocol Foundation (OPF). Soon we will also be releasing C2D V2 which will provide different environments and new ways to pay for computation.
For more details on the C2D V2 architecture, refer to the documentation in the repository:\
Node Architecture
Ocean Nodes are the core infrastructure component within the Ocean Protocol ecosystem, designed to facilitate decentralized data exchange and management. It operates by leveraging a multi-layered architecture that includes network, components, and module layers.
Key features include secure peer-to-peer communication via libp2p, flexible and secure encryption solutions, and support for various Compute-to-Data (C2D) operations.
Ocean Node's modular design allows for customization and scalability, enabling seamless integration of its core services—such as the Indexer for metadata management and the Provider for secure data transactions—ensuring robust and efficient decentralized data operations.
Architecture Overview
The Node stack is divided into the following layers:
Network layer (libp2p & HTTP API)
Components layer (Indexer, Provider)
Modules layer
libp2p supports ECDSA key pairs, and node identity should be defined as a public key.
Multiple ways of storing URLs:
Choose one node and use that private key to encrypt URLs (enterprise approach).
Nodes can receive user requests in two ways:
HTTP API
libp2p from another node
They are merged into a common object and passed to the appropriate component.
Nodes should be able to forward requests between them if the local database is missing objects. (Example: Alice wants to get DDO id #123 from Node A. Node A checks its local database. If the DDO is found, it is sent back to Alice. If not, Node A can query the network and retrieve the DDO from another node that has it.)
Nodes' libp2p implementation:
Should support core protocols (ping, identify, kad-dht for peering, circuit relay for connections).
For peer discovery, we should support both mDNS & Kademlia DHT.
All Ocean Nodes should subscribe to the topic: OceanProtocol. If any interesting messages are received, each node is going to reply.
An off-chain, multi-chain metadata & chain events cache. It continually monitors the chains for well-known events and caches them (V4 equivalence: Aquarius).
Features:
Monitors MetadataCreated, MetadataUpdated, MetadataState and stores DDOs in the database.
Validates DDOs according to multiple SHACL schemas. When hosting a node, you can provide your own SHACL schema or use the ones provided.
Provides proof for valid DDOs.
Performs checks on-chain for buyer permissions and payments.
The provider is crucial in checking that all the relevant fees have been paid before the consumer is able to download the asset. See the for details on all of the different types of fees.
Encrypts the URL and metadata during publishing.
For more details on the C2D V2 architecture, refer to the documentation in the repository:
Community Monetization
How can you build a self sufficient project?
The intentions with all of the updates are to ensure that your project is able to become self-sufficient and profitable in the long run (if that’s your aim). We love projects that are built on top of Ocean and we want to ensure that you are able to generate enough income to keep your project running well into the future.
1. Publishing & Selling Data
Do you have data that you can monetize?🤔
Ocean introduced the new crypto primitives of “data on-ramp” and “data off-ramp” via datatokens. The publisher creates ERC20 datatokens for a dataset (on-ramp). Then, anyone can access that dataset by acquiring and sending datatokens to the publisher via Ocean handshaking (data off-ramp). As a publisher, it’s in your best interest to create and publish useful data — datasets that people want to consume — because the more they consume the more you can earn. This is the heart of Ocean utility: connecting data publishers with data consumers 🫂
The datasets can take one of many shapes. For AI use cases, they may be raw datasets, cleaned-up datasets, feature-engineered data, AI models, AI model predictions, or otherwise. (They can even be other forms of copyright-style IP such as photos, videos, or music!) Algorithms themselves may be sold as part of Ocean’s Compute-to-Data feature.
The first opportunity of data NFTs is the potential to sell the base intellectual property (IP) as an exclusive license to others. This is akin to EMI selling the Beatles’ master tapes to Universal Music: whoever owns the masters has the right to create records, CDs, and digital . It’s the same for data: as the data NFT owner you have the exclusive right to create ERC20 datatoken sub-licenses. With Ocean, this right is now transferable as a data NFT. You can sell these data NFTs in OpenSea and other NFT marketplaces.
If you’re part of an established organization or a growing startup, you’ll also love the new role structure that comes with data NFTs. For example, you can specify a different address to collect compared to the address that owns the NFT. It’s now possible to fully administer your project through these .
In short, if you have data to sell, then Ocean gives you superpowers to scale up and manage your data project. We hope this enables you to bring your data to new audiences and increase your profits.
We have always been super encouraging of anyone who wishes to build a dApp on top of Ocean or to fork Ocean Market and make their own data marketplace. And now, we have taken this to the next level and introduced more opportunities and even more fee customization options.
Ocean empowers dApp owners like yourself to have greater flexibility and control over the fees you can charge. This means you can tailor the fee structure to suit your specific needs and ensure the sustainability of your project. The smart contracts enable you to collect a fee not only in consume, but also in fixed-rate exchange, also you can set the fee value. For more detailed information regarding the fees, we invite you to visit the page.
Another new opportunity is using your own ERC20 token in your dApp, where it’s used as the unit of exchange. This is fully supported and can be a great way to ensure the sustainability of your project.
Now this is a completely brand new opportunity to start generating — running your own . We have been aware for a while now that many of you haven’t taken up the opportunity to run your own provider, and the reason seems obvious — there aren’t strong enough incentives to do so.
For those that aren’t aware, is the proxy service that’s responsible for encrypting/ decrypting the data and streaming it to the consumer. It also validates if the user is allowed to access a particular data asset or service. It’s a crucial component in Ocean’s architecture.
Now, as mentioned above, fees are now paid to the individual or organization running the provider whenever a user downloads a data asset. The fees for downloading an asset are set as a cost per MB. In addition, there is also a provider fee that is paid whenever a compute job is run, which is set as a price per minute.
The download and compute fees can both be set to any absolute amount and you can also decide which token you want to receive the fees in — they don’t have to be in the same currency used in the consuming market. So for example, the provider fee could be a fixed rate of 5 USDT per 1000 MB of data downloaded, and this fee remains fixed in USDT even if the marketplace is using a completely different currency.
Additionally, provider fees are not limited to data consumption — they can also be used to charge for compute resources. So, for example, this means a provider can charge a fixed fee of 15 DAI to reserve compute resources for 1 hour. This has a huge upside for both the user and the provider host. From the user’s perspective, this means that they can now reserve a suitable amount of compute resources according to what they require. For the host of the provider, this presents another great opportunity to create an income.
Benefits to the Ocean Community We’re always looking to give back to the Ocean community and collecting fees is an important part of that. As mentioned above, the Ocean Protocol Foundation retains the ability to implement community fees on data consumption. The tokens that we receive will either be burned or invested in the community via projects that they are building. These investments will take place either through , , or Ocean Ventures.
Projects that utilize OCEAN or H2O are subject to a 0.1% fee. In the case of projects that opt to use different tokens, an additional 0.1% fee will be applied. We want to support marketplaces that use other tokens but we also recognize that they don’t bring the same wider benefit to the Ocean community, so we feel this small additional fee is proportionate.
Data NFTs
ERC721 data NFTs represent holding the copyright/base IP of a data asset.
A non-fungible token stored on the blockchain represents a unique asset. NFTs can represent images, videos, digital art, or any piece of information. NFTs can be traded, and allow the transfer of copyright/base IP. EIP-721 defines an interface for handling NFTs on EVM-compatible blockchains. The creator of the NFT can deploy a new contract on Ethereum or any Blockchain supporting NFT-related interface and also, transfer the ownership of copyright/base IP through transfer transactions.
What is a Data NFT?
A data NFT represents the copyright (or exclusive license against copyright) for a data asset on the blockchain — we call this the “base IP”. When a user publishes a dataset in Ocean, they create a new NFT as part of the process. This data NFT is proof of your claim of base IP. Assuming a valid claim, you are entitled to the revenue from that asset, just like a title deed gives you the right to receive rent.
The data NFT smart contract holds metadata about the data asset, stores roles like “who can mint datatokens” or “who controls fees”, and an open-ended key-value store to enable custom fields.
If you have the private key that controls the NFT, you own that NFT. The owner has the claim on the base IP and is the default recipient of any revenue. They can also assign another account to receive revenue. This enables the publisher to sell their base IP and the revenues that come with it. When the Data NFT is transferred to another user, all the information about roles and where the revenue should be sent is reset. The default recipient of the revenue is the new owner of the data NFT.
Data NFTs offer several key features and functionalities within the Ocean Protocol ecosystem:
Ownership and Transferability: Data NFTs establish ownership rights, enabling data owners to transfer or sell their data assets to other participants in the network.
Metadata and Descriptions: Each Data NFT contains metadata that describes the associated dataset, providing essential information such as title, description, creator, and licensing terms.
Access Control and Permissions: Data NFTs can include access control mechanisms, allowing data owners to define who can access and utilize their datasets, as well as the conditions and terms of usage.
By tokenizing data assets into Data NFTs, data owners can establish clear ownership rights and enable seamless transferability of the associated datasets. Data NFTs serve as digital certificates of authenticity, enabling data consumers to trust the origin and integrity of the data they access.
With data NFTs, you are able to take advantage of the broader NFT ecosystem and all the tools and possibilities that come with it. As a first example, many leading crypto wallets have first-class support for NFTs, allowing you to manage data NFTs from those wallets. Or, you can post your data NFT for sale on a popular NFT marketplace like or . As a final example, we’re excited to see .
We have implemented data NFTs using the . Ocean Protocol defines the contract, allowing Base IP holders to create their ERC721 contract instances on any supported networks. The deployed contract stores Metadata, ownership, sub-license information, and permissions. The contract creator can also create and mint ERC20 token instances for sub-licensing the Base IP.
ERC721 tokens are non-fungible, and thus cannot be used for automatic price discovery like ERC20 tokens. ERC721 and ERC20 combined together can be used for sub-licensing. Ocean Protocol's solves this problem by using ERC721 for tokenizing the Base IP and tokenizing sub-licenses by using ERC20. To save gas fees, it uses proxy approach on the ERC721 template.
Our implementation has been built on top of the battle-tested . However, there are a bunch of interesting parts of the implementation that go a bit beyond an out-of-the-box NFT. The data NFTs can be easily managed from any NFT marketplace like .
Something else that we’re super excited about in the data NFTs is a cutting-edge standard called being driven by our friends at . The ERC725y feature enables the NFT owner (or a user with the “store updater” role) to input and update information in a key-value store. These values can be viewed externally by anyone.
ERC725y is incredibly flexible and can be used to store any string; you could use it for anything from additional metadata to encrypted values. This helps future-proof the data NFTs and ensure that they are suitable for a wide range of projects that have not been launched yet. As you can imagine, the inclusion of ERC725y has huge potential and we look forward to seeing the different ways people end up using it. If you’re interested in using this, take a look at .
Run C2D Jobs
Get Compute Environments
To proceed with compute-to-data job creation, the prerequisite is
to select the preferred environment to run the algorithm on it. This can be
accomplished by running the CLI command getComputeEnvironments likewise:
npm run cli getComputeEnvironments
Start a Compute Job 🎯
Initiating a compute job can be accomplished through two primary methods.
The first approach involves publishing both the dataset and algorithm, as explained in the previous section, Publish a Dataset Once that's completed, you can proceed to initiate the compute job.
Alternatively, you have the option to explore available datasets and algorithms and kickstart a compute-to-data job by combining your preferred choices.
To illustrate the latter option, you can use the following command:
In this command, replace DATASET_DID with the specific DID of the dataset you intend to utilize and ALGO_DID with the DID of the algorithm you want to apply. By executing this command, you'll trigger the initiation of a compute-to-data job that harnesses the selected dataset and algorithm for processing.
For running the algorithms free by starting a compute job, these are the following steps.Note
Only for free start compute, the dataset is not mandatory for user to provide in the command line. The required command line parameters are the algorithm DID and environment ID, retrieved from getComputeEnvironments
command.
The first step involves publishing the algorithm, as explained in the previous section, Once that's completed, you can proceed to initiate the compute job.
Alternatively, you have the option to explore available algorithms and kickstart a free compute-to-data job by combining your preferred choices.
To illustrate the latter option, you can use the following command for running free start compute with additional datasets:
In this command, replace DATASET_DID with the specific DID of the dataset you intend to utilize and ALGO_DID with the DID of the algorithm you want to apply and the environment for free start compute returned from npm run cli getComputeEnvironments.
By executing this command, you'll trigger the initiation of a free compute-to-data job with the alogithm provided.
Free start compute can be run without published datasets, only the algorithm and environment is required:
NOTE: For zsh console, please surround [] with quotes like this: "[]".
To obtain the compute results, we'll follow a two-step process. First, we'll employ the `getJobStatus`` method, patiently monitoring its status until it signals the job's completion. Afterward, we'll utilize this method to acquire the actual results.
To monitor the algorithm logs execution and setup configuration for algorithm,
this command does the trick!
To track the status of a job, you'll require both the dataset DID and the compute job DID. You can initiate this process by executing the following command:
Executing this command will allow you to observe the job's status and verify its successful completion.
For the second method, the dataset DID is no longer required. Instead, you'll need to specify the job ID, the index of the result you wish to download from the available results for that job, and the destination folder where you want to save the downloaded content. The corresponding command is as follows:
Workflow
Understanding the Compute-to-Data (C2D) Workflow
🚀 Now that we've introduced the key actors and provided an overview of the process, it's time to delve into the nitty-gritty of the compute workflow. We'll dissect each step, examining the inner workings of Compute-to-Data (C2D). From data selection to secure computations, we'll leave no stone unturned in this exploration.
For visual clarity, here's an image of the workflow in action! 🖼️✨
Compute detailed flow diagram
Below, we'll outline each step in detail 📝
Starting a C2D Job
The consumer selects a preferred environment from the provider's list and initiates a compute-to-data job by choosing a dataset-algorithm pair.
The provider checks the orders on the blockchain.
If the orders for dataset, algorithm and compute environment fees are valid, the provider can start the compute flow.
The provider informs the consumer of the job's id successful creation.
With the job ID and confirmation of the orders, the provider starts the job by calling the operator service.
The operator service adds the new job in its local jobs queue.
It's the operator engine's responsibility to periodically check the operator service for the list of pending jobs. If there are available resources for a new job, the operator engine requests the job list from the operator service to decide whether to initiate a new job.
The operator service provides the list of jobs, and the operator engine is then prepared to start a new job.
As a new job begins, volumes are created on the Kubernetes cluster, a task handled by the operator engine.
The cluster creates and allocates volumes for the job using the job volumes.
The volumes are created and allocated to the pod.
After volume creation and allocation, the operator engine starts "pod-configuration" as a new pod in the cluster.
Pod-configuration requests the necessary dataset(s) and algorithm from their respective providers.
The files are downloaded by the pod configuration via the provider.
The pod configuration writes the datasets in the job volume.
The pod configuration informs the operator engine that it's ready to start the job.
The operator engine launches the algorithm pod on the Kubernetes cluster, with volume containing dataset(s) and algorithm mounted.
Kubernetes runs the algorithm pod.
The Operator engine monitors the algorithm, stopping it if it exceeds the specified time limit based on the chosen environment.
The operator engine deletes the K8 volumes.
The Kubernetes cluster removes all used volumes.
Once volumes are deleted, the operator engine finalizes the job.
The operator engine informs the operator service that the job is completed, and the results are now accessible.
The consumer retrieves job details by calling the provider's get job details.
The provider communicates with the operator service to fetch job details.
The operator service returns the job details to the provider.
Equipped with job details, the dataset consumer can retrieve the results from the recently executed job.
The provider engages the operator engine to access the job results.
As the operator service lacks access to this information, it uses the output volume to fetch the results.
What is Ocean?
Ocean is a decentralized data and compute protocol.
AI lives on data and compute; Ocean facilitates it.
Ocean has two specific parts:
A live tech stack. At the core is Datatokens, Ocean Nodes, and Compute-to-Data
What can you do with Ocean?
This page shows things you can do with Ocean...
As a builder
As a data scientist
As Ocean Node runner
Contracts
Empowering the Decentralised Data Economy
The suite of smart contracts serve as the backbone of the decentralized data economy. These contracts facilitate secure, transparent, and efficient interactions among data providers, consumers, and ecosystem participants.
The smart contracts have been deployed across multiple and are readily accessible through the GitHub . They introduced significant enhancements that encompass the following key features:
In Ocean V3, the publication of a dataset involved deploying an ERC20 "datatoken" contract along with relevant . This process allowed the dataset publisher to claim copyright or exclusive rights to the underlying Intellectual Property (IP). Upon obtaining 1.0 ERC20 datatokens for a particular dataset, users were granted a license to consume that dataset, utilizing the Ocean infrastructure by spending the obtained datatokens.
However, Ocean V3 faced limitations in terms of flexibility. It lacked support for different licenses associated with the same base IP, such as 1-day versus 1-month access, and the transferability of the base IP was not possible. Additionally, the ERC20 datatoken template was hardcoded, restricting customization options.
Data NFTs and Datatokens
In Ocean Protocol, ERC721 data NFTs represent holding the copyright/base IP of a data asset, and ERC20 datatokens represent licenses to access the assets.
In summary: A serves as a representation of the copyright or exclusive license for a data asset on the blockchain, known as the . Datatokens, on the other hand, function as a crucial mechanism for decentralized access to data assets.
For a specific data NFT, multiple ERC20 datatoken contracts can exist. Here's the main concept: Owning 1.0 datatokens grants you the ability to consume the corresponding dataset. Essentially, it acts as a sub-license from the , allowing you to utilize the dataset according to the specified license terms (when provided by the publisher). License terms can be established with a "good default" or by the Data NFT owner.
The choice to employ the ERC20 fungible token standard for datatokens is logical, as licenses themselves are fungible. This standard ensures compatibility and interoperability of datatokens with ERC20-based wallets, decentralized exchanges (DEXes), decentralized autonomous organizations (DAOs), and other relevant platforms. Datatokens can be transferred, acquired through marketplaces or exchanges, distributed via airdrops, and more.
Datatoken Templates
Discover all about the extensible & flexible smart contract templates.
Each or within Ocean Protocol is generated from pre-defined contracts. The templateId parameter specifies the template used for creating a data NFT or datatoken, which can be set during the creation process. The templateId is stored within the smart contract code and can be accessed using the () function.
Currently, Ocean Protocol supports 1 type for data NFTs and 2 template variants for datatokens: the and the . While these templates share the same interfaces, they differ in their underlying implementation and may offer additional features.
The details regarding currently supported datatoken templates are as follows:
Developers
Token-gated dApps & REST APIs: monetize by making your dApp or its REST API token-gated. .
AI dApps: monetize your AI dApp by token-gating on AI training data, feature vectors, models, or predictions.
Data Markets
AWS
How to use AWS centralized hosting for your NFT assets
AWS provides various options to host data and multiple configuration possibilities. Publishers are required to do their research and decide what would be the right choice. The below steps provide one of the possible ways to host data using an AWS S3 bucket and publish it on Ocean Marketplace.
Prerequisite
Create an account on . Users might also be asked to provide payment details and billing addresses that are out of this tutorial's scope.
Step 1 - Create a storage account
Go to AWS portal
Go to the AWS portal for S3: https://aws.amazon.com/s3/ and select from the upper right corner Create an AWS account
Update Metadata
This tutorial will guide you to update an existing asset published on-chain using Ocean libraries. The tutorial assumes that you already have the did of the asset which needs to be updated. In this tutorial, we will update the name, description, tags of the data NFT. Please refer to know more about additional the fields which can be updated.
Ocean.js
JavaScript library to privately & securely publish, exchange, and consume data.
With ocean.js, you can:
Publish data services: downloadable files or compute-to-data. Create an ERC721 data NFT for each service, and ERC20 datatoken for access (1.0 datatokens to access).
Sell datatokens for a fixed price. Sell data NFTs.
Publish
Once you've configured the RPC environment variable, you're ready to publish a new dataset on the connected network. The flexible setup allows you to switch to a different network simply by substituting the RPC endpoint with one corresponding to another network. 🌐
For setup configuration on Ocean CLI, please consult first
To initiate the dataset publishing process, we'll start by updating the helper (Decentralized Data Object) example named "SimpleDownloadDataset.json." This example can be found in the ./metadata folder, located at the root directory of the cloned Ocean CLI project.
Now, let's run the command to publish the dataset:
Executing this command will initiate the dataset publishing process, making your dataset accessible and discoverable on the Ocean Protocol network. 🌊
Creating a data NFT
This tutorial guides you through the process of creating your own data NFT using Ocean libraries. To know more about data NFT please refer .
Asset Visibility
In the Ocean Protocol ecosystem, each asset is associated with a state that is maintained by the NFT (Non-Fungible Token) contract. The determines its visibility and availability for different actions on platforms like Ocean Market, as well as its appearance in user profiles. To explore the various asset's state in detail, please check out the page. It provides comprehensive information about the different states that assets can be in.
By assigning specific states to assets, Ocean Protocol enables a structured approach to asset management and visibility. These states help regulate asset discoverability, ordering permissions, and the representation of assets in user profiles, ensuring a controlled and reliable asset ecosystem.
It is possible to remove assets from Ocean Protocol by modifying the state of the asset. Each asset has a state, which is stored in the NFT contract. Additional details regarding asset states can be found at this . There is also an assets purgatory that contains information about the purgatory status of an asset, as defined in the list-purgatory. For more information about the purgatory, please refer to the .
We can utilize a portion of the previous tutorial on updating metadata and incorporate the steps to update the asset's state in the asset DDO.
DDO Fields interactions
After creating DDO instance based on DDO's version, we can interact with the DDO fields through the following methods:
getDDOFields() which returns DDO fields such as:
id: The Decentralized Identifier (DID) of the asset.
Uploader
The Uploader represents a cutting-edge solution designed to streamline the upload process within a decentralized network. Built with efficiency and scalability in mind, Uploader leverages advanced technologies to provide secure, reliable, and cost-effective storage solutions to users.
Uploader is built on a robust architecture that seamlessly integrates various components to ensure optimal performance. The architecture consists of:
Uploader API Layer: Exposes both public and private APIs for frontend and microservices interactions, respectively.
1-N Storage Microservices: Multiple microservices, each specializing in different storage types, responsible for handling storage operations.
Developer FAQ
Frequently Asked Questions About Ocean Technology
Have some questions about the Ocean Protocol tech stack?
Hopefully, you'll find the answers here! If not then please don't hesitate to reach out to us on - there are no stupid questions!
Uploader.js
is a robust TypeScript library that serves as a vital bridge to interact with the Ocean Uploader API. It simplifies the process of managing file storage uploads, obtaining quotes, and more within the Ocean Protocol ecosystem. This library offers developers a straightforward and efficient way to access the full range of Uploader API endpoints, facilitating seamless integration of decentralized storage capabilities into their applications.
Whether you're building a decentralized marketplace, a content management system, or any application that involves handling digital assets, Uploader.js provides a powerful toolset to streamline your development process and enhance your users' experience.
Ensure that the Signer object (signer in this case) you're passing to the function when you call it from the browser is properly initialized and is compatible with the browser. For instance, if you're using something like MetaMask as your Ethereum provider in the browser, you'd typically use the ethers.Web3Provider to generate a signer.
Excited to get your files safely stored? Let's breeze through the process using Ocean Uploader. First things first, install the package with npm or yarn:
or
Mint Datatokens
This tutorial guides you through the process of minting datatokens and sending them to a receiver address. The tutorial assumes that you already have the address of the datatoken contract which is owned by you.
Encryption / Decryption
Endpoint: POST /api/services/encrypt
Parameters: The body of the request should contain a binary application/octet-stream.
Authentication Endpoints
Provider offers an alternative to signing each request, by allowing users to generate auth tokens. The generated auth token can be used until its expiration in all supported requests. Simply omit the signature parameter and add the AuthToken request header based on a created token.
Please note that if a signature parameter exists, it will take precedence over the AuthToken headers. All routes that support a signature parameter support the replacement, with the exception of auth-related ones (createAuthToken and deleteAuthToken need to be signed).
Endpoint:GET /api/services/createAuthToken
Description: Allows the user to create an authentication token that can be used to authenticate requests to the provider API, instead of signing each request. The generated auth token can be used until its expiration in all supported requests.
Parameters:
Subgraph
Unlocking the Speed: Subgraph - Bringing Lightning-Fast Retrieval to On-Chain Data.
The is built on top of (the popular 😎 indexing and querying protocol for blockchain data). It is an essential component of the Ocean Protocol ecosystem. It provides an off-chain service that utilizes GraphQL to offer efficient access to information related to datatokens, users, and balances. By leveraging the subgraph, data retrieval becomes faster compared to an on-chain query. The data sourced from the Ocean subgraph can be accessed through queries.
Imagine this 💭: if you were to always fetch data from the on-chain, you'd start to feel a little...old 👵 Like your queries are stuck in a time warp. But fear not! When you embrace the power of the subgraph, data becomes your elixir of youth.
The subgraph reads data from the blockchain, extracting relevant information. Additionally, it indexes events emitted from the Ocean smart contracts. This collected data is then made accessible to any decentralized applications (dApps) that require it, through GraphQL queries. The subgraph organizes and presents the data in a JSON format, facilitating efficient and structured access for dApps.
You can utilize the Subgraph instances provided by Ocean Protocol or deploy your instance. Deploying your own instance allows you to have more control and customization options for your specific use case. To learn how to host your own Ocean Subgraph instance, refer to the guide available on the
Ocean.py
Python library to privately & securely publish, exchange, and consume data.
helps data scientists earn $ from their AI models, track provenance of data & compute, and get more data. (More details .)
Ocean.py makes these tasks easy:
Publish data services: data feeds, REST APIs, downloadable files or compute-to-data. Create an ERC721 data NFT for each service, and ERC20 datatoken for access (1.0 datatokens to access).
The blockchain is public - does this mean that anyone can access my data?
The blockchain being public means that transaction information is transparent and can be viewed by anyone. However, your data isn't directly accessible to the public. Ocean Protocol employs various mechanisms, including encryption and access control, to safeguard your data. Access to the data is determined by the permissions you set, ensuring that only authorized users can retrieve and work with your data. So, while blockchain transactions are public, your data remains protected and accessible only to those with proper authorization.
How are datatokens created?
Datatokens are created within the Ocean Protocol ecosystem when you tokenize a dataset(convert a dataset into a fungible token that can be traded). More details, on the datatokens page
How does the datatoken creator make money?
You can generate revenue as a dataset publisher by selling datatokens to access your published dataset. For more details, please visit the community monetization page.
Where can I find information about the number of datatokens created and track their progress?
To access this data, some technical expertise is required. You can find this information at the subgraph level. In the documentation, we provide a few examples of how to retrieve this data using JavaScript. Feel free to give it a shot by visiting this page. If it doesn't meet your requirements, don't hesitate to reach out to us on Discord.
How can developers use Ocean technology to build their own data marketplaces?
You can fork Ocean Market and then make changes as you wish. Please see the customising your market page for details.
Is there a trading platform or stock exchange that has successfully forked the Ocean marketplace codebase?
Ocean technology is actively used by Daimler/Acentrik, deltaDAO/GAIA-X, and several other entities. You can find further details on the Ocean ecosystem page.
What are the Ocean faucets and how can they be used?
An Ocean faucet is a site to get (fake) OCEAN for use on a given testnet. There's an Ocean faucet for each testnet that Ocean is deployed to. The networks page have more information.
How can I convert tokens from the BEP20 network to the ERC20 network?
Please follow this tutorial to bridge from/to BNB Smart Chain. Please double-check the addresses and make sure you are using the right smart contracts.
How to bridge my mOcean back to Ocean?
Please follow this tutorial to bridge to/from Polygon mainnet. Please double-check the addresses and make sure you are using the right smart contracts.
Is it possible to reverse engineer a dataset on Ocean by having access to both the algorithm and the output?
Not to our knowledge. But please, give it a shot and share the results with us 😄
PS: We offer good rewards 😇
If a dataset consists of 100 individuals' private data, does this solution allow each individual to maintain sovereign control over their data while still enabling algorithms to compute as if it were one dataset?
Yes. Each individual could publish their dataset themselves, to get a data NFT. From the data NFT, they can mint datatokens which are to access the data. They have sovereign control over this, as hold the keys to the data NFTs and datatokens, and have great flexibility in how to give others access. For example, they could send a datatoken to a DAO for the DAO can manage. Or they could grant datatoken-minting permissions to the DAO. The DAO could use this to assemble a dataset across 100 individuals. Learn more about Data NFTs on the Docs.
Interoperability: Data NFTs conform to the ERC721 token standard, ensuring interoperability across various platforms, wallets, and marketplaces within the Ethereum ecosystem.
npm run cli publish metadata/simpleDownloadDataset.json
The provided example creates a consumable asset with a predetermined price of 2 OCEAN. If you wish to modify this and create an asset that is freely accessible, you can do so by replacing the value of "stats.price.value" with 0 in the JSON example mentioned above.
Choose several nodes, so your files can be accessed even if one node goes down (given at least one node is still alive).
Supports multiple C2D types:
Light Docker only (for edge nodes).
Ocean C2D (Kubernetes).
Each component can be enabled/disabled on startup (e.g., start node without Indexer).
Monitors all transactions and events from the data token contracts. This includes minting tokens, creating pricing schema (fixed & free pricing), and orders.
Allows queries for all the above.
Decrypts the URL when the dataset is downloaded or a compute job is started.
Encrypts/decrypts files before storage/while accessing.
Provides access to data assets by streaming data (and never the URL).
Provides compute services.
The node operator can charge provider fees, compensating the individuals or organizations operating their own node when users request assets.
Currently, we are providing the legacy Ocean C2D compute services (which run in Kubernetes) via the node. In the future, we will soon be releasing C2D V2 which will also allow connections to multiple C2D engines: light, Ocean C2D, and third parties.
A lively community. This includes builders, data scientists, and Ocean Ambassadors. Ocean's community is active on social media.
Let's drill into each.
These enable decentralized access control, via token-gating. Key principles:
Publish data services as ERC721 data NFTs and ERC20 datatokens
You can access the dataset / data service if you hold 1.0 datatokens
Consuming data services = spending datatokens
Crypto wallets, exchanges, and DAOs become data wallets, exchanges, and DAOs.
Data NFTs & datatokens are an on-ramp and off-ramp for data assets into DeFi
Data can be on Azure or AWS, Filecoin or Arweave, REST APIs or smart contract feeds. Data may be raw AI training data, feature vectors, trained models, even AI model predictions, or non-AI data.
This enables one buy & sell private data, while preserving privacy
Private data is valuable: using it can improve research and business outcomes. But concerns over privacy and control make it hard to access.
Compute-to-Data (C2D) grants access run compute against the data, on the same premises of the data. Only the results are visible to the consumer. The data never leaves the premises. Decentralized blockchain technology does the handshaking.
C2D enables people to sell private data while preserving privacy, as an opportunity for companies to monetize their data assets.
C2D can also be used for data sharing in science or technology contexts, with lower liability risk, because the data doesn't move.
Compute-to-Data flow
Ocean Nodes enable decentralized computing by turning idle compute resources into a monetizable compute-ready infrastructure to scale AI.
Scalable AI Compute on Demand: Access a global network of compute resources for faster training and inference without owning physical hardware.
Peer-to-Peer Compute Network: Leverage a decentralized network of nodes where participants share compute power directly, enhancing efficiency and resilience.
Monetization of Idle Resources: Turn unused compute power into revenue by contributing to the Ocean decentralized network.
Learn more
Ocean VS Code Extension empowers developers to build, test, and deploy AI and data workflows directly within VS Code, fully integrated with Ocean’s decentralized compute and data ecosystem.
Seamless Development Environment: Write, test, and deploy algorithms in your familiar VS Code interface without switching platforms.
Integrated Decentralized Compute: Connect directly to Ocean Nodes to run compute-heavy tasks securely and efficiently.
Simplified Data Access & Management: Easily discover, access, and use datasets on Ocean while maintaining privacy and compliance.
Learn more
Ocean has a lively ecosystem of dapps grown over years, built by enthusiastic developers.
The Ocean ecosystem also contains many data scientists and AI enthusiasts, excited about the future of AI & data. You can find them doing predictions, data challenges, Data Farming, and more.
Follow Ocean on Twitter or Telegram to keep up to date. Chat directly with the Ocean community on Discord. Or, track Ocean progress directly on GitHub.
Monetize by making your dApp token-gated. Users no longer have to use credit cards or manage OAuth credentials. Rather, they buy & spend ERC20 datatokens to access your dApp content.
Go further yet: rather than storing user profile data on your centralized server -- which exposes you to liability -- have it on-chain encrypted by the user's wallet, and just-in-time decrypt for the app.
Build Your Token-gated REST API
Focus on the backend: make a Web3-native REST API. Like the token-gated dApps, consumers of the REST API buy access with crypto, not credit cards.
Build Your Data Market
Build a decentralized data marketplace by to quickly get something good, or by building up from Ocean components for a more custom look.
What data scientists can do
Use Ocean in Python
The library is built for the key environment of data scientists: Python. Use it to earn $ from your data, share your data, get more data from others, and see provenance of data usage.
Do crypto price predictions
With , you submit predictions for the future price of BTC, ETH etc, and earn. The more accurate your predictions, the more $ you can earn.
Compete in a Data Challenge
Ocean regularly offer on real-world problems. Showcase your skills, and earn $ prizes.
What Ocean Node runners can do
Monetize your computing hardware
You can monetize any machine with idle compute power, from personal laptops and gaming PCs to high-performance servers and cloud instances, by connecting them to Ocean Nodes. These machines contribute unused CPU or GPU resources to a decentralized compute network, earning rewards for AI training, inference, or data processing.
What OCEAN holders can do
Earn Rewards via Data Farming
Ocean's incentives program rewards OCEAN to participants who make accurate predictions of the price directions of DeFi crypto tokens. Most of the activity happens on . Explore more
Become an Ocean Ambassador
Become an Ambassador
As an ambassador, you are an advocate for the protocol, promoting its vision and mission. By sharing your knowledge and enthusiasm, you can educate others about the benefits of Ocean Protocol, inspiring them to join the ecosystem. As part of a global community of like-minded individuals, you gain access to exclusive resources, networking opportunities, and collaborations that further enhance your expertise in the data economy. Of course, the Ocean Protocol Ambassador Program rewards contributors with weekly bounties and discretionary grants for growing the Ocean Protocol communtiy worldwide.
Follow the steps below to become an ambassador:
To become a member of the Ambassador Program, follow these steps:
Ocean V4 effectively tackles these challenges by adopting ERC721tokens to explicitly represent the base IP as "data NFTs" (Non-Fungible Tokens). Data NFT owners can now deploy ERC20 "datatoken" contracts specific to their data NFTs, with each datatoken contract offering its own distinct licensing terms.
By utilizing ERC721 tokens, Ocean grants data creators greater flexibility and control over licensing arrangements. The introduction of data NFTs allows for the representation of base IP and the creation of customized ERC20 datatoken contracts tailored to individual licensing requirements.
Ocean Protocol Smart Contracts
Ocean brings forth enhanced opportunities for dApp owners, creating a conducive environment for the emergence of a thriving market of third-party Providers.
With Ocean, dApp owners can unlock additional benefits. Firstly, the smart contracts empower dApp owners to collect fees not only during data consumption but also through fixed-rate exchanges. This expanded revenue model allows owners to derive more value from the ecosystem. Moreover, in Ocean, the dApp operator has the authority to determine the fee value, providing them with increased control over their pricing strategies.
In addition to empowering dApp owners, Ocean facilitates the participation of third-party Providers who can offer compute services in exchange for a fee. This paves the way for the development of a diverse marketplace of Providers. This model supports both centralized trusted providers, where data publishers and consumers have established trust relationships, as well as trustless providers that leverage decentralization or other privacy-preserving mechanisms.
By enabling a marketplace of Providers, Ocean fosters competition, innovation, and choice. It creates an ecosystem where various providers can offer their compute services, catering to the diverse needs of data publishers and consumers. Whether based on trust or privacy-preserving mechanisms, this expansion in provider options enhances the overall functionality and accessibility of the Ocean Protocol ecosystem.
Key features of the smart contracts:
Base IP is now represented by a data NFT, from which a data publisher can create multiple ERC20s datatokens representing different types of access for the same dataset.
Interoperability with the NFT ecosystem (and DeFi & DAO tools).
Besides base data IP, you can use data NFTs to implement comments & ratings, verifiable claims, identity credentials, and social media posts. They can point to parent data NFTs, enabling the nesting of comments on comments, or replies to tweets. All on-chain, GDPR-compliant, easily searched, with js & py drivers 🤯
Introduce an advanced structure both for dApp and provider runners 💰
Administration: there are now multiple roles for a more flexible administration both at and levels 👥
When the NFT is transferred, it auto-updates all permissions, e.g. who receives payment, or who can mint derivative ERC20 datatokens.
Key-value store in the NFT contract: NFT contract can be used to store custom key-value pairs (ERC725Y standard) enabling applications like soulbound tokens and Sybil protection approaches 🗃️
Multiple NFT template support: the Factory can deploy different types of NFT templates 🖼️
Multiple datatoken template support: the Factory can deploy different types of .
In the forthcoming pages, you will discover more information about the key features. If you have any inquiries or find anything missing, feel free to contact the core team on Discord 💬
, to help the community create sustainable businesses.
You can publish a data NFT initially with no ERC20 datatoken contracts. This means you simply aren’t ready to grant access to your data asset yet (sub-license it). Then, you can publish one or more ERC20 datatoken contracts against the data NFT. One datatoken contract might grant consume rights for 1 day, another for 1 week, etc. Each different datatoken contract is for different license terms.
For a more comprehensive exploration of intellectual property and its practical connections with ERC721 and ERC20, you can read the blog post written by Trent McConaghy, co-founder of Ocean Protocol. It delves into the subject matter in detail and provides valuable insights.
DataNFTs and Datatokens example:
In step 1, Alice publishes her dataset with Ocean: this means deploying an ERC721 data NFT contract (claiming copyright/base IP), then an ERC20 datatoken contract (license against base IP). Then Alice mints an ERC20 datatokens
In step 2, Alice transfers 1.0 of them to Bob's wallet; now he has a license to be able to download that dataset.
Data NFT & Datatokens flow
What happends under the hood? 🤔
Publishing with smart contracts in Ocean Protocol involves a well-defined process that streamlines the publishing of data assets. It provides a systematic approach to ensure efficient management and exchange of data within the Ocean Protocol ecosystem. By leveraging smart contracts, publishers can securely create and deploy data NFTs, allowing them to tokenize and represent their data assets. Additionally, the flexibility of the smart contracts enables publishers to define pricing schemas for datatokens, facilitating fair and transparent transactions. This publishing framework empowers data publishers by providing them with greater control and access to a global marketplace, while ensuring trust, immutability, and traceability of their published data assets.
The smart contracts publishing includes the following steps:
The data publisher initiates the creation of a new data NFT.
The data NFT factory deploys the template for the new data NFT.
The data NFT template creates the data NFT contract.
The address of the newly created data NFT is available to the data publisher.
The publisher is now able to create datatokens with pricing schema for the data NFT. To accomplish this, the publisher initiates a call to the data NFT contract, specifically requesting the creation of a new datatoken with a fixed rate schema.
The data NFT contract deploys a new datatoken and a fixed rate schema by interacting with the datatoken template contract.
The datatoken contract is created (Datatoken-1 contract).
The datatoken template generates a new fixed rate schema for Datatoken-1.
The address of Datatoken-1 is now available to the data publisher.
Optionally, the publisher can create a new datatoken (Datatoken-2) with a free price schema.
The data NFT contract interacts with the Datatoken Template contract to create a new datatoken and a dispenser schema.
The datatoken templated deploys the Datatoken-2 contract.
The datatoken templated creates a dispenser for the Datatoken-2 contract.
Below is a visual representation that illustrates the flow:
Data NFT & Datatokens flow
We have some awesome hands-on experience when it comes to publishing a data NFT and minting datatokens.
The regular template allows users to buy/sell/hold datatokens. The datatokens can be minted by the address having a MINTER role, making the supply of datatoken variable. This template is assigned templateId =1 and the source code is available here.
The enterprise template has additional functions apart from methods in the ERC20 interface. This additional feature allows access to the service by paying in the basetoken instead of the datatoken. Internally, the smart contract handles the conversion of basetoken to datatoken, initiating an order to access the service, and minting/burning the datatoken. The total supply of the datatoken effectively remains 0 in the case of the enterprise template. This template is assigned templateId =2 and the source code is available here.
When you're creating an ERC20 datatoken, you can specify the desired template by passing on the template index.
To specify the datatoken template via ocean.js, you need to customize the DatatokenCreateParams with your desired templateIndex.
By default, all assets published through the Ocean Market use the Enterprise Template.
Retrieve the template
It's important to note that Ocean Protocol may introduce new templates to support additional variations of data NFTs and datatokens in the future.
: build a decentralized data market.
Private user profile data: storing user profile data on your centralized server exposes you to liability. Instead, have it on-chain encrypted by the user's wallet, and just-in-time decrypt for the app. Video, slides.
Infrastructure for Decentralized Compute: Run an Ocean Node by monetizing your unused hardware, such as your gaming laptop, old laptops or desktops, GPU servers, & more. You will find more info on this page
AI models: Using the Ocean VS Code extension, users can build and run AI algorithms on decentralized compute resources, resulting in a fully trained AI model ready for deployment.
After logging into the new account, search for the available services and select S3 type of storage.
Select S3 storage
To create an S3 bucket, choose Create bucket.
Create a bucket
Fill in the form with the necessary information. Then, the bucket is up & running.
Check that the bucket is up and running
Step 2 - Upload asset on S3 bucket
Now, the asset can be uploaded by selecting the bucket name and choosing Upload in the Objects tab.
Upload asset on S3 bucket
Add files to the bucket
Get the files and add them to the bucket.
The file is an example used in multiple Ocean repositories, and it can be found here.
Upload asset on S3 bucket
The permissions and properties can be set afterward, for the moment keep them as default.
After selecting Upload, make sure that the status is Succeeded.
Upload asset on S3 bucket
Step 3 - Access the Object URL on S3 Bucket
By default, the permissions of accessing the file from the S3 bucket are set to private. To publish an asset on the market, the S3 URL needs to be public. This step shows how to set up access control policies to grant permissions to others.
Editing permissions
Go to the Permissions tab and select Edit and then uncheck Block all public access boxes to give everyone read access to the object and click Save.
If editing the permissions is unavailable, modify the Object Ownership by enabling the ACLs as shown below.
Access the Object URL on S3 Bucket
Modifying bucket policy
To have the bucket granted public access, its policy needs to be modified likewise.
Note that the <BUCKET-NAME> must be chosen from the personal buckets dashboard.
After saving the changes, the bucket should appear as Public access.
Access the Object URL on S3 Bucket
Verify the object URL on public access
Select the file from the bucket that needs verification and select Open. Now download the file on your system.
Access the Object URL on S3 Bucket
Step 4 - Get the S3 Bucket Link & Publish Asset on Market
Now that the S3 endpoint has public access, the asset will be hosted successfully.
Go to Ocean Market to complete the form for asset creation.
Copy the Object URL that can be found at Object Overview from the AWS S3 bucket and paste it into the File field from the form found at step 2 as it is illustrated below.
Create a new file in the same working directory where configuration file (config.js) and .env files are present, and copy the code as listed below.
updateMetadata.js
// Note: Make sure .env file and config.js are created and setup correctlyconst
Execute the script
node updateMetadata.js
We provided several code examples using the Ocean.js library for interacting with the Ocean Protocol. Some highlights from the code examples (compute examples) are:
Minting an NFT - This example demonstrates how to mint an NFT (Non-Fungible Token) using the Ocean.js library. It shows the necessary steps, including creating a NFTFactory instance, defining NFT parameters, and calling the create() method to mint the NFT.
Publishing a dataset - This example explains how to publish a dataset on the Ocean Protocol network. It covers steps such as creating a DDO, signing the DDO, and publish the dataset.
Consuming a dataset - This example demonstrates how to consume a published dataset. It shows how to search for available assets, retrieve the DDO for a specific asset, order the asset using a specific datatoken, and then download the asset.
You can explore more detailed code examples and explanations on Ocean.js readme.
The Ocean.js library adopts the module architectural pattern, ensuring clear separation and organization of code units. Utilizing ES6 modules simplifies the process by allowing you to import only the necessary module for your specific task.
The module structure follows this format:
Types
Config
Contracts
Services
Utils
When working with a particular module, you will need to provide different parameters. To instantiate classes from the contracts module, you must pass objects such as Signer, which represents the wallet instance, or the contract address you wish to utilize, depending on the scenario. As for the services modules, you will need to provide the provider URI or metadata cache URI.
Ocean.js is more than just a library; it's a gateway to unlocking your potential in the world of decentralized data services. To help you understand its real-world applications, we've curated a collection of examples and showcases. These examples demonstrate how you can use Ocean.js to create innovative solutions that harness the power of decentralized technologies. Each example provides a unique perspective on how you can apply Ocean.js, from decentralized marketplaces for workshops to peer-to-peer platforms for e-books and AI-generated art. These showcases serve as an inspiration for developers like you, looking to leverage Ocean.js in your projects, showcasing its adaptability and transformative capabilities. Dive into these examples to see how Ocean.js can bring your creative visions to life. 📚
With these examples and showcases, you've seen just a glimpse of what you can achieve with this library. Now, it's your turn to dive in, explore, and unleash your creativity using Ocean.js. 🚀
The provided script demonstrates how to create a data NFT using Oceanjs.
First, create a new file in the working directory, alongside the config.js and .env files. Name it create_dataNFT.js (or any appropriate name). Then, copy the following code into the new created file:
create_dataNFT.js
// Note: Make sure .env file and config.js are created and setup correctlyconst
Create a new file in the same working directory where the configuration file (config.js) and .env files are present, and copy the code as listed below.
// Note: Make sure .env file and config.js are created and setup correctly
const { oceanConfig } = require('./config.js');
const { ZERO_ADDRESS, NftFactory, getHash, Nft } = require ('@oceanprotocol/lib');
// replace the did here
const did = "did:op:a419f07306d71f3357f8df74807d5d12bddd6bcd738eb0b461470c64859d6f0f";
// This function takes did as a parameter and updates the data NFT information
const updateAssetState = async (did) => {
const publisherAccount = await oceanConfig.publisherAccount.getAddress();
// Fetch ddo from Aquarius
const asset = await await oceanConfig.aquarius.resolve(did);
const nft = new Nft(oceanConfig.ethersProvider);
// Update the metadata state and bring it to end-of-life state ("1")
await nft.setMetadataState(
asset?.nft?.address,
publisherAccount,
1
)
// Check if ddo is correctly udpated in Aquarius
await oceanConfig.aquarius.waitForAqua(ddo.id);
// Fetch updated asset from Aquarius
const updatedAsset = await await oceanConfig.aquarius.resolve(did);
console.log(`Resolved asset did [${updatedAsset.id}]from aquarius.`);
console.log(`Updated asset state: [${updatedAsset.nft.state}].`);
};
// Call setMetadata(...) function defined above
updateAssetState(did).then(() => {
process.exit();
}).catch((err) => {
console.error(err);
process.exit(1);
});
The variables AQUARIUS_URL and PROVIDER_URL should be set correctly in .env file
Create a script to update the state of an asset by updating the asset's metatada
version: The version of the DDO.
metadata: The metadata describing the asset.
services: An array of services associated with the asset.
credentials: An array of verifiable credentials.
chainId: The blockchain chain ID where the asset is registered.
nftAddress: The address of the NFT representing the asset.
getAssetFields() which returns Asset fields such as:
datatokens (optional): The datatokens associated with the asset.
indexedMetadata (optional): Encapsulates data about blockchain asset related event, NFT, stats (pricing of the asset, number of orders per asset), purgatory (if the asset belongs or not in the purgatory).
event (optional): The last event related to the asset.
nft (optional): Information about the NFT representing the asset.
purgatory (optional): Purgatory status of the asset, if applicable.
stats (optional): Statistical information about the asset (e.g., usage, views).Example of indexedMetadata
getDDOData() which simply retruns as Record<string, any> the full DDO structure including DDO and Asset fields.
getDid() which returns only the Decentralized Identifier (DID), as string, of the asset.
Now let's use DDO V4 example, DDOExampleV4 into the following javascript code, assuming @oceanprotocol/ddo-js has been installed as dependency before:
Execute script
const { DDOManager } = require ('@oceanprotocol/ddo-js');
const ddoInstance = DDOManager.getDDOClass(DDOExampleV4);
// DDO V4
console.log('DDO V4 Fields: ', ddoInstance.getDDOFields());
// Individual fields access
console.log('DDO V4 chain ID: ', ddoInstance.getDDOFields().chainId);
console.log('DDO V4 Asset Fields: ', ddoInstance.getAssetFields());
console.log('DDO V4 Data: ', ddoInstance.getDDOData());
console.log('DDO V4 DID: ', ddoInstance.getDid());
// The same script can be applied on DDO V5 and deprecated DDO from `Instantiate DDO section`.
node retrieve-ddo-fields.js
Usage of DDO Manager Functions
IPFS Integration: Temporary storage using the InterPlanetary File System (IPFS).
Uploader streamlines the file uploading process, providing users with a seamless experience to effortlessly incorporate their digital assets into a decentralized network. Whether you're uploading images, documents, or other media, Uploader enhances accessibility and ease of use, fostering a more decentralized and inclusive digital landscape.
Obtain unique identifiers such as hashes or CIDs for your uploaded files. These unique identifiers play a pivotal role in enabling efficient tracking and interaction with decentralized assets. By obtaining these identifiers, users gain a crucial toolset for managing, verifying, and engaging with their digital assets on the decentralized network, ensuring a robust and secure mechanism for overseeing the lifecycle of their contributed files.
Uploader offers a range of powerful features tailored to meet the needs of any decentralized storage:
User Content Uploads: Users can seamlessly upload their content through the user-friendly frontend interface.
Payment Handling: Uploader integrates with payment systems to manage the financial aspects of storage services.
Decentralized Storage: Content is pushed to decentralized storage networks like Filecoin and Arweave for enhanced security and redundancy.
API Documentation: Comprehensive API documentation on each repo to allow users to understand and interact with the system effortlessly.
Uploader.js: a TypeScript library designed to simplify interaction with the Uploader API. This library provides a user-friendly and intuitive interface for calling API endpoints within the Uploader Storage system.
Uploader simplifies the user workflow, allowing for easy management of storage operations:
Users fetch available storage types and payment options from the frontend.
Quotes for storing files on the Microservice network.
Files are uploaded from the frontend to Uploader, which handles temporary storage via IPFS.
The Microservice takes over, ensuring data is stored on the selected network securely.
Users can monitor upload status and retrieve links to access their stored content.
Ocean Uploader - storage flow 1
Ocean Uploader - storage flow 1
Documentation is provided in the repos to facilitate seamless integration and interaction with the Uploader. The documentation outlines all API endpoints, payload formats, and example use cases, empowering developers to effectively harness the capabilities of the Uploader solution.
Did you encounter a problem? Open an issue in Ocean Protocol's repos:
Got that done? Awesome! Now, let's dive into a bit of TypeScript:
There you go! That's all it takes to upload your files using Uploader.js. Easy, right? Now go ahead and get those files stored securely. You got this! 🌟💾
For additional details, please visit the Uploader.js repository.
The library offers developers a versatile array of methods designed for seamless interaction with the Ocean Uploader API. These methods collectively empower developers to utilize Ocean's decentralized infrastructure for their own projects:
Whether you're a developer looking to integrate Ocean Uploader into your application or a contributor interested in enhancing this TypeScript library, we welcome your involvement. By following the provided documentation, you can harness the capabilities of Uploader.js to make the most of decentralized file storage in your projects.
Feel free to explore the API reference, contribute to the library's development, and become a part of the Ocean Protocol community's mission to democratize data access and storage.
import { ethers } from 'ethers';
import {
UploaderClient,
GetQuoteArgs,
GetQuoteResult
} from '@oceanprotocol/uploader';
import dotenv from 'dotenv';
dotenv.config();
// Set up a new instance of the Uploader client
const signer = new ethers.Wallet(process.env.PRIVATE_KEY);
const client = new UploaderClient(process.env.UPLOADER_URL, process.env.UPLOADER_ACCOUNT, signer);
async function uploadAsset() {
// Get storage info
const info = await client.getStorageInfo();
// Fetch a quote using the local file path
const quoteArgs: GetQuoteArgs = {
type: info[0].type,
duration: 4353545453,
payment: {
chainId: info[0].payment[0].chainId,
tokenAddress: info[0].payment[0].acceptedTokens[0].value
},
userAddress: process.env.USER_ADDRESS,
filePath: ['/home/username/ocean/test1.txt'] // example file path
};
const quoteResult: GetQuoteResult = await client.getQuote(quoteArgs);
// Upload the file using the returned quote
await client.upload(quoteResult.quoteId, quoteArgs.filePath);
console.log('Files uploaded successfully.');
}
uploadAsset().catch(console.error);
Purpose: This endpoint is used to encrypt a document. It accepts binary data and returns an encrypted bytes string.
Responses:
200: This is a successful HTTP response code. It returns a bytes string containing the encrypted document. For example: b'0x04b2bfab1f4e...7ed0573'
Example response:
Endpoint: POST /api/services/decrypt
Parameters: The body of the request should contain a JSON object with the following properties:
decrypterAddress: A string containing the address of the decrypter (required).
chainId: The chain ID of the network the document is on (required).
transactionId: The transaction ID of the encrypted document (optional).
dataNftAddress: The address of the data non-fungible token (optional).
encryptedDocument: The encrypted document (optional).
flags: The flags of the encrypted document (optional).
documentHash: The hash of the encrypted document (optional).
nonce: The nonce of the encrypted document (required).
signature: The signature of the encrypted document (required).
Purpose: This endpoint is used to decrypt a document. It accepts the decrypter address, chain ID, and other optional parameters, and returns the decrypted document.
Responses:
200: This is a successful HTTP response code. It returns a bytes string containing the decrypted document.
Example response:
Encrypt endpoint
b'0x04b2bfab1f4e...7ed0573'
const axios = require('axios');
async function decryptAsset(payload) {
// Define the base URL of the services.
const SERVICES_URL = "<BASE URL>"; // Replace with your base services URL.
// Define the endpoint.
const endpoint = `${SERVICES_URL}/api/services/decrypt`;
try {
// Send a POST request to the endpoint with the payload in the request body.
const response = await axios.post(endpoint, payload);
// Check the response.
if (response.status !== 200) {
throw new Error(`Response status code is not 200: ${response.data}`);
}
// Use the response data here.
console.log(response.data);
} catch (error) {
console.error(error);
}
}
// Define the payload.
let payload = {
"decrypterAddress": "<DECRYPTER ADDRESS>", // Replace with your decrypter address.
"chainId": "<CHAIN ID>", // Replace with your chain ID.
"transactionId": "<TRANSACTION ID>", // Replace with your transaction ID.
"dataNftAddress": "<DATA NFT ADDRESS>", // Replace with your Data NFT Address.
};
// Run the function.
decryptAsset(payload);
address: The Ethereum address of the consumer (Optional).
nonce: A unique identifier for this request, to prevent replay attacks (Required).
signature: A digital signature proving ownership of the address. The signature should be generated by signing the hashed concatenation of the address and nonce parameters (Required).
expiration: A valid future UTC timestamp representing when the auth token will expire (Required).
Curl Example:
Inside the angular brackets, the user should provide the valid values for the request.
Response:
Allows the user to delete an existing auth token before it naturally expires.
Parameters
Returns: Success message if token is successfully deleted. If the token is not found or already expired, returns an error message.
Replace <provider_url>, <your_address>, <your_token>, and <your_signature> with actual values. This script sends a DELETE request to the deleteAuthToken endpoint and logs the response. Please ensure that axios is installed in your environment (npm install axios).
Create Auth Token
GET /api/services/createAuthToken?address=<your_address>&&nonce=<your_nonce>&&expiration=<expiration>&signature=<your_signature>
address: String object containing consumer's address (optional)
nonce: Integer, Nonce (required)
signature: String object containing user signature (signed message)
The signature is based on hashing the following parameters:
address + nonce
token: token to be expired
const axios = require('axios');
// Define the address, token, and signature
const address = '<your_address>'; // Replace with your address
const token = '<your_token>'; // Replace with your token
const signature = '<your_signature>'; // Replace with your signature
// Define the URL for the deleteAuthToken endpoint
const deleteAuthTokenURL = 'http://<provider_url>/api/services/deleteAuthToken'; // Replace with your provider's URL
// Make the DELETE request
axios.delete(deleteAuthTokenURL, {
data: {
address: address,
token: token
},
headers: {
'Content-Type': 'application/json',
'signature': signature
}
})
.then(response => {
console.log(response.data);
})
.catch(error => {
console.log('Error:', error);
});
{"success": "Token has been deactivated."}
Javascript Example:
Delete Auth Token
DELETE /api/services/deleteAuthToken
Javascript Example:
Example Response:
page.
If you're eager to use the Ocean Subgraph, here's some important information for you: We've deployed an Ocean Subgraph for each of the supported networks. Take a look at the table below, where you'll find handy links to both the subgraph instance and GraphiQL for each network. With the user-friendly GraphiQL interface, you can execute GraphQL queries directly, without any additional setup. It's a breeze! 🌊
Network
Subgraph URL
GraphiQL URL
Ethereum
Polygon
In the following pages, we've prepared a few examples just for you. From running queries to exploring data, you'll have the chance to dive right into the Ocean Subgraph data. There, you'll find a wide range of additional code snippets and examples that showcase the power and versatility of the Ocean Subgraph. So, grab a virtual snorkel, and let's explore together! 🤿
When it comes to fetching valuable information about and , the subgraph queries play a crucial role. They retrieve numerous details and information, but, the Subgraph cannot decrypt the DDO. But worry not, we have a dedicated component for that—! 🐬 Aquarius communicates with the provider and decrypts the encrypted information, making it readily available for queries.
Ocean Subgraph deployments
When making subgraph queries, please remember that the parameters you send, such as a datatoken address or a data NFT address, should be in lowercase. This is an essential requirement to ensure accurate processing of the queries. We kindly request your attention to this detail to facilitate a seamless query experience.
For more examples, visit the subgraph GitHub , where you'll discover an extensive collection of code snippets and examples that highlight the Subgraph's capabilities and adaptability.
Sell datatokens via for a fixed price. Sell data NFTs.
Transfer data NFTs & datatokens to another owner, and all other ERC721 & ERC20 actions using web3.
As a Python library, Ocean.py is built for the key environment of data scientists. It that can simply be imported alongside other Python data science tools like numpy, matplotlib, scikit-learn and tensorflow.
Follow these steps in sequence to ramp into Ocean.
Metadata plays a crucial role in asset discovery, providing essential information such as asset type, name, creation date, and licensing details. Each data asset can have a decentralized identifier (DID) that resolves to a DID document (DDO) containing associated metadata. The DDO is essentially a collection of fields in a JSON object. To understand working with OCEAN DIDs, you can refer to the DID documentation. For a more comprehensive understanding of metadata structure, the DDO Specification documentation provides in-depth information.
Data discovery
In general, any dApp within the Ocean ecosystem is required to store metadata for every listed dataset. The metadata is useful to determine which datasets are the most relevant.
So, for example, imagine you're searching for data on Spanish almond production in an Ocean-powered dApp. You might find a large number of datasets, making it difficult to identify the most relevant one. What can we do about it? 🤔 This is where metadata is useful! The metadata provides valuable information that helps you identify the most relevant dataset. This information can include:
name, e.g. “Largueta Almond Production: 1995 to 2005”
dateCreated, e.g. “2007–01–20”
datePublished, e.g. “2022–11–10T12:32:15Z”
Other metadata might also be available. For example:
categories, e.g. [“agriculture”, “economics”]
tags, e.g. [“Europe”, “Italy”, “nuts”, “almonds”]
description, e.g. “2002 Italian almond production statistics for 14 varieties and 20 regions.”
DIDs and DDOs follow the .
(DIDs) are a type of identifier that enable verifiable, decentralized digital identity. Each DID is associated with a unique entity, and DIDs may represent humans, objects, and more. A DID Document (DDO) is a JSON blob that holds information about the DID. Given a DID, a resolver will return the DDO of that DID.
Decentralized identifiers (DIDs) are a type of identifier that enable verifiable, decentralized digital identity. Each DID is associated with a unique entity, and DIDs may represent humans, objects, and more.
An asset in Ocean represents a downloadable file, compute service, or similar. Each asset is a resource under the control of a publisher. The Ocean network itself does not store the actual resource (e.g. files).
An asset has a DID and DDO. The DDO should include metadata about the asset, and define access in at least one . Only owners or delegated users can modify the DDO.
All DDOs are stored on-chain in encrypted form to be fully GDPR-compatible. A metadata cache like can help in reading, decrypting, and searching through encrypted DDO data from the chain. Because the file URLs are encrypted on top of the full DDO encryption, returning unencrypted DDOs e.g. via an API is safe to do as the file URLs will still stay encrypted.
The DDO is stored on-chain as part of the NFT contract and stored in encrypted form using the private key of the . To resolve it, a metadata cache like must query the to decrypt the DDO.
Here is the flow:
To set up the metadata for an asset, you'll need to call the function at the contract level.
- Each asset has a state, which is held by the NFT contract. One of the following: active (0), end-of-life (1), deprecated (2), revoked (3), ordering temporarily disabled (4), and asset unlisted (5).
_metaDataDecryptorUrl - You create the DDO and then the Provider encrypts it with its private key. Only that Provider can decrypt it.
_metaDataDecryptorAddress - The decryptor address.
You'll have more information about the DIDs, on the page.
Fine-Grained Permissions
Fine-Grained Permissions Using Role-Based Access Control. You can Control who can publish, buy or browse data
A large part of Ocean is about access control, which is primarily handled by datatokens. Users can access a resource (e.g. a file) by redeeming datatokens for that resource. We recognize that enterprises and other users often need more precise ways to specify and manage access, and we have introduced fine-grained permissions for these use cases. Fine-grained permissions mean that access can be controlled precisely at two levels:
The fine-grained permissions features are designed to work in forks of Ocean Market. We have not enabled them in Ocean Market itself, to keep Ocean Market open for everyone to use. On the front end, the permissions features are easily enabled by setting environment variables.
Some datasets need to be restricted to appropriately credentialed users. In this situation there is tension:
Datatokens on their own aren’t enough - the datatokens can be exchanged without any restrictions, which means anyone can acquire them and access the data.
We want to retain datatokens approach, since they enable Ocean users to leverage existing crypto infrastructure e.g. wallets, exchange etc.
We can resolve this tension by drawing on the following analogy:
Imagine going to an age 18+ rock concert. You can only get in if you show both (a) your concert ticket and (b) an id showing that you’re old enough.
We can port this model into Ocean, where (a) is a datatoken, and (b) is a credential. The datatoken is the baseline access control. It’s fungible, and something that you’ve paid for or had shared to you. It’s independent of your identity. The credential is something that’s a function of your identity.
The credential based restrictions are implemented in two ways, at the market level and at the asset level. Access to the market is restricted on a role basis, the user's identity is attached to a role via the role based access control (RBAC) server. Access to individual assets is restricted via allow and deny lists which list the ethereum addresses of the users who can and cannot access the asset within the DDO.
For asset-level restrictions Ocean supports allow and deny lists. Allow and deny lists are advanced features that allow publishers to control access to individual data assets. Publishers can restrict assets so that they can only be accessed by approved users (allow lists) or they can restrict assets so that they can be accessed by anyone except certain users (deny lists).
When an allow-list is in place, a consumer can only access the resource if they have a datatoken and one of the credentials in the "allow" list of the DDO. Ocean also has complementary deny functionality: if a consumer is on the "deny" list, they will not be allowed to access the resource.
Initially, the only credential supported is Ethereum public addresses. To be fair, it’s more a pointer to an individual not a credential; but it has a low-complexity implementation so makes a good starting point. For extensibility, the Ocean metadata schema enables specification of other types of credentials like W3C Verifiable Credentials and more. When this gets implemented, asset-level permissions will be properly RBAC too. Since asset-level permissions are in the DDO, and the DDO is controlled by the publisher, asset-level restrictions are controlled by the publisher.
For market-level permissions, Ocean implements a role-based access control server (RBAC server). It implements restrictions at the user level, based on the user’s role (credentials). The RBAC server is run & controlled by the marketplace owner. Therefore permissions at this level are at the discretion of the marketplace owner.
The RBAC server is the primary mechanism for restricting your users ability to publish, buy, or browse assets in the market.
The RBAC server defines four different roles:
Admin
Publisher
Consumer
Admin/ Publisher
Currently users with either the admin or publisher roles will be able to use the Market without any restrictions. They can publish, buy and browse datasets.
Consumer
A user with the consumer is able to browse datasets, purchase them, trade datatokens and also contribute to datapools. However, they are not able to publish datasets.
Users
Users are able to browse and search datasets but they are not able to purchase datasets, trade datatokens, or contribute to data pools. They are also not able to publish datasets.
Address without a role
If a user attempts to view the data market without a role, or without a wallet connected, they will not be able to view or search any of the datasets.
No wallet connected
When the RBAC server is enabled on the market, users are required to have a wallet connected to browse the datasets.
Currently the are two ways that the RBAC server can be configured to map user roles to Ethereum addresses. The RBAC server is also built in such a way that it is easy for you to add your own authorization service. They two existing methods are:
Keycloak
If you already have a identity and access management server running you can configure the RBAC server to use it by adding the URL of your Keycloak server to the KEYCLOAK_URL environmental variable in the RBAC .enb file.
JSON
Alternatively, if you are not already using Keycloak, the easiest way to map user roles to ethereum addresses is in a JSON object that is saved as the JSON_DATA environmental variable in the RBAC .env file. There is an example of the format required for this JSON object in .example.env
It is possible that you can configure both of these methods of mapping user roles to Ethereum Addresses. In this case the requests to your RBAC server should specify which auth service they are using e.g. "authService": "json" or "authService": "keycloak"
Default Auth service
Additionally, you can also set an environmental variable within the RBAC server that specifies the default authorization method that will be used e.g. DEFAULT_AUTH_SERVICE = "json". When this variable is specified, requests sent to your RBAC server don't need to include an authService and they will automatically use the default authorization method.
You can start running the RBAC server by following these steps:
Clone this repository:
Install the dependencies:
Build the service
Start the server
When you are ready to deploy the RBAC server to
Replace the KEYCLOAK_URL in the Dockerfile with the correct URL for your hosting of .
Run the following command to build the RBAC service in a Docker container:
Next, run the following command to start running the RBAC service in the Docker container:
Now you are ready to send requests to the RBAC server via postman. Make sure to replace the URL to http://localhost:49160 in your requests.
Architecture Overview
Ocean Protocol Architecture Adventure!
Embark on an exploration of the innovative realm of Ocean Protocol, where data flows seamlessly and AI achieves new heights. Dive into the intricately layered architecture that converges data and services, fostering a harmonious collaboration. Let us delve deep and uncover the profound design of Ocean Protocol.🐬
Overview of the Ocean Protocol Architecture
Layer 1: The Foundational Blockchain Layer
At the core of Ocean Protocol lies the robust Blockchain Layer. Powered by blockchain technology, this layer ensures secure and transparent transactions. It forms the bedrock of decentralized trust, where data providers and consumers come together to trade valuable assets.
The smart contracts are deployed on the Ethereum mainnet and other compatible networks. The libraries encapsulate the calls to these smart contracts and provide features like publishing new assets, facilitating consumption, managing pricing, and much more. To explore the contracts in more depth, go ahead to the contracts section.
Layer 2: The Empowering Middle Layer
Above the smart contracts, you'll find essential libraries employed by applications within the Ocean Protocol ecosystem, the , and .
These libraries include , a JavaScript library, and , a Python library. They serve as powerful tools for developers, enabling integration and interaction with the protocol.
: Ocean.js is a JavaScript library that serves as a powerful tool for developers looking to integrate their applications with the Ocean Protocol ecosystem. Designed to facilitate interaction with the protocol, Ocean.js provides a comprehensive set of functionalities, including data tokenization, asset management, and smart contract interaction. Ocean.js simplifies the process of implementing data access controls, building dApps, and exploring data sets within a decentralized environment.
: Ocean.py is a Python library that empowers developers to integrate their applications with the Ocean Protocol ecosystem. With its rich set of functionalities, Ocean.py provides a comprehensive toolkit for interacting with the protocol. Developers and can leverage Ocean.py to perform a wide range of tasks, including data tokenization, asset management, and smart contract interactions. This library serves as a bridge between Python and the decentralized world of Ocean Protocol, enabling you to harness the power of decentralized data.
Ocean Node is a single component which runs all core middleware services within the Ocean stack. It replaces the roles of Aquarius, Provider and the Subgraph. It integrates the Indexer for metadata management and the Provider for secure data access. It ensures efficient and reliable interactions within the Ocean Protocol network.
Ocean Nodes handles network communication through libp2p, supports secure data handling, and enables flexible compute-to-data operations.
The functions of Ocean nodes include:
It is crucial in handling the asset downloads, it streams the purchased data directly to the buyer.
It conducts the permission an access checks during the consume flow.
The Node handles (Decentralized Data Object) encryption, but it offers support for .
Previously Ocean used the following middleware components:
(C2D) represents a groundbreaking paradigm within the Ocean Protocol ecosystem, revolutionizing the way data is processed and analyzed. With C2D, the traditional approach of moving data to the computation is inverted, ensuring privacy and security. Instead, algorithms are securely transported to the data sources, enabling computation to be performed locally, without the need to expose sensitive data. This innovative framework facilitates collaborative data analysis while preserving data privacy, making it ideal for scenarios where data owners want to retain control over their valuable assets. C2D provides a powerful tool for enabling secure and privacy-preserving data analysis and encourages collaboration among data providers, ensuring the utilization of valuable data resources while maintaining strict privacy protocols.
Here, the ocean comes alive with a vibrant ecosystem of dApps, marketplaces, and more. This layer hosts a variety of user-friendly interfaces, applications, and tools, inviting data scientists and curious explorers alike to access, explore, and contribute to the ocean's treasures.
Prominently featured within this layer is , a hub where data enthusiasts and industry stakeholders converge to discover, trade, and unlock the inherent value of data assets. Beyond Ocean Market, the Application Layer hosts a diverse ecosystem of specialized applications and marketplaces, each catering to unique use cases and industries. Empowered by the capabilities of Ocean Protocol, these applications facilitate advanced data exploration, analytics, and collaborative ventures, revolutionizing the way data is accessed, shared, and monetized.
At the top of the Ocean Protocol ecosystem, we find the esteemed , the gateway for users to immerse themselves in the world of decentralized data transactions. These wallets serve as trusted companions, enabling users to seamlessly transact within the ecosystem, purchase and sell data NFTs, and acquire valuable datatokens. For a more detailed exploration of Web 3 Wallets and their capabilities, you can refer to the .
With the layers of the architecture clearly delineated, the stage is set for a comprehensive exploration of their underlying logic and intricate design. By examining each individually, we can gain a deeper understanding of their unique characteristics and functionalities.
Storage Specifications
Specification of storage options for assets in Ocean Protocol.
Ocean does not handle the actual storage of files directly. The files are stored via other services which are then specified within the DDO.
During the publish process, file URLs must be encrypted with a respective Provider API call before storing the DDO on-chain. For this, you need to send the following object to Provider (where "files" contains one or more storage objects):
The remainder of this document specifies the different types of storage objects that are supported:
Parameters:
Consume Asset
Consuming an asset involves a two-step process: placing an order and then utilizing the order transaction to download and access the asset's files. Let's delve into each step in more detail.
To initiate the ordering process, there are two scenarios depending on the pricing schema of the asset. Firstly, if the asset has a fixed-rate pricing schema configured, you would need to acquire the corresponding datatoken by purchasing it. Once you have obtained the datatoken, you send it to the publisher to place the order for the asset.
The second scenario applies when the asset follows a free pricing schema. In this case, you can obtain a free datatoken from the dispenser service provided by Ocean Protocol. Using the acquired free datatoken, you can place the order for the desired asset.
However, it's crucial to note that even when utilizing free assets, network gas fees still apply. These fees cover the costs associated with executing transactions on the blockchain network.
Uploader UI
The stands as a robust UI react library dedicated to optimizing the uploading, and interaction with digital assets.
Through an intuitive platform, the tool significantly simplifies the entire process, offering users a seamless experience for uploading files, acquiring unique identifiers such as hashes or CIDs, and effectively managing their decentralized assets. Developed using React, TypeScript, and CSS modules, the library seamlessly connects to Ocean remote components by default, ensuring a cohesive and efficient integration within the ecosystem.
Integrating into your application is straightforward. The package facilitates seamless uploads but requires a wallet connector library to function optimally. Compatible wallet connection choices include , , and .
Step 1: Install the necessary packages. For instance, if you're using ConnectKit, the installation command would be:
Step 2: Incorporate the UploaderComponent from the uploader-ui-lib into your app. It's crucial to ensure the component is nested within both the WagmiConfig and ConnectKit providers. Here's a basic implementation:
Get fixed-rate exchanges
Discover the World of NFTs: Retrieving a List of Fixed-rate exchanges
Having gained knowledge about fetching lists of data NFTs and datatokens and extracting specific information about each, let's now explore the process of retrieving the information of fixed-rate exchanges. A fixed-rate exchange refers to a mechanism where data assets can be traded at a predetermined rate or price. These exchanges offer stability and predictability in data transactions, enabling users to securely and reliably exchange data assets based on fixed rates. If you need a refresher on fixed-rate exchanges, visit the page.
PS: In this example, the query is executed on the Ocean subgraph deployed on the mainnet. If you want to change the network, please refer to.
The javascript below can be used to run the query and fetch a list of fixed-rate exchanges. If you wish to change the network, replace the variable's value network as needed.
Architecture
Architecture overview
Compute-to-Data (C2D) is a cutting-edge data processing paradigm that enables secure and privacy-preserving computation on sensitive datasets.
In the C2D workflow, the following steps are performed:
The consumer initiates a compute-to-data job by selecting the desired data asset and algorithm, and then, the orders are validated via the dApp used.
A dedicated and isolated execution pod is created for the C2D job.
Get data NFT information
Explore the Power of Querying: Unveiling In-Depth Details of Individual Data NFTs
Now that you are familiar with the process of retrieving a list of data NFTs 😎, let's explore how to obtain more specific details about a particular NFT through querying. By utilizing the knowledge you have gained, you can customize your GraphQL query to include additional parameters such as the NFT's metadata, creator information, template, or any other relevant data points. This will enable you to delve deeper into the intricacies of a specific NFT and gain a comprehensive understanding of its attributes. With this newfound capability, you can unlock valuable insights and make informed decisions based on the specific details retrieved. So, let's dive into the fascinating world of querying and unravel the unique characteristics of individual data NFTs.
The result of the following GraphQL query returns the information about a particular data NFT. In this example, 0x1c161d721e6d99f58d47f709cdc77025056c544c.
PS: In this example, the query is executed on the Ocean subgraph deployed on the mainnet. If you want to change the network, please refer to.
Ocean Nodes - Decentralized units that turn idle hardware into a global AI compute network for scalable, privacy-preserving tasks.
Ocean VS code extension - A developer tool that lets you build, run, and manage AI algorithms on Ocean decentralized compute network directly from VS Code.
It establishes communication with the operator-service for initiating Compute-to-Data jobs.
It provides a metadata cache, enhancing search efficiency by caching on-chain data into a Typesense database. This enables faster and more efficient data discovery.
technical information about the files, such as the content type.
additionalInformation can be used to store any other facts about the asset.
flags - Additional information to represent the state of the data. One of two values: 0 - plain text, 1 - compressed, 2 - encrypted. Used by Aquarius.
data - The DDO of the asset. You create the DDO as a JSON, send it to the Provider that encrypts it, and then you set it up at the contract level.
_metaDataHash - Hash of the clear data generated before the encryption. It is used by Provider to check the validity of the data after decryption.
_metadataProofs - Array with signatures of entities who validated data (before the encryption). Pass an empty array if you don't have any.
Overview
Rules for DID & DDO
Publishing & Retrieving DDOs
While we utilize a specific DDO structure, you have the flexibility to customize it according to your unique requirements. However, to enable seamless processing, it is essential to have your own Aquarius instance that can handle your modified DDO.
As developers, we understand that you eat, breathe, and live code. That's why we invite you to explore the ocean.py and ocean.js pages, where you'll find practical examples of how to set up and update metadata for an asset 💻
The Interplanetary File System (IPFS) is a distributed file storage protocol that allows computers all over the globe to store and serve files as part of a giant peer-to-peer network. Any computer, anywhere in the world, can download the IPFS software and start hosting and serving files.
Parameters:
hash - The file hash,required
GraphQL
GraphQL is a query language for APIs and a runtime for fulfilling those queries with your existing data.
Parameters:
url - Server endpoint URL, required
query - The query to be executed, required
headers - Additional HTTP headers, optional
Use a smart contract as data source.
Parameters:
chainId - The chainId used to query the contract, required
address - The smartcontract address, required
abi - The function abi (NOT the entire contract abi), required
Arweave is a decentralized data storage that allows permanently storing files over a distributed network of computers.
Parameters:
transactionId - The transaction identifier,required
First-class integrations supported in the future : FilecoinStorjSQL
A service can contain multiple files, using multiple storage types.
Example:
To get information about the files after encryption, the /fileinfo endpoint of the Provider returns based on a passed DID an array of file metadata (based on the file type):
This only concerns metadata about a file, but never the file URLs. The only way to decrypt them is to exchange at least 1 datatoken based on the respective service pricing scheme.
Static URLs.
Interplanetary File System
GraphQL
Smart Contract Data
Arweave
By following the steps above, you can smoothly incorporate the Uploader UI into your application while ensuring the essential providers wrap the necessary components.
Alternatively, the example below shows how you could use uploader-ui-lib with RainbowKit:
** under development
To use Ocean's Uploader UI library in your NextJS project modify your next.config.js file to include these fallbacks:
** add these fallbacks to avoid any issue related to webpack 5 Polyfills imcompatibility: https://github.com/webpack/changelog-v5#automatic-nodejs-polyfills-removed
Install dependencies:
Import the library's CSS into your project:
Dynamically import the Uploader component and ensure it is not processed during server-side rendering (SSR) using the next/dynamic function:
Import component:
When incorporating the Uploader component into your application, make sure to set 'use client' on top in your app's component. This ensures that the component operates on the client side, bypassing SSR when rendering:
This comprehensive setup ensures the proper integration and functioning of the Ocean Protocol's Uploader UI library within a NextJS application.
Access the application form: "Apply to use this channel."
Answer the questions in the application form.
Once you've completed the application process, you can start earning experience points (XP) by actively engaging in discussions on various topics related to the Ocean Protocol.
Additionally, the specific type of datatoken associated with an asset influences the ordering process. There are two common datatoken templates: Template 1 (regular template) and Template 2 (enterprise template). The type of template determines the sequence of method calls required before placing an order.
For assets utilizing Template '1', prior to ordering, you need to perform two separate method calls. First, you need to call the approve method to grant permission for the fixedRateExchange contract to spend the required amount of datatokens. Then, you proceed to call the buyDatatokens method from the fixedRateExchange contract. This process ensures that you have the necessary datatokens in your possession to successfully place the order. Alternatively, if the asset follows a free pricing schema, you can employ the dispenser.dispense method to obtain the free datatoken before proceeding with the order.
On the other hand, assets utilizing Template '2' offer bundled methods for a more streamlined approach. For ordering such assets, you can use methods like buyFromFreeAndOrder or buyFromDispenserAndOrder. These bundled methods handle the acquisition of the necessary datatokens and the subsequent ordering process in a single step, simplifying the workflow for enterprise-template assets.
Later on, when working with the ocean.js library, you can use this order transaction identifier to call the getDownloadUrl method from the provider service class. This method allows you to retrieve the download URL for accessing the asset's files.
Create a new file in the same working directory where the configuration file (config.js) and .env files are present, and copy the code as listed below.
// Note: Make sure .env file and config.js are created and setup correctly
const { oceanConfig } = require("./config.js");
const {
ZERO_ADDRESS,
NftFactory,
getHash,
ProviderFees,
Datatoken,
ProviderInstance,
Nft,
FixedRateExchange,
approve
} = require("@oceanprotocol/lib");
// replace the did here
const did = "did:op:a419f07306d71f3357f8df74807d5d12bddd6bcd738eb0b461470c64859d6f0f";
// This function takes did as a parameter and updates the data NFT information
const consumeAsset = async (did) => {
const consumer = await oceanConfig.consumerAccount.getAddress();
// Fetch ddo from Aquarius
const asset = await await oceanConfig.aquarius.resolve(did);
const nft = new Nft(consumer);
await approve(
Error,
oceanConfig,
await consumer.getAddress(),
oceanConfig.Ocean,
oceanConfig.fixedRateExchangeAddress,
"1"
);
const fixedRate = new FixedRateExchange(
oceanConfig.fixedRateExchangeAddress,
consumer
);
const txBuyDt = await fixedRate.buyDatatokens(
oceanConfig.fixedRateId,
"1",
"2"
);
const initializeData = await ProviderInstance.initialize(
asset.id,
asset.services[0].id,
0,
await consumer.getAddress(),
oceanConfig.providerUri
);
const providerFees: ProviderFees = {
providerFeeAddress: initializeData.providerFee.providerFeeAddress,
providerFeeToken: initializeData.providerFee.providerFeeToken,
providerFeeAmount: initializeData.providerFee.providerFeeAmount,
v: initializeData.providerFee.v,
r: initializeData.providerFee.r,
s: initializeData.providerFee.s,
providerData: initializeData.providerFee.providerData,
validUntil: initializeData.providerFee.validUntil,
};
const datatoken = new Datatoken(consumer);
const tx = await datatoken.startOrder(
oceanConfig.fixedRateExchangeAddress,
await consumer.getAddress(),
0,
providerFees
);
const orderTx = await tx.wait();
const orderStartedTx = getEventFromTx(orderTx, "OrderStarted");
const downloadURL = await ProviderInstance.getDownloadUrl(
asset.id,
asset.services[0].id,
0,
orderTx.transactionHash,
oceanConfig.providerUri,
consumer
);
};
// Call setMetadata(...) function defined above
consumeAsset(did).then(() => {
process.exit();
}).catch((err) => {
console.error(err);
process.exit(1);
});
Prerequisites
The variables AQUARIUS_URL and PROVIDER_URL should be set correctly in .env file
Create a script to consume an asset
The Python script below can be used to run the query and retrieve a list of fixed-rate exchanges. If you wish to change the network, then replace the value of the variable base_url as needed.
Create script
Execute script
Copy the query to fetch a list of fixed-rate exchanges in the Ocean Subgraph GraphiQL interface.
{
fixedRateExchanges(skip:0, first:2, subgraphError:deny){
id
contract
exchangeId
owner{id}
datatoken{
id
name
symbol
}
price
datatokenBalance
active
totalSwapValue
swaps(skip:0, first:1){
tx
by {
id
}
baseTokenAmount
dataTokenAmount
createdTimestamp
}
updates(skip:0, first:1){
oldPrice
newPrice
newActive
createdTimestamp
tx
}
}
}
The execution pod loads the specified algorithm into its environment.
The execution pod securely loads the selected dataset for processing.
The algorithm is executed on the loaded dataset within the isolated execution pod.
The results and logs generated by the algorithm are securely returned to the user.
The execution pod deletes the dataset, algorithm, and itself to ensure data privacy and security.
Compute architecture overview
The interaction between the Consumer and the Provider follows a specific workflow. To initiate the process, the Consumer contacts the Provider by invoking the start(did, algorithm, additionalDIDs) function with parameters such as the data identifier (DID), algorithm, and additional DIDs if required. Upon receiving this request, the Provider generates a unique job identifier (XXXX) and returns it to the Consumer. The Provider then assumes the responsibility of overseeing the remaining steps.
Throughout the computation process, the Consumer has the ability to check the status of the job by making a query to the Provider using the getJobDetails(XXXX) function, providing the job identifier (XXXX) as a reference.
Now, let's delve into the inner workings of the Provider. Initially, it verifies whether the Consumer has sent the appropriate datatokens to gain access to the desired data. Once validated, the Provider interacts with the Operator-Service, a microservice responsible for coordinating the job execution. The Provider submits a request to the Operator-Service, which subsequently forwards the request to the Operator-Engine, the actual compute system in operation.
The Operator-Engine, equipped with functionalities like running Kubernetes compute jobs, carries out the necessary computations as per the requirements. Throughout the computation process, the Operator-Engine informs the Operator-Service of the job's progress. Finally, when the job reaches completion, the Operator-Engine signals the Operator-Service, ensuring that the Provider receives notification of the job's successful conclusion.
Here are the actors/components:
Consumers - The end users who need to use some computing services offered by the same Publisher as the data Publisher.
Operator-Service - Micro-service that is handling the compute requests.
Operator-Engine - The computing systems where the compute will be executed.
Kubernetes - a K8 cluster
Before the flow can begin, these pre-conditions must be met:
The Asset DDO has a compute service.
The Asset DDO compute service must permit algorithms to run on it.
The Asset DDO must specify an Ocean Provider endpoint exposed by the Publisher.
Similar to the access service, the compute service within Ocean Protocol relies on the Ocean Provider, which is a crucial component managed by the asset Publishers. The role of the Ocean Provider is to facilitate interactions with users and handle the fundamental aspects of a Publisher's infrastructure, enabling seamless integration into the Ocean Protocol ecosystem. It serves as the primary interface for direct interaction with the infrastructure where the data is located.
The Ocean Provider encompasses the necessary credentials to establish secure and authorized interactions with the underlying infrastructure. Initially, this infrastructure may be hosted in cloud providers, although it also has the flexibility to extend to on-premise environments if required. By encompassing the necessary credentials, the Ocean Provider ensures the smooth and controlled access to the infrastructure, allowing Publishers to effectively leverage the compute service within Ocean Protocol.
The Operator Service is a micro-service in charge of managing the workflow executing requests.
The main responsibilities are:
Expose an HTTP API allowing for the execution of data access and compute endpoints.
Interact with the infrastructure (cloud/on-premise) using the Publisher's credentials.
Start/stop/execute computing instances with the algorithms provided by users.
Retrieve the logs generated during executions.
Typically the Operator Service is integrated from Ocean Provider, but can be called independently of it.
The Operator Service is in charge of establishing the communication with the K8s cluster, allowing it to:
Register new compute jobs
List the current compute jobs
Get a detailed result for a given job
Stop a running job
The Operator Service doesn't provide any storage capability, all the state is stored directly in the K8s cluster.
The Operator Engine is in charge of orchestrating the compute infrastructure using Kubernetes as backend where each compute job runs in an isolated Kubernetes Pod. Typically the Operator Engine retrieves the workflows created by the Operator Service in Kubernetes, and manage the infrastructure necessary to complete the execution of the compute workflows.
The Operator Engine is in charge of retrieving all the workflows registered in a K8s cluster, allowing to:
Orchestrate the flow of the execution
Start the configuration pod in charge of download the workflow dependencies (datasets and algorithms)
Start the pod including the algorithm to execute
Start the publishing pod that publish the new assets created in the Ocean Protocol network.
The Operator Engine doesn't provide any storage capability, all the state is stored directly in the K8s cluster.
The Pod-Configuration repository works hand in hand with the Operator Engine, playing a vital role in the initialization phase of a job. It carries out essential functions that establish the environment for job execution.
At the core of the Pod-Configuration is a node.js script that dynamically manages the setup process when a job begins within the operator-engine. Its primary responsibility revolves around fetching and preparing the required assets and files, ensuring a smooth and seamless execution of the job. By meticulously handling the environment configuration, the Pod-Configuration script guarantees that all necessary components are in place, setting the stage for a successful job execution.
Fetching Dataset Assets: It fetches the files corresponding to datasets and saves them in the location /data/inputs/DID/. The files are named based on their array index ranging from 0 to X, depending on the total number of files associated with the dataset.
Fetching Algorithm Files: The script then retrieves the algorithm files and stores them in the /data/transformations/ directory. The first file is named 'algorithm', and the subsequent files are indexed from 1 to X, based on the number of files present for the algorithm.
Fetching DDOS: Additionally, the Pod-Configuration fetches Decentralized Document Oriented Storage (DDOS) and saves them to the disk at the location /data/ddos/.
Error Handling: In case of any provisioning failures, whether during data fetching or algorithm processing, the script updates the job status in a PostgreSQL database, and logs the relevant error messages.
Upon the successful completion of its tasks, the Pod-Configuration gracefully concludes its operations and sends a signal to the operator-engine, prompting the initiation of the algorithm pod for subsequent steps. This repository serves as a fundamental component in ensuring the seamless processing of jobs by efficiently managing assets, algorithm files, and addressing potential provisioning errors. By effectively handling these crucial aspects, the Pod-Configuration establishes a solid foundation for smooth job execution and enables the efficient progression of the overall workflow.
Pod Publishing is a command-line utility that seamlessly integrates with the Operator Service and Operator Engine within a Kubernetes-based compute infrastructure. It serves as a versatile tool for efficient processing, logging, and uploading workflow outputs. By working in tandem with the Operator Service and Operator Engine, Pod Publishing streamlines the workflow management process, enabling easy and reliable handling of output data generated during computation tasks. Whether it's processing complex datasets or logging crucial information, Pod Publishing simplifies these tasks and enhances the overall efficiency of the compute infrastructure.
The primary functionality of Pod Publishing can be divided into three key areas:
Interaction with Operator Service: Pod Publishing uploads the outputs of compute workflows initiated by the Operator Service to a designated AWS S3 bucket or the InterPlanetary File System (IPFS). It logs all processing steps and updates a PostgreSQL database.
Role in Publishing Pod: Within the compute infrastructure orchestrated by the Operator Engine on Kubernetes (K8s), Pod Publishing is integral to the Publishing Pod. The Publishing Pod handles the creation of new assets in the Ocean Protocol network after a workflow execution.
Workflow Outputs Management: Pod Publishing manages the storage of workflow outputs. Depending on configuration, it interacts with IPFS or AWS S3, and logs the processing steps.
You have the option to initiate a compute job using one or more data assets. You can explore this functionality by utilizing the and libraries.
Access Control using Ocean Provider
Operator Service
Operator Engine
Pod Configuration
Pod Publishing
Pod Publishing does not provide storage capabilities; all state information is stored directly in the K8s cluster or the respective data storage solution (AWS S3 or IPFS).
The utility works in close coordination with the Operator Service and Operator Engine, but does not have standalone functionality.
The javascript below can be used to run the query and fetch the information of a data NFT. If you wish to change the network, replace the variable's value network as needed. Change the value of the variable datanftAddress with the address of your choice.
The Python script below can be used to run the query and fetch the details about an NFT. If you wish to change the network, replace the variable's value base_url as needed. Change the value of the variable dataNFT_address with the address of the datatoken of your choice.
Create script
dataNFT_information.py
import requestsimport
Execute script
python dataNFT_information.py
Copy the query to fetch the information about a data NFT in the Ocean Subgraph GraphiQL interface. If you want to fetch the information about another NFT, replace the id with the address of your choice.
{
nft (id:"0x1c161d721e6d99f58d47f709cdc77025056c544c", subgraphError:deny){
id
name
symbol
owner
address
assetState
tx
block
transferable
creator
createdTimestamp
providerUrl
managerRole
erc20DeployerRole
storeUpdateRole
metadataRole
tokenUri
template
orderCount
}
}
Sample response
this table
Decentralised Data Marketplace 🌊
A decentralised marketplace for peer-to-peer online workshops.
Music NFTs Marketplace 🎼
A peer-to-peer platform for buying on-demand music NFTs.
Tokengated Content 🔒
A decentralised marketplace for buying & selling AI-generated Art.
Tokengated AI Chatbot 🤖
A decentralised e-commerce platform to sell templates, UI kits and plugins.
Buy & Sell Online Workshops 🎓
A decentralised marketplace for peer-to-peer online workshops.
E-Books On-Demand 📖
A peer-to-peer platform for reading on-demand e-books.
Buy Templates, UI Kits, and plugins 🎨
A decentralized e-commerce platform to sell templates, UI kits, and plugins.
Decentralised Ticketing Mobile App 📱
The first end-to-end decentralized mobile App to buy, sell & trade tickets of any type.
Publish & Collect Digital Art 🖼️
A decentralised marketplace for buying & selling AI-generated Art.
For obtaining the API keys for blockchain access and setting the correct environment variables, please consult this section first and proceed with the next steps.
Create a directory
Let's start with creating a working directory where we store the environment variable file, configuration files, and the scripts.
mkdir my-ocean-project
cd my-ocean-project
Create a .env file
In the working directory create a .env file. The content of this file will store the values for the following variables:
Variable name
Description
Required
The below tabs show partially filled .env file content for some of the supported networks.
Replace <replace this> with the appropriate values. You can see all the networks configuration on Oceanjs' .
In this step, all required dependencies will be installed.
Let's install Ocean.js library into your current project by running:
A configuration file will read the content of the .env file and initialize the required configuration objects which will be used in the further tutorials. The below scripts creates a Web3 wallet instance and an Ocean's configuration object.
Create the configuration file in the working directory i.e. at the same path where the .env is located.
Now you have set up the necessary files and configurations to interact with Ocean Protocol's smart contracts using ocean.js. You can proceed with further tutorials or development using these configurations.
Get datatokens
Discover the World of datatokens: Retrieving a List of datatokens
With your newfound knowledge of fetching data NFTs and retrieving the associated information, fetching a list of datatokens will be a breeze 🌊. Building upon your understanding, let's now delve into the process of retrieving a list of datatokens. By applying similar techniques and leveraging the power of GraphQL queries, you'll be able to effortlessly navigate the landscape of datatokens and access the wealth of information they hold. So, let's dive right in and unlock the potential of exploring datatokens with ease and efficiency.
PS: In this example, the query is executed on the Ocean subgraph deployed on the mainnet. If you want to change the network, please refer to.
The javascript below can be used to run the query. If you wish to change the network, replace the variable's value network as needed.
The Python script below can be used to run the query and fetch a list of datatokens. If you wish to change the network, then replace the value of the variable base_url as needed.
Create script
Execute script
Copy the query to fetch a list of datatokens in the Ocean Subgraph .
Get data NFTs
Discover the World of NFTs: Retrieving a List of Data NFTs
If you are already familiarized with the concept of NFTs, you're off to a great start. However, if you require a refresher, we recommend visiting the data NFTs and datatokens page for a quick overview.
Now, let us delve into the realm of utilizing the subgraph to extract a list of data NFTs that have been published using the Ocean contracts. By employing GraphQL queries, we can seamlessly retrieve the desired information from the subgraph. You'll see how simple it is 😎
You'll find below an example of a GraphQL query that retrieves the first 10 data NFTs from the subgraph. The GraphQL query is structured to access the "nfts" route, extracting the first 10 elements. For each item retrieved, it retrieves the id, name, symbol, owner, address, assetState, tx, block and transferable parameters.
There are several options available to see this query in action. Below, you will find three:
Run the GraphQL query in the GraphiQL interface.
Execute the query in Python by following the code snippet.
Execute the query in JavaScript by clicking on the "Run" button of the Javascript tab.
PS: In these examples, the query is executed on the Ocean subgraph deployed on the mainnet. If you want to change the network, please refer to.
The javascript below can be used to run the query and retrieve a list of NFTs. If you wish to change the network, then replace the value of network variable as needed.
The Python script below can be used to run the query to fetch a list of data NFTs from the subgraph. If you wish to change the network, replace the value of the variable base_url as needed.
Create script
Execute script
Copy the query to fetch a list of data NFTs in the Ocean Subgraph .
Pricing Schemas
Choose the revenue model during asset publishing.
Ocean Protocol offers you flexible and customizable pricing options to monetize your valuable data assets. You have two main pricing models to choose from:
These models are designed to cater to your specific needs and ensure a smooth experience for data consumers.
Fees
The Ocean Protocol defines various fees for creating a sustainability loop.
One transaction may have fees going to several entities, such as the market where the asset was published, or the Ocean Community. Here are all of them:
Publish Market: the market where the asset was published.
Consume Market: the market where the asset was consumed.
Run C2D Jobs
Overview
Compute-to-Data is a powerful feature of Ocean Protocol that enables privacy-preserving data analysis and computation. With Compute-to-Data, data owners can maintain control over their data while allowing external parties to perform computations on that data.
This documentation provides an overview of Compute-to-Data in Ocean Protocol and explains how to use it with Ocean.js. For detailed code examples and implementation details, please refer to the official GitHub repository.
Getting Started
To get started with Compute-to-Data using Ocean.js, follow these steps:
Get datatoken information
Explore the Power of Querying: Unveiling In-Depth Details of Individual Datatokens
To fetch detailed information about a specific datatoken, you can utilize the power of GraphQL queries. By constructing a query tailored to your needs, you can access key parameters such as the datatoken's ID, name, symbol, total supply, creator, and associated dataTokenAddress. This allows you to gain a deeper understanding of the datatoken's characteristics and properties. With this information at your disposal, you can make informed decisions, analyze market trends, and explore the vast potential of datatokens within the Ocean ecosystem. Harness the capabilities of GraphQL and unlock a wealth of datatoken insights.
The result of the following GraphQL query returns the information about a particular datatoken. Here, 0x122d10d543bc600967b4db0f45f80cb1ddee43eb is the address of the datatoken.
PS: In this example, the query is executed on the Ocean subgraph deployed on the mainnet. If you want to change the network, please refer to.
The URL of the Aquarius. This value is needed when reading an asset from off-chain store.
No
PROVIDER_URL
The URL of the Provider. This value is needed when publishing a new asset or update an existing asset.
No
OCEAN_NETWORK
Name of the network where the Ocean Protocol's smart contracts are deployed.
Yes
OCEAN_NETWORK_URL
The URL of the Ethereum node (along with API key for non-local networks)**
Yes
PRIVATE_KEY
The private key of the account which you want to use. A private key is made up of 64 hex characters. Make sure you have sufficient balance to pay for the transaction fees.
Yes
Treat this file as a secret and do not commit this file to git or share the content publicly. If you are using git, then include this file name in .gitignore file.
{"data":{"fixedRateExchanges":[{"active":true,"contract":"0xfa48673a7c36a2a768f89ac1ee8c355d5c367b02","datatoken":{"id":"0x9b39a17cc72c8be4813d890172eff746470994ac","name":"Delightful Pelican Token","symbol":"DELPEL-79"},"datatokenBalance":"0","exchangeId":"0x06284c39b48afe5f01a04d56f1aae45dbb29793b190ee11e93a4a77215383d44","id":"0xfa48673a7c36a2a768f89ac1ee8c355d5c367b02-0x06284c39b48afe5f01a04d56f1aae45dbb29793b190ee11e93a4a77215383d44","owner":{"id":"0x03ef3f422d429bcbd4ee5f77da2917a699f237ed"},"price":"33","swaps":[{"baseTokenAmount":"33.033","by":{"id":"0x9b39a17cc72c8be4813d890172eff746470994ac"},"createdTimestamp":1656563684,"dataTokenAmount":"1","tx":"0x0b55482f69169c103563062e109f9d71afa01d18f201c425b24b1c74d3c282a3"}],"totalSwapValue":"0","updates":[]},{"active":true,"contract":"0xfa48673a7c36a2a768f89ac1ee8c355d5c367b02","datatoken":{"id":"0x2cf074e36a802241f2f8ddb35f4a4557b8f1179b","name":"Arcadian Eel Token","symbol":"ARCEEL-17"},"datatokenBalance":"0","exchangeId":"0x2719862ebc4ed253f09088c878e00ef8ee2a792e1c5c765fac35dc18d7ef4deb","id":"0xfa48673a7c36a2a768f89ac1ee8c355d5c367b02-0x2719862ebc4ed253f09088c878e00ef8ee2a792e1c5c765fac35dc18d7ef4deb","owner":{"id":"0x87b5606fba13529e1812319d25c6c2cd5c3f3cbc"},"price":"35","swaps":[],"totalSwapValue":"0","updates":[]}]}}
{"data":{"nft":{"address":"0x1c161d721e6d99f58d47f709cdc77025056c544c","assetState":0,"block":15185270,"createdTimestamp":1658397870,"creator":"0xd30dd83132f2227f114db8b90f565bca2832afbd","erc20DeployerRole":["0x1706df1f2d93558d1d77bed49ccdb8b88fafc306"],"id":"0x1c161d721e6d99f58d47f709cdc77025056c544c","managerRole":["0xd30dd83132f2227f114db8b90f565bca2832afbd"],"metadataRole":null,"name":"Ocean Data NFT","orderCount":"1","owner":"0xd30dd83132f2227f114db8b90f565bca2832afbd","providerUrl":"https://v4.provider.mainnet.oceanprotocol.com","storeUpdateRole":null,"symbol":"OCEAN-NFT","template":"","tokenUri":"<removed>","transferable":true,"tx":"0x327a9da0d2e9df945fd2f8e10b1caa77acf98e803c5a2f588597172a0bcbb93a"}}}
The price of an asset is determined by the number of tokens (this can be OCEAN or any ERC20 Token configured when published the asset) a buyer must pay to access the data. When users pay the tokens, they get a datatoken in their wallets, a tokenized representation of the access right stored on the blockchain. To read more about datatoken and data NFT click here.
To provide you with even greater flexibility in monetizing your data assets, Ocean Protocol allows you to customize the pricing schema by configuring your own ERC20 token when publishing the asset. This means that instead of using OCEAN as the pricing currency, you can utilize your own token, aligning the pricing structure with your specific requirements and preferences.
You can customised your token this way:
NEXT_PUBLIC_OCEAN_TOKEN_ADDRESS='0x00000'// YOUR TOKEN'S ADDRESS
Furthermore, Ocean Protocol recognizes that different data assets may have distinct pricing needs. That's why the platform supports multiple pricing schemas, allowing you to implement various pricing models for different datasets or use cases. This flexibility ensures that you can tailor the pricing strategy to each specific asset, maximizing its value and potential for monetization.
Pricing Schemas
With the fixed pricing model, you have the power to set a specific price for your data assets. This means that buyers interested in accessing your data will need to pay the designated amount of configured tokens. To make things even easier, Ocean automatically creates a special token called a "datatoken" behind the scenes.
This datatoken represents the access right to your data, so buyers don't have to worry about the technical details. If you ever want to adjust the price of your dataset, you have the flexibility to do so whenever you need.
The fixed pricing model relies on the createWithDecimals in the smart contract, which securely stores the pricing information for assets published using this model.
On the other hand, the free pricing model gives data consumers access to your asset without requiring them to make a direct payment. Users can freely access your data, with the only cost being the transaction fees associated with the blockchain network.
In this model, datatokens are allocated to a dispenser smart contract, which dispenses data tokens to users at no charge when they access your asset. This is perfect if you want to make your data widely available and encourage collaboration. It's particularly suitable for individuals and organizations working in the public domain or for assets that need to comply with open-access licenses.
The free pricing model relies on the create in the smart contract, which securely stores the pricing information for assets published using this model.
To make the most of these pricing models, you can rely on user-friendly libraries such as Ocean.js and Ocean.py, specifically developed for interacting with Ocean Protocol.
With Ocean.js, you can use the createFRE() function to effortlessly deploy a data NFT (non-fungible token) and datatoken with a fixed-rate exchange pricing model. Similarly, in Ocean.py, the create_url_asset() function allows you to create an asset with fixed pricing. These libraries simplify the process of interacting with Ocean Protocol, managing pricing, and handling asset creation.
By taking advantage of Ocean Protocol's pricing options and leveraging the capabilities of Ocean.js and Ocean.py (or by using the Market), you can effectively monetize your data assets while ensuring transparent and seamless access for data consumers.
In the case of , when you deploy a fixed rate exchange, the funds generated as revenue are automatically sent to the owner's address. The owner receives the revenue without any manual intervention.
On the other hand, with , for a fixed rate exchange, the revenue is available at the fixed rate exchange level. The owner or the payment collector has the authority to manually retrieve the revenue.
Free pricing
Create NFT with Free Pricing
Provider: the entity facilitating asset consumption. May serve up data, run compute, etc.
Ocean Community: Ocean Community Wallet.
When you publish an asset on the Ocean marketplace, there are currently no charges for publishing fees 🎉
However, if you're building a custom marketplace, you have the flexibility to include a publishing fee by adding an extra transaction in the publish flow. Depending on your marketplace's unique use case, you, as the marketplace owner, can decide whether or not to implement this fee. We believe in giving you the freedom to tailor your marketplace to your specific needs and preferences.
Value in Ocean Market
Value in Other Markets
0%
Customizable in market config.
Swap fees are incurred as a transaction cost whenever someone exchanges one type of token for another within a fixed rate exchange. These exchanges can involve swapping a datatoken for a basetoken, like OCEAN or H2O, or vice versa, where basetoken is exchanged for datatoken. The specific value of the swap fee depends on the type of token being used in the exchange.
The swap fee values are set at the smart contract level and can only be modified by the Ocean Protocol Foundation (OPF).
Value for OCCEAN or H2O
Value for other ERC20 tokens
0.1%
0.2%
When a user exchanges a datatoken for the privilege of downloading an asset or initiating a compute job that utilizes the asset, consume fees come into play. These fees are associated with accessing an asset and include:
Ocean's smart contracts collect Ocean Community fees during order operations. These fees are reinvested in community projects and distributed to the veOCEAN holders through Data Farming.
This fee is set at the level.
Each of these fees plays a role in ensuring fair compensation and supporting the Ocean community.
Fee
Value in Ocean Market
Value in Other Markets
Publisher Market
0
Customizable in market config.
Consume Market
0
Providers facilitate data consumption, initiate compute jobs, encrypt and decrypt DDOs, and verify user access to specific data assets or services.
Provider fees serve as compensation to the individuals or organizations operating their own provider instances when users request assets.
You can retrieve them when calling the initialize endpoint.
These fees can be set as a fixed amount rather than a percentage.
Providers have the flexibility to specify the token in which the fees must be paid, which can differ from the token used in the consuming market.
Provider fees can be utilized to charge for resources. Consumers can select the desired payment amount based on the compute resources required to execute an algorithm within the environment, aligning with their specific needs.
Eg: A provider can charge a fixed fee of 10 USDT per consume, irrespective of the pricing schema used (e.g., fixed rate with ETH, BTC, dispenser).
Eg: A provider may impose a fixed fee of 15 DAI to reserve compute resources for 1 hour, enabling the initiation of compute jobs.
These fees play a crucial role in incentivizing individuals and organizations to operate provider instances and charge consumers based on their resource usage. By doing so, they contribute to the growth and sustainability of the Ocean Protocol ecosystem.
Type
OPF Provider
3rd party Provider
Token to charge the fee: PROVIDER_FEE_TOKEN
OCEAN
Customizable by the Provider Owner.
E.g. USDC
Download: COST_PER_MB
0
Publish fee
Swap fee
Consume(aka. Order) fee
Update Ocean Community Fees
The Ocean Protocol Foundation can the Ocean community fees.
Provider fee
Stay up-to-date with the latest information! The values within the system are regularly updated. We recommend verifying the most recent values directly from the and the .
Environment Setup: Ensure that you have the necessary dependencies and libraries installed to work with Ocean.js. Refer to the Ocean.js documentation for detailed instructions on setting up your development environment.
Connecting to the Ocean Protocol Network: Establish a connection to the Ocean Protocol network using Ocean.js. This connection will enable you to interact with the various components of Ocean Protocol, including Compute-to-Data.
Registering a Compute-to-Data Service: As a data provider, you can register a Compute-to-Data service using Ocean.js. This process involves specifying the data you want to expose and defining the computation tasks that can be performed on it.
Searching and Consuming Compute-to-Data Services: As a data consumer, you can search for Compute-to-Data services available on the Ocean Protocol network. Utilize Ocean.js to discover services based on data types, pricing, and other parameters.
Executing Computations on Data: Once you have identified a suitable Compute-to-Data service, use Ocean.js to execute computations on the provided data. The actual computation is performed by the service provider, and the results are securely returned to you.
Please note that the implementation details of Compute-to-Data can vary depending on your specific use case. The code examples available in the Ocean.js GitHub repository provide comprehensive illustrations of working with Compute-to-Data in Ocean Protocol. Visit ComputeExamples.md for detailed code snippets and explanations that guide you through leveraging Compute-to-Data capabilities.
// Note: Make sure .env file and config.js are created and setup correctly
const { oceanConfig } = require('./config.js');
const { ZERO_ADDRESS, NftFactory, getHash, Nft } = require ('@oceanprotocol/lib');
// replace the did here
const datasetDid = "did:op:a419f07306d71f3357f8df74807d5d12bddd6bcd738eb0b461470c64859d6f0f";
const algorithmDid = "did:op:a419f07306d71f3357f8df74807d5d12bddd6bcd738eb0b461470c64859d6f0f";
// This function takes dataset and algorithm dids as a parameters,
// and starts a compute job for them
const startComputeJob = async (datasetDid, algorithmDid) => {
const consumer = await oceanConfig.consumerAccount.getAddress();
// Fetch the dataset and the algorithm from Aquarius
const dataset = await await oceanConfig.aquarius.resolve(datasetDid);
const algorithm = await await oceanConfig.aquarius.resolve(algorithmDid);
// Let's fetch the compute environments and choose the free one
const computeEnv = computeEnvs[resolvedDatasetDdo.chainId].find(
(ce) => ce.priceMin === 0
)
// Request five minutes of compute access
const mytime = new Date()
const computeMinutes = 5
mytime.setMinutes(mytime.getMinutes() + computeMinutes)
const computeValidUntil = Math.floor(mytime.getTime() / 1000
// Let's initialize the provider for the compute job
const asset: ComputeAsset[] = {
documentId: dataset.id,
serviceId: dataset.services[0].id
}
const algo: ComputeAlgorithm = {
documentId: algorithm.id,
serviceId: algorithm.services[0].id
}
const providerInitializeComputeResults = await ProviderInstance.initializeCompute(
assets,
algo,
computeEnv.id,
computeValidUntil,
providerUrl,
await consumerAccount.getAddress()
)
await approve(
consumerAccount,
config,
await consumerAccount.getAddress(),
addresses.Ocean,
datasetFreAddress,
'100'
)
await approve(
consumerAccount,
config,
await consumerAccount.getAddress(),
addresses.Ocean,
algoFreAddress,
'100'
)
const fixedRate = new FixedRateExchange(fixedRateExchangeAddress, consumerAccount)
const buyDatasetTx = await fixedRate.buyDatatokens(datasetFreAddress, '1', '2')
const buyAlgoTx = await fixedRate.buyDatatokens(algoFreAddress, '1', '2')
// We now order both the dataset and the algorithm
algo.transferTxId = await handleOrder(
providerInitializeComputeResults.algorithm,
algorithm.services[0].datatokenAddress,
consumerAccount,
computeEnv.consumerAddress,
0
)
asset.transferTxId = await handleOrder(
providerInitializeComputeResults.datasets[0],
dataset.services[0].datatokenAddress,,
consumerAccount,
computeEnv.consumerAddress,
0
)
// Start the compute job for the given dataset and algorithm
const computeJobs = await ProviderInstance.computeStart(
providerUrl,
consumerAccount,
computeEnv.id,
assets[0],
algo
)
return computeJobs[0].jobId
};
const checkIfJobFinished = async (jobId) => {
const jobStatus = await ProviderInstance.computeStatus(
providerUrl,
await consumerAccount.getAddress(),
computeJobId,
DATASET_DDO.id
)
if (jobStatus?.status === 70) return true
else checkIfJobFinished(jobId)
}
const checkIfJobFinished = async (jobId) => {
const jobStatus = await ProviderInstance.computeStatus(
providerUrl,
await consumerAccount.getAddress(),
computeJobId,
DATASET_DDO.id
)
if (jobStatus?.status === 70) return true
else checkIfJobFinished(jobId)
}
const downloadComputeResults = async (jobId) => {
const downloadURL = await ProviderInstance.getComputeResultUrl(
oceanConfig.providerURI,
oceanConfig.consumerAccount,
jobId,
0
)
}
// Call startComputeJob(...) checkIfJobFinished(...) downloadComputeResults(...)
// functions defined above in that particular order
startComputeJob(datasetDid, algorithmDid).then((jobId) => {
checkIfJobFinished(jobId).then((result) => {
downloadComputeResults(jobId).then((result) => {
process.exit();
})
})
}).catch((err) => {
console.error(err);
process.exit(1);
});
Prerequisites
The variable AQUARIUS_URL and PROVIDER_URL should be set correctly in .env file
Create a script that starts compute to data using an already published dataset and algorithm
The javascript below can be used to run the query and fetch the information of a datatoken. If you wish to change the network, replace the variable's value network as needed. Change the value of the variable datatokenAddress with the address of your choice.
The Python script below can be used to run the query and fetch a datatoken information. If you wish to change the network, replace the variable's value base_url as needed. Change the value of the variable datatoken_address with the address of the datatoken of your choice.
Create script
datatoken_information.py
import requestsimport
Execute script
python datatoken_information.py
Copy the query to fetch the information of a datatoken in the Ocean Subgraph GraphiQL interface.
{
token(id:"0x122d10d543bc600967b4db0f45f80cb1ddee43eb", subgraphError: deny){
id
symbol
nft {
name
symbol
address
}
name
symbol
cap
isDatatoken
holderCount
orderCount
orders(skip:0,first:1){
amount
serviceIndex
payer {
id
}
consumer{
id
}
estimatedUSDValue
lastPriceToken
lastPriceValue
}
}
fixedRateExchanges(subgraphError:deny){
id
price
active
}
}
Sample response
this table
python list_all_tokens.py
{
tokens(skip:0, first: 2, subgraphError: deny){
id
symbol
nft {
name
symbol
address
}
name
symbol
cap
isDatatoken
holderCount
orderCount
orders(skip:0,first:1){
amount
serviceIndex
payer {
id
}
consumer{
id
}
estimatedUSDValue
lastPriceToken
lastPriceValue
}
}
}
This tutorial guides you through the process of creating your own data NFT and a datatoken using Ocean libraries. To know more about data NFTs and datatokens please refer this page. Ocean Protocol supports different pricing schemes which can be set while publishing an asset. Please refer this page for more details on pricing schemes.
Create a new file in the same working directory where configuration file (config.js) and .env files are present, and copy the code as listed below.
The code utilizes methods such as NftFactory and Datatoken from the Ocean libraries to enable you to interact with the Ocean Protocol and perform various operations related to data NFTs and datatokens.
The createFRE() performs the following:
Creates a web3 instance and import Ocean configs.
Retrieves the accounts from the web3 instance and sets the publisher.
Defines parameters for the data NFT, including name, symbol, template index, token URI, transferability, and owner.
Execute script
By utilizing these dependencies and configuration settings, the script can leverage the functionalities provided by the Ocean libraries and interact with the Ocean Protocol ecosystem effectively.
Compute Options
Specification of compute options for assets in Ocean Protocol.
Compute Options
An asset categorized as a compute type incorporates additional attributes under the compute object.
These attributes are specifically relevant to assets that fall within the compute category and are not required for assets classified under the access type. However, if an asset is designated as compute, it is essential to include these attributes to provide comprehensive information about the compute service associated with the asset.
Attribute
Type
Description
* Required
The publisherTrustedAlgorithms is an array of objects that specifies algorithm permissions. It controls which algorithms can be used for computation. If not defined or empty array, any published algorithm will not allowed. If it is defined containing *, any published algorithm is allowed by the dataset and permit running compute jobs. However, if the array is not empty, only algorithms published by the defined publishers are permitted.
The structure of each object within the publisherTrustedAlgorithms array is as follows:
Attribute
Type
Description
To produce filesChecksum, call the Provider FileInfoEndpoint with parameter withChecksum = True. If the algorithm has multiple files, filesChecksum is a concatenated string of all files checksums (ie: checksumFile1+checksumFile2 , etc)
To produce containerSectionChecksum:
Sometimes, the asset needs additional input data before downloading or running a Compute-to-Data job. Examples:
The publisher needs to know the sampling interval before the buyer downloads it. Suppose the dataset URL is https://example.com/mydata. The publisher defines a field called sampling and asks the buyer to enter a value. This parameter is then added to the URL of the published dataset as query parameters: https://example.com/mydata?sampling=10.
An algorithm that needs to know the number of iterations it should perform. In this case, the algorithm publisher defines a field called iterations. The buyer needs to enter a value for the iterations
The consumerParameters is an array of objects. Each object defines a field and has the following structure:
Attribute
Type
Description
* Required
Each option is an object containing a single key: value pair where the key is the option name, and the value is the option value.
Algorithms will have access to a JSON file located at /data/inputs/algoCustomData.json, which contains the keys/values input data required. Example:
The DDO instantiation within the DDO.js library is done through static class DDOManager which returns the dedicated DDO class according to DDO's version.
Defines parameters for the datatoken, including name, symbol, template index, cap, fee amount, payment collector address, fee token address, minter, and multi-party fee address.
Defines parameters for the price schema, including the fixed rate address, base token address, owner, market fee collector, base token decimals, datatoken decimals, fixed rate, market fee, and optional parameters.
Uses the NftFactory to create a data NFT and datatoken with the fixed rate exchange, using the specified parameters.
Retrieves the addresses of the data NFT and datatoken from the result.
Returns the data NFT and datatoken addresses.
Create a script to deploy a data NFT and datatoken with the price schema you chose.
Fees: The code snippets below define fees related parameters. Please refer fees page for more details
If not defined or empty array, then any algorithm will not be allowed by that specific dataset. If the list contains wildcard '*', all algorithms are trusted & allowed by the compute asset. (see below).
containerSectionChecksum
string
Hash of algorithm's image details (as string).
parameter. Later, this value is stored in a specific location in the Compute-to-Data pod for the algorithm to read and use it.
label*
string
The field label which is displayed
required*
boolean
If customer input for this field is mandatory.
description*
string
The field description.
default*
string, number, or boolean
The field default value. For select types, string key of default option.
options
Array of option
For select types, a list of options.
allowRawAlgorithm*
boolean
If true, any passed raw text will be allowed to run. Useful for an algorithm drag & drop use case, but increases risk of data escape through malicious user input. Should be false by default in all implementations.
allowNetworkAccess*
boolean
If true, the algorithm job will have network access.
publisherTrustedAlgorithmPublishers*
Array of string
If not defined or empty array, then any publisher address has **restricted** access to run the algorithm against that specific dataset. If the list contains wildcard '*', all publishers are allowed to run compute jobs against that dataset.
publisherTrustedAlgorithms*
did
string
The DID of the algorithm which is trusted by the publisher.
filesChecksum
string
Hash of algorithm's files (as string).
name*
string
The parameter name (this is sent as HTTP param or key towards algo)
type*
string
The field type (text, number, boolean, select)
Trusted Algorithms
Compute Options Example
Example:
Consumer Parameters
Consumer Parameters Example
Key Value Example
Array of publisherTrustedAlgorithms
DDO Manager has 3 children classes:
V4DDO for 4.1.0, 4.3.0, 4.5.0, 4.7.0
V5DDO for 5.0.0 which contains the credentials subject used for enterprise purposes
DeprecatedDDO for deprecated which represents a shorter form of DDO due to deprecated state for the NFT field (value of NFT state is different than 0).
DDO V4 example:
DDO V5 example:
Deprecated DDO Example:
Now let's use these DDO examples, DDOExampleV4, DDOExampleV5, deprecatedDDO into the following javascript code, assuming @oceanprotocol/ddo-js has been installed as dependency before:
/**
* @dev createNftWithErc20WithFixedRate
* Creates a new NFT, then a ERC20, then a FixedRateExchange, all in one call
* Use this carefully, because if Fixed Rate creation fails, you are still going to pay a lot of gas
* @param _NftCreateData input data for NFT Creation
* @param _ErcCreateData input data for ERC20 Creation
* @param _FixedData input data for FixedRate Creation
*/
function createNftWithErc20WithFixedRate(
NftCreateData calldata _NftCreateData,
ErcCreateData calldata _ErcCreateData,
FixedData calldata _FixedData
) external nonReentrant returns (address erc721Address, address erc20Address, bytes32 exchangeId){
//we are adding ourselfs as a ERC20 Deployer, because we need it in order to deploy the fixedrate
erc721Address = deployERC721Contract(
_NftCreateData.name,
_NftCreateData.symbol,
_NftCreateData.templateIndex,
address(this),
address(0),
_NftCreateData.tokenURI,
_NftCreateData.transferable,
_NftCreateData.owner);
erc20Address = IERC721Template(erc721Address).createERC20(
_ErcCreateData.templateIndex,
_ErcCreateData.strings,
_ErcCreateData.addresses,
_ErcCreateData.uints,
_ErcCreateData.bytess
);
exchangeId = IERC20Template(erc20Address).createFixedRate(
_FixedData.fixedPriceAddress,
_FixedData.addresses,
_FixedData.uints
);
// remove our selfs from the erc20DeployerRole
IERC721Template(erc721Address).removeFromCreateERC20List(address(this));
}
/**
* @dev createNftWithErc20WithDispenser
* Creates a new NFT, then a ERC20, then a Dispenser, all in one call
* Use this carefully
* @param _NftCreateData input data for NFT Creation
* @param _ErcCreateData input data for ERC20 Creation
* @param _DispenserData input data for Dispenser Creation
*/
function createNftWithErc20WithDispenser(
NftCreateData calldata _NftCreateData,
ErcCreateData calldata _ErcCreateData,
DispenserData calldata _DispenserData
) external nonReentrant returns (address erc721Address, address erc20Address){
//we are adding ourselfs as a ERC20 Deployer, because we need it in order to deploy the fixedrate
erc721Address = deployERC721Contract(
_NftCreateData.name,
_NftCreateData.symbol,
_NftCreateData.templateIndex,
address(this),
address(0),
_NftCreateData.tokenURI,
_NftCreateData.transferable,
_NftCreateData.owner);
erc20Address = IERC721Template(erc721Address).createERC20(
_ErcCreateData.templateIndex,
_ErcCreateData.strings,
_ErcCreateData.addresses,
_ErcCreateData.uints,
_ErcCreateData.bytess
);
IERC20Template(erc20Address).createDispenser(
_DispenserData.dispenserAddress,
_DispenserData.maxTokens,
_DispenserData.maxBalance,
_DispenserData.withMint,
_DispenserData.allowedSwapper
);
// remove our selfs from the erc20DeployerRole
IERC721Template(erc721Address).removeFromCreateERC20List(address(this));
}
/**
* @dev updateOPCFee
* Updates OP Community Fees
* @param _newSwapOceanFee Amount charged for swapping with ocean approved tokens
* @param _newSwapNonOceanFee Amount charged for swapping with non ocean approved tokens
* @param _newConsumeFee Amount charged from consumeFees
* @param _newProviderFee Amount charged for providerFees
*/
function updateOPCFee(uint256 _newSwapOceanFee, uint256 _newSwapNonOceanFee,
uint256 _newConsumeFee, uint256 _newProviderFee) external onlyRouterOwner {
swapOceanFee = _newSwapOceanFee;
swapNonOceanFee = _newSwapNonOceanFee;
consumeFee = _newConsumeFee;
providerFee = _newProviderFee;
emit OPCFeeChanged(msg.sender, _newSwapOceanFee, _newSwapNonOceanFee, _newConsumeFee, _newProviderFee);
}
{"data":{"fixedRateExchanges":[{"active":true,"id":"0xfa48673a7c36a2a768f89ac1ee8c355d5c367b02-0x06284c39b48afe5f01a04d56f1aae45dbb29793b190ee11e93a4a77215383d44","price":"33"},{"active":true,"id":"0xfa48673a7c36a2a768f89ac1ee8c355d5c367b02-0x2719862ebc4ed253f09088c878e00ef8ee2a792e1c5c765fac35dc18d7ef4deb","price":"35"},{"active":true,"id":"0xfa48673a7c36a2a768f89ac1ee8c355d5c367b02-0x2dccaa373e4b65d5ec153c150270e989d1bda1efd3794c851e45314c40809f9c","price":"33"}],"token":{"cap":"115792089237316195423570985008687900000000000000000000000000","holderCount":"0","id":"0x122d10d543bc600967b4db0f45f80cb1ddee43eb","isDatatoken":true,"name":"Brave Lobster Token","nft":{"address":"0xea615374949a2405c3ee555053eca4d74ec4c2f0","name":"Ocean Data NFT","symbol":"OCEAN-NFT"},"orderCount":"0","orders":[],"symbol":"BRALOB-11"}}}
Networks
All the public networks the Ocean Protocol contracts are deployed to.
Ocean Protocol's smart contracts and OCEAN are deployed on multiple public networks: several production chains, and several testnets too.
The file address.json holds up-to-date deployment addresses for all Ocean contracts.
On tokens:
You need the network's native token to pay for gas to make transactions: ETH for Ethereum mainnet, MATIC for Polygon, etc. You typically get these from exchanges.
You may get OCEAN from an exchange, and bridge it as needed.
For testnets, you'll need "fake" native tokens to pay for gas, and "fake" OCEAN. Typically, you get these from faucets.
Below, we give token-related instructions, for each network.
Here are the networks that Ocean is deployed to.
Production Networks:
Ethereum mainnet
Polygon mainnet
Oasis Sapphire mainnet
Test Networks:
Görli
Sepolia
Oasis Sapphire testnet
The rest of this doc gives details for each network. You can skip it until you need the reference information.
Native token
ETH
Wallet. To connect to Ethereum mainnet with e.g. MetaMask, click on the network name dropdown and select "Ethereum mainnet" from the list.
Native token
MATIC
Wallet. If you can't find Polygon Mainnet as a predefined network, follow .
Bridge. Follow the in our docs.
is deployed on Oasis Sapphire mainnet for its ability to keep EVM transactions private. This deployment does do not currently support ocean.js, ocean.py, or Ocean Market.
Native token
ROSE
Wallet. If you cannot find Oasis Sapphire Mainnet as a predefined network, fyou can manually connect by entering the following during import: Network Name: Oasis Sapphire, RPC URL: https://sapphire.oasis.io, Chain ID: 23294, Token: ROSE. For further info, see .
Bridge. Use to bridge OCEAN from Ethereum mainnet to Oasis Sapphire mainnet.
Native token
BSC BNB
This is one of the -spawned chains. BNB is the token of Binance.
Wallet. If BNB Smart Chain is not listed as a predefined network in your wallet, see to manually connect.
Bridge. Our describes how to get OCEAN to BNB Smart Chain.
Native token
Energy Web Chain EWT
This is the chain for .
Wallet. If you cannot find Energy Web Chain as a predefined network in your wallet, you can manually connect to it by following this .
Bridge. To bridge assets between Ethereum Mainnet and Energy Web Chain and Ethereum mainnet, you can use .
Native token
ETH
Wallet. If you cannot find Optimism as a predefined network in your wallet, you can manually connect to with .
Bridge. Follow the .
Native token
Moonriver MOVR
is an EVM-based parachain of Kusama.
Wallet. If Moonriver is not listed as a predefined network in your wallet, you can manually connect to it by following .
Bridge. To bridge assets between Moonriver and Ethereum mainnet, you can use the .
Unlike production networks, tokens on test networks do not hold real economic value.
Native token
Sepolia (fake) ETH
Wallet. To connect with e.g. MetaMask, select "Sepolia" from the network dropdown list(enable "Show test networks").
is deployed on Oasis Sapphire testnet. This deployment does do not currently support ocean.js, ocean.py, or Ocean Market.
Native token
(fake) ROSE
Wallet. If you cannot find Oasis Sapphire Testnet as a predefined network, you can manually connect to it by entering the following during import: Network Name: Oasis Sapphire Testnet, RPC URL: https://testnet.sapphire.oasis.dev, Chain ID: 23295, Token: ROSE. For further info, see .
Native token
Sepolia (fake) ETH
Wallet. If OP Sepolia is not listed as a predefined network, follow .
Next:
Back:
General Endpoints
Nonce
Retrieves the last-used nonce value for a specific user's Ethereum address.
Endpoint: GET /api/services/nonce
Parameters: userAddress: This is a string that should contain the Ethereum address of the user. It is passed as a query parameter in the URL.
Purpose: This endpoint is used to fetch the last-used nonce value for a user's Ethereum address. A nonce is a number that can only be used once, and it's typically used in cryptography to prevent replay attacks. While this endpoint provides the last-used nonce, it's recommended to use the current UTC timestamp as a nonce, where required in other endpoints.
Here are some typical responses you might receive from the API:
200: This is a successful HTTP response code. It means the server has successfully processed the request and returns a JSON object containing the nonce value.
Example response:
Retrieves Content-Type and Content-Length from the given URL or asset.
Endpoint: POST /api/services/fileinfo
Parameters: The body of the request should contain a JSON object with the following properties:
did
Example response:
Endpoint: GET /api/services/download
Parameters: The query parameters for this endpoint should contain the following properties:
documentId
Before calling the /download endpoint, you need to follow these steps:
You need to set up and connect a wallet for the consumer. The consumer needs to have purchased the datatoken for the asset that you are trying to download. Libraries such as ocean.js or ocean.py can be used for this.
Get the nonce. This can be done by calling the /getnonce endpoint above.
Sign a message from the account that has purchased the datatoken.
In order to consume a data service the user is required to send one datatoken to the provider.
The datatoken is transferred on the blockchain by requesting the user to sign an ERC20 approval transaction where the approval is given to the provider's account for the number of tokens required by the service.
Endpoint: GET /api/services/initialize
Parameters: The query parameters for this endpoint should contain the following properties:
documentId
Example response:
Asset Requests
The universal Aquarius Endpoint is .
A method for retrieving all information about the asset using a unique identifier known as a Decentralized Identifier (DID).
Endpoint: GET /api/aquarius/assets/ddo/<did>
Compute Endpoints
All compute endpoints respond with an Array of status objects, each object describing a compute job info.
Each status object will contain:
Status description (statusText): (see Operator-Service for full status list)
status
Description
Get datatoken buyers
Query the Subgraph to see the buyers of a datatoken.
The result of the following GraphQL query returns the list of buyers for a particular datatoken. Here, 0xc22bfd40f81c4a28c809f80d05070b95a11829d9 is the address of the datatoken.
PS: In this example, the query is executed on the Ocean subgraph deployed on the Sepolia network. If you want to change the network, please refer to.
The javascript below can be used to run the query and fetch the list of buyers for a datatoken. If you wish to change the network, replace the variable's value network as needed. Change the value of the variable datatoken with the address of your choice.
Warming up
10
Job started
20
Configuring volumes
30
Provisioning success
31
Data provisioning failed
32
Algorithm provisioning failed
40
Running algorith
50
Filtering results
60
Publishing results
70
Job completed
Endpoint: POST /api/services/compute
Start a new job
Parameters
Returns: Array of status objects as described above, in this case the array will have only one object
Example:
Response:
Get all jobs and corresponding stats
Parameters
Returns
Array of status objects as described above
Example:
Response:
Allows download of asset data file.
Parameters
Returns: Bytes string containing the compute result.
Example:
Response:
Stop a running compute job.
Parameters
Returns
Array of status objects as described above
Example:
Response:
Delete a compute job and all resources associated with the job. If job is running it will be stopped first.
Parameters
Returns
Array of status objects as described above
Example:
Response:
Allows download of asset data file.
Parameters
Returns: List of compute environments.
Example:
Response:
1
Create or restart compute job
Status and Result
GET /api/services/compute
GET /api/services/computeResult
Stop
PUT /api/services/compute
Delete
DELETE /api/services/compute
GET /api/services/computeEnvironments
owner:The owner of this compute job
documentId: String object containing document id (e.g. a DID)
jobId: String object containing workflowId
dateCreated: Unix timestamp of job creation
dateFinished: Unix timestamp when job finished (null if job not finished)
status: Int, see below for list
statusText: String, see below
algorithmLogUrl: URL to get the algo log (for user)
resultsUrls: Array of URLs for algo outputs
resultsDid: If published, the DID
signature: String object containing user signature (signed message) (required)
consumerAddress: String object containing consumer's ethereum address (required)
nonce: Integer, Nonce (required)
environment: String representing a compute environment offered by the provider
dataset: Json object containing dataset information
dataset.documentId: String, object containing document id (e.g. a DID) (required)
dataset.serviceId: String, ID of the service the datatoken is attached to (required)
dataset.transferTxId: Hex string, the id of on-chain transaction for approval of datatokens transfer
given to the provider's account (required)
dataset.userdata: Json, user-defined parameters passed to the dataset service (optional)
algorithm: Json object, containing algorithm information
algorithm.documentId: Hex string, the did of the algorithm to be executed (optional)
algorithm.meta: Json object, defines the algorithm attributes and url or raw code (optional)
algorithm.serviceId: String, ID of the service to use to process the algorithm (optional)
algorithm.transferTxId: Hex string, the id of on-chain transaction of the order to use the algorithm (optional)
algorithm.userdata: Json, user-defined parameters passed to the algorithm running service (optional)
algorithm.algocustomdata: Json object, algorithm custom parameters (optional)
additionalDatasets: Json object containing a list of dataset objects (optional)
One of `algorithm.documentId` or `algorithm.meta` is required, `algorithm.meta` takes precedence
signature: String object containing user signature (signed message)
documentId: String object containing document did (optional)
jobId: String object containing workflowID (optional)
consumerAddress: String object containing consumer's address (optional)
At least one parameter from documentId, jobId and owner is required (can be any of them)
GET /api/services/compute?signature=0x00110011&documentId=did:op:1111&jobId=012023
jobId: String object containing workflowId (optional)
index: Integer, index of the result to download (optional)
consumerAddress: String object containing consumer's address (optional)
nonce: Integer, Nonce (required)
signature: String object containing user signature (signed message)
GET /api/services/computeResult?index=0&consumerAddress=0xA78deb2Fa79463945C247991075E2a0e98Ba7A09&jobId=4d32947065bb46c8b87c1f7adfb7ed8b&nonce=1644317370
signature: String object containing user signature (signed message)
documentId: String object containing document did (optional)
jobId: String object containing workflowID (optional)
consumerAddress: String object containing consumer's address (optional)
At least one parameter from documentId,jobId and owner is required (can be any of them)
PUT /api/services/compute?signature=0x00110011&documentId=did:op:1111&jobId=012023
signature: String object containing user signature (signed message)
documentId: String object containing document did (optional)
jobId: String object containing workflowId (optional)
consumerAddress: String object containing consumer's address (optional)
At least one parameter from documentId, jobId is required (can be any of them)
in addition to consumerAddress and signature
: This is a string representing the Decentralized Identifier (DID) of the dataset.
serviceId: This is a string representing the ID of the service.
Purpose: This endpoint is used to retrieve the Content-Type and Content-Length from a given URL or asset. For published assets, did and serviceId should be provided. It also accepts file objects (as described in the Ocean Protocol documentation) and can compute a checksum if the file size is less than MAX_CHECKSUM_LENGTH. For larger files, the checksum will not be computed.
Responses:
200: This is a successful HTTP response code. It returns a JSON object containing the file info.
: A string containing the document id (e.g., a DID).
serviceId: A string representing the list of file objects that describe each file in the dataset.
transferTxId: A hex string representing the ID of the on-chain transaction for approval of data tokens transfer given to the provider's account.
fileIndex: An integer representing the index of the file from the files list in the dataset.
nonce: The nonce.
consumerAddress: A string containing the consumer's Ethereum address.
signature: A string containing the user's signature (signed message).
Purpose: This endpoint is used to retrieve the attached asset files. It returns a file stream of the requested file.
Responses:
200: This is a successful HTTP response code. It means the server has successfully processed the request and returned the file stream.
Add the nonce and signature to the payload.
: A string containing the document id (e.g., a DID).
serviceId: A string representing the ID of the service the data token is attached to.
consumerAddress: A string containing the consumer's Ethereum address.
environment: A string representing a compute environment offered by the provider.
validUntil: An integer representing the date of validity of the service (optional).
fileIndex: An integer representing the index of the file from the files list in the dataset. If set, the provider will validate the file access (optional).
Purpose: This endpoint is used to initialize a service and return a quote for the number of tokens to transfer to the provider's account.
Responses:
200: This is a successful HTTP response code. It returns a JSON object containing information about the quote for tokens to be transferred.
const axios = require('axios');
async function downloadAsset(payload) {
// Define the base URL of the services.
const SERVICES_URL = "<BASE URL>"; // Replace with your base services URL.
// Define the endpoint.
const endpoint = `${SERVICES_URL}/api/services/download`;
try {
// Send a GET request to the endpoint with the payload as query parameters.
const response = await axios.get(endpoint, { params: payload });
// Check the response.
if (response.status !== 200) {
throw new Error(`Response status code is not 200: ${response.data}`);
}
// Use the response data here.
console.log(response.data);
} catch (error) {
console.error(error);
}
}
// Define the payload.
let payload = {
"documentId": "<DOCUMENT ID>", // Replace with your document ID.
"serviceId": "<SERVICE ID>", // Replace with your service ID.
"consumerAddress": "<CONSUMER ADDRESS>", // Replace with your consumer address.
"transferTxId": "<TX ID>", // Replace with your transfer transaction ID.
"fileIndex": 0
};
// Run the function.
downloadAsset(payload);
const axios = require('axios');
async function initializeServiceAccess(payload) {
// Define the base URL of the services.
const SERVICES_URL = "<BASE URL>"; // Replace with your base services URL.
// Define the endpoint.
const endpoint = `${SERVICES_URL}/api/services/initialize`;
try {
// Send a GET request to the endpoint with the payload in the request query.
const response = await axios.get(endpoint, { params: payload });
// Check the response.
if (response.status !== 200) {
throw new Error(`Response status code is not 200: ${response.data}`);
}
// Use the response data here.
console.log(response.data);
} catch (error) {
console.error(error);
}
}
// Define the payload.
let payload = {
"documentId": "<DOCUMENT ID>", // Replace with your document ID.
"consumerAddress": "<CONSUMER ADDRESS>", // Replace with your consumer address.
"serviceId": "<SERVICE ID>", // Replace with your service ID.
// Add other necessary parameters as needed.
};
// Run the function.
initializeServiceAccess(payload);
: This endpoint is used to fetch the Decentralized Document (DDO) of a particular asset. A DDO is a detailed information package about a specific asset, including its ID, metadata, and other necessary data.
Parameters: The <did> in the URL is a placeholder for the DID, a unique identifier for the asset you want to retrieve the DDO for.
Name
Description
Type
Within
Required
did
DID of the asset
string
path
Here are some typical responses you might receive from the API:
200: This is a successful HTTP response code. In this case, it means the server successfully found and returned the DDO for the given DID. The returned data is formatted in JSON.
404: This is an HTTP response code that signifies the requested resource couldn't be found on the server. In this context, it means the asset DID you requested isn't found in Elasticsearch, the database Aquarius uses. The server responds with a JSON-formatted message stating that the asset DID wasn't found.
A method for retrieving the metadata about the asset using the Decentralized Identifier (DID).
Endpoint: GET /api/aquarius/assets/metadata/<did>
Purpose: This endpoint is used to fetch the metadata of a particular asset. It includes details about the asset such as its name, description, creation date, owner, etc.
Parameters: The <did> in the URL is a placeholder for the DID, a unique identifier for the asset you want to retrieve the metadata for.
Here are some typical responses you might receive from the API:
200: This is a successful HTTP response code. In this case, it means the server successfully found and returned the metadata for the given DID. The returned data is formatted in JSON.
404: This is an HTTP response code that signifies the requested resource couldn't be found on the server. In this context, it means the asset DID you requested isn't found in the database. The server responds with a JSON-formatted message stating that the asset DID wasn't found.
Name
Description
Type
Within
Required
did
DID of the asset
string
path
Used to retrieve the names of a group of assets using a list of unique identifiers known as Decentralized Identifiers (DIDs).
Here's a more detailed explanation:
Endpoint: POST /api/aquarius/assets/names
Purpose: This endpoint is used to fetch the names of specific assets. These assets are identified by a list of DIDs provided in the request payload. The returned asset names are those specified in the assets' metadata.
Parameters: The parameters are sent in the body of the POST request, formatted as JSON. Specifically, an array of DIDs (named "didList") should be provided.
Here are some typical responses you might receive from the API:
200: This is a successful HTTP response code. In this case, it means the server successfully found and returned the names for the assets corresponding to the provided DIDs. The returned data is formatted in JSON, mapping each DID to its respective asset name.
400: This is an HTTP response code that signifies a client error in the request. In this context, it means that the "didList" provided in the request payload was empty. The server responds with a JSON-formatted message indicating that the requested "didList" cannot be empty.
Name
Description
Type
Within
Required
didList
list of asset DIDs
list
body
Used to run a custom search query on the assets using Elasticsearch's native query syntax. We recommend reading the Elasticsearch documentation to understand their syntax.
Endpoint: POST /api/aquarius/assets/query
Purpose: This endpoint is used to execute a native Elasticsearch (ES) query against the stored assets. This allows for highly customizable searches and can be used to filter and sort assets based on complex criteria. The body of the request should contain a valid JSON object that defines the ES query.
Parameters: The parameters for this endpoint are provided in the body of the POST request as a valid JSON object that conforms to the Elasticsearch query DSL (Domain Specific Language).
Here are some typical responses you might receive from the API:
200: This is a successful HTTP response code. It means the server successfully ran your ES query and returned the results. The results are returned as a JSON object.
500: This HTTP status code represents a server error. In this context, it typically means there was an error with Elasticsearch while trying to execute the query. It could be due to an invalid or malformed query, an issue with the Elasticsearch service, or some other server-side problem. The specific details of the error are typically included in the response body.
Used to validate the content of a DDO (Decentralized Identifier Document).
Endpoint: POST /api/aquarius/assets/ddo/validate
Purpose: This endpoint is used to verify the validity of a DDO. This could be especially helpful prior to submitting a DDO to ensure it meets the necessary criteria and avoid any issues or errors. The endpoint consumes application/octet-stream, which means the data sent should be in binary format, often used for handling different data types.
Parameters: The parameters for this endpoint are provided in the body of the POST request as a valid JSON object, which represents the DDO that needs to be validated.
Here are some typical responses you might receive from the API:
200: This is a successful HTTP response code. It means the server successfully validated your DDO content and it meets the necessary criteria.
400: This HTTP status code indicates a client error. In this context, it means that the submitted DDO format is invalid. You will need to revise the DDO content according to the required specifications and resubmit it.
500: This HTTP status code represents a server error. This indicates an internal server error while processing your request. The specific details of the error are typically included in the response body.
Used to manually initiate the process of DDO caching based on a transaction ID. This transaction ID should include either MetadataCreated or MetadataUpdated events.
Endpoint: POST /api/aquarius/assets/triggerCaching
Purpose: This endpoint is used to manually trigger the caching process of a DDO (Decentralized Identifier Document). This process is initiated based on a specific transaction ID, which should include either MetadataCreated or MetadataUpdated events. This can be particularly useful in situations where immediate caching of metadata changes is required.
Parameters: The parameters for this endpoint are provided in the body of the POST request as a valid JSON object. This includes the transaction ID and log index that is associated with the metadata event.
Name
Description
Type
Within
Required
transactionId
DID of the asset
string
path
Here are some typical responses you might receive from the API:
200: This is a successful HTTP response code. It means the server successfully initiated the DDO caching process and the updated asset is returned.
400: This HTTP status code indicates a client error. In this context, it suggests issues with the request: either the log index was not found, or the transaction log did not contain MetadataCreated or MetadataUpdated events. You should revise your input parameters and try again.
500: This HTTP status code represents a server error. This indicates an internal server error while processing your request. The specific details of the error are typically included in the response body.
curl --location --request GET 'https://v4.aquarius.oceanprotocol.com/api/aquarius/assets/ddo/did:op:cd086344c275bc7c560e91d472be069a24921e73a2c3798fb2b8caadf8d245d6'
curl --location --request GET 'https://v4.aquarius.oceanprotocol.com/api/aquarius/assets/metadata/did:op:cd086344c275bc7c560e91d472be069a24921e73a2c3798fb2b8caadf8d245d6'
The Python script below can be used to run the query and fetch the list of buyers for a datatoken. If you wish to change the network, replace the variable's value base_url as needed. Change the value of the variable datatoken_address with the address of the datatoken of your choice.
Create Script
datatoken_buyers.py
import requestsimport
Execute Script
python datatoken_buyers.py
Copy the query to fetch the list of buyers for a datatoken in the Ocean Subgraph GraphiQL interface.
token(id : "0xc22bfd40f81c4a28c809f80d05070b95a11829d9") {
id,
orders(
orderBy: createdTimestamp
orderDirection: desc
first: 1000
) {
id
consumer {
id
}
payer {
id
}
reuses {
id
}
block
createdTimestamp
amount
}
}
Sample response
this table
Writing Algorithms
Learn how to write algorithms for use in Ocean Protocol's Compute-to-Data feature.
In the Ocean Protocol stack, algorithms are recognized as distinct asset types, alongside datasets. When it comes to Compute-to-Data, an algorithm comprises the following key components:
Algorithm Code: The algorithm code refers to the specific instructions and logic that define the computational steps to be executed on a dataset. It encapsulates the algorithms' functionalities, calculations, and transformations.
Docker Image: A Docker image plays a crucial role in encapsulating the algorithm code and its runtime dependencies. It consists of a base image, which provides the underlying environment for the algorithm, and a corresponding tag that identifies a specific version or variant of the image.
Entry Point: The entry point serves as the starting point for the algorithm's execution within the compute environment. It defines the initial actions to be performed when the algorithm is invoked, such as loading necessary libraries, setting up configurations, or calling specific functions.
Collectively, these components form the foundation of an algorithm in the context of Compute-to-Data.
When creating an algorithm asset in Ocean Protocol, it is essential to include the additional algorithm object in its metadata service. This algorithm object plays a crucial role in defining the Docker container environment associated with the algorithm. By specifying the necessary details within the algorithm object, such as the base image, tags, runtime configurations, and dependencies, the metadata service ensures that the algorithm asset is properly configured for execution within a Docker container.
Variable
Usage
Define your entry point according to your dependencies. E.g. if you have multiple versions of Python installed, use the appropriate command python3.6 $ALGO.
What Docker container should I use?
There are plenty of Docker containers that work out of the box. However, if you have custom dependencies, you may want to configure your own Docker Image. To do so, create a Dockerfile with the appropriate instructions for dependency management and publish the container, e.g. using Dockerhub.
We also collect some which you can also view in Dockerhub.
When publishing an algorithm through the , these properties can be set via the publish UI.
Data Storage
As part of a compute job, every algorithm runs in a K8s pod with these volumes mounted:
Path
Permissions
Usage
Please note that when using local Providers or Metatata Caches, the ddos might not be correctly transferred into c2d, but inputs are still available. If your algorithm relies on contents from the DDO json structure, make sure to use a public Provider and Metadata Cache (Aquarius instance).
Environment variables available to algorithms
For every algorithm pod, the Compute to Data environment provides the following environment variables:
Variable
Usage
Algorithm Metadata
An asset of type algorithm has additional attributes under metadata.algorithm, describing the algorithm and the Docker environment it is supposed to be run under.
Attribute
Type
Description
* Required
The container object has the following attributes defining the Docker image for running the algorithm:
Attribute
Type
Description
* Required
FAQ
Have some questions about Ocean Protocol?
Hopefully, you'll find the answers here! If not then please don't hesitate to reach out to us on - there are no stupid questions!
Storage for all of the algorithm's output files. They are uploaded on some form of cloud storage, and URLs are sent back to the consumer.
/data/logs/
read/write
All algorithm output (such as print, console.log, etc.) is stored in a file located in this folder. They are stored and sent to the consumer as well.
consumerParameters
An object that defines required consumer input before running the algorithm
container*
container
Object describing the Docker container image. See below
tag*
string
Tag of the Docker image.
checksum*
string
Digest of the Docker image. (ie: sha256:xxxxx)
image
The Docker image name the algorithm will run with.
tag
The Docker image tag that you are going to use.
entrypoint
The Docker entrypoint. $ALGO is a macro that gets replaced inside the compute job, depending where your algorithm code is downloaded.
/data/inputs
read
Storage for input data sets, accessible only to the algorithm running in the pod. Contents will be the files themselves, inside indexed folders e.g. /data/inputs/{did}/{service_id}.
/data/ddos
read
Storage for all DDOs involved in compute job (input data set + algorithm). Contents will json files containing the DDO structure.
DIDS
An array of DID strings containing the input datasets.
TRANSFORMATION_DID
The DID of the algorithm.
language
string
Language used to implement the software.
version
string
Version of the software preferably in SemVer notation. E.g. 1.0.0.
entrypoint*
string
The command to execute, or script to run inside the Docker image.
image*
string
Name of the Docker image.
Environment
Environment Object Example
{"algorithm":{"container
Environment Examples
Run an algorithm written in JavaScript/Node.js, based on Node.js v14:
The following is a simple JavaScript/Node.js algorithm, doing a line count for ALL input datasets. The algorithm is not using any environment variables, but instead it's scanning the /data/inputs folder.
This snippet will create and expose the following files as compute job results to the consumer:
/data/outputs/output.log
/data/logs/algo.log
To run this, use the following container object:
Example: Python
A more advanced line counting in Python, which relies on environment variables and constructs a job object, containing all the input files & DDOs
import pandas as pd
import numpy as np
import os
import time
import json
def get_job_details():
"""Reads in metadata information about assets used by the algo"""
job = dict()
job['dids'] = json.loads(os.getenv('DIDS', None))
job['metadata'] = dict()
job['files'] = dict()
job['algo'] = dict()
job['secret'] = os.getenv('secret', None)
algo_did = os.getenv('TRANSFORMATION_DID', None)
if job['dids'] is not None:
for did in job['dids']:
# get the ddo from disk
filename = '/data/ddos/' + did
print(f'Reading json from {filename}')
with open(filename) as json_file:
ddo = json.load(json_file)
# search for metadata service
for service in ddo['service']:
if service['type'] == 'metadata':
job['files'][did] = list()
index = 0
for file in service['attributes']['main']['files']:
job['files'][did].append(
'/data/inputs/' + did + '/' + str(index))
index = index + 1
if algo_did is not None:
job['algo']['did'] = algo_did
job['algo']['ddo_path'] = '/data/ddos/' + algo_did
return job
def line_counter(job_details):
"""Executes the line counter based on inputs"""
print('Starting compute job with the following input information:')
print(json.dumps(job_details, sort_keys=True, indent=4))
""" Now, count the lines of the first file in first did """
first_did = job_details['dids'][0]
filename = job_details['files'][first_did][0]
non_blank_count = 0
with open(filename) as infp:
for line in infp:
if line.strip():
non_blank_count += 1
print ('number of non-blank lines found %d' % non_blank_count)
""" Print that number to output to generate algo output"""
f = open("/data/outputs/result", "w")
f.write(str(non_blank_count))
f.close()
if __name__ == '__main__':
line_counter(get_job_details())
To run this algorithm, use the following container object:
Modern Artificial Intelligence (AI) models require vast amounts of training data.
In fact, every stage in the AI modeling life cycle is about data: raw training data -> cleaned data -> feature vectors -> trained models -> model predictions.
Ocean's all about managing data: getting it, sharing it, selling it, and making $ from it -- all with Web3 benefits like decentralized control, data provenance, privacy, sovereign control, and more.
Thus, Ocean helps manage data all along the AI model life cycle:
Ocean helps with raw training data
Ocean helps with cleaned data & feature vectors
Ocean helps with trained models as data
Ocean helps with model predictions as data
A great example is , where user make $ from their model predictions in a decentralized, private fashion.
How is Ocean Protocol aiming to start a new Data Economy?
Ocean Protocol's mission is to develop tools and services that facilitate the emergence of a new Data Economy. This new economy aims to empower data owners with control, maintain privacy, and catalyze the commercialization of data, including the establishment of data marketplaces.
To understand more about Ocean's vision, check out this blog post.
How does Ocean Protocol generate revenue?
The protocol generates revenue through transaction fees. These fees serve multiple purposes: they fund the ongoing development of Ocean technology and support the buy-and-burn process of the OCEAN.
To get a glimpse of the revenue generated on the Polygon network, which is the most frequently used network, you can find detailed information here.
To monitor burned tokens, visit etherscan. As of September 2023, approximately 1.4 million tokens have been burned. 🔥📈
How decentralized is Ocean?
To be fully decentralized means no single point of control, at any level of the stack.
OCEAN is already fully decentralized.
The Ocean core tech stack is already fully decentralized too: smart contracts on permissionless chains, and anyone can run support middleware.
Predictoor is fully decentralized.
Data Farming has some centralized components; we aim to decentralize those in the next 12-24 months.
About OCEAN
How is OCEAN used? How does it capture value?
OCEAN token major usage is currently in Predictoor DF i.e. rewarding Predictoors who perform predictions on DeFi token price feeds to predict the price directions of Defi token feeds. To know more about this, navigate here
What is the total supply of OCEAN?
1.41 Billion OCEAN.
Can OCEAN supply become deflationary?
A portion of the revenue earned in the Ocean ecosystem is earmarked for buy-and-burn. If the transaction volume on Ocean reaches scale and is broadly adopted to the point where the buy-burn mechanism outruns the emissions of OCEAN, the supply would deflate.
Does OCEAN also have governance functionality?
During the OceanDAO grants program (2021-2022), OCEAN was used for community voting and governance. Currently, there are no governance functions associated with the token.
Which blockchain network currently has the highest liquidity for OCEAN?
Ethereum mainnet.
Can the Ocean tech stack be used without OCEAN?
All Ocean modules and components are open-source and freely available to the community. Developers can change the default currency from OCEAN to a different one for their dApp.
How does the ecosystem and the token benefit from the usage of the open-source tech stack when transactions can be paid in any currency?
For each consume transaction, the Ocean community gets a small fee. This happens whether OCEAN is used or not. Here are details.
Ocean Nodes
What are Ocean Nodes?
Ocean Nodes is a decentralized solution that simplifies running and monetizing AI models by allowing users to manage data, computational resources, and AI models through Ocean Protocol's infrastructure, enabling easier and more secure data sharing and decentralized AI model development. Learn more here.
What are the minimum requirements to run a node? Can it be run on a phone or other small devices?
We recommend the following minimum system requirements for running one Ocean node, though these may vary depending on your configuration: - 1 vCPU - 2 GB RAM for basic operations - 4 GB storage - Operating System: We recommend using the latest LTS version of Ubuntu or the latest iOS. However, nodes should also work on other operating systems, including Windows.
While it is technically feasible to run a node on smaller devices, such as phones, the limited processing power and memory of these devices can lead to significant performance issues, making them unreliable for stable node operation.
Can I run a node using Windows or macOS, and are there any recommended guides for those operating systems?
Yes, you can run an Ocean node on both Windows and macOS.
For Windows, it's recommended to use WSL2 (Windows Subsystem for Linux) to create a Linux environment, as it works better with Docker. Once WSL2 is set up, you can follow the Linux installation guides. Here’s a helpful link to get started with WSL2
For macOS, you can install Docker directly and run the Docker image. It’s also recommended to use Homebrew to install necessary dependencies like Node.js.
Is there a maximum number of nodes allowed, and are there rules against running multiple nodes on the same IP?
There’s no limit to the number of nodes you can run, however there are a few guidelines to keep in mind. You can run multiple nodes on the same IP address, as long as each node is using a different port.
How long does it take for a new node to appear in the dashboard?
The time it takes for a new node to appear on the dashboard depends on the system load. Typically, nodes become visible within a few hours, though this can vary based on network conditions.
How can I verify that my node is running successfully?
To verify your node is running properly, follow these steps:
Check the Local Dashboard: Go to http://your_ip:8000/dashboard to view the status of your node, including connected peers and the indexer status.
Verify on the Ocean Node Dashboard: After a few hours, visit the Ocean Node Dashboard and search for your Node ID, Wallet, or IP to confirm your node is correctly configured and visible on the network.
Are there penalties if my node goes offline?
If your node goes offline, it won't be treated as a new node when you restart it - the timer will pick up from where it left off. However, frequent disconnections can impact your eligibility and uptime metrics, which are important for earning rewards. To qualify for rewards, your node must maintain at least 90% uptime. For example, in a week (10,080 minutes), your node needs to be active for at least 9,072 minutes. If your node is down for more than 16 hours and 48 minutes in a week, it will not be eligible for rewards.
How many nodes a user can run using a single wallet or on a single server?
Each node needs its own wallet - one node per wallet. You can use an Admin wallet to manage multiple nodes, but it’s not recommended to use the same private key for multiple nodes. Since the node ID is derived from the private key, using the same key for different nodes may cause issues.
You can run as many nodes on a server as its resources allow, depending on the server’s capacity.
Why does my node show “Reward Eligibility: false” and “No peer data” even though it is connected?
Your node may show "Reward Eligibility: false" and "No peer data" even when connected, and this may be for a few reasons:
Random Round Checks: The node status may change due to random round checks. If your node is unreachable during one of these checks, it could trigger these messages.
Configuration Issues: Misconfigurations, like an incorrect P2P_ANNOUNCE_ADDRESS, can impact communication. Ensure your settings are correct.
Port Accessibility: Make sure the required ports are open and accessible for your node to operate properly.
How do I backup or migrate my node to a new server without losing uptime?
To back up or migrate your node without losing uptime, follow these steps:
Run a Parallel Node: Start a new node on the new VPS while keeping the old one active. This ensures uninterrupted uptime during migration.
Use the Same Private Key: Configure the new node with the same private key as the old one. This will retain the same node ID and ensure continuity in uptime and rewards eligibility.
Update Configuration: Update the new node's configuration, including the announce_address in the Docker YAML file, to reflect the new IP address.
Verify on the Dashboard: Check the to confirm that the new node is recognized and that the IP address has been correctly updated.
How do I resolve the "No peer data" issue that affects node eligibility?
It's normal for a node's status to change automatically from time to time due to random round checks conducted on each node. If a node is unreachable during a check, the system will display the reason on the dashboard.
To resolve the "No peer data" issue, consider the following steps:
Restart Your Node: This simple action has been helpful for some users facing similar issues.
Check Configuration: a) Ensure that your P2P_ANNOUNCE_ADDRESS is configured correctly. b) Verify that the necessary ports are open.
Local Dashboard Access: Confirm that you can access your node from the local dashboard by visiting http://your_ip:8000/dashboard.
Do I need to open all ports to the outside world (e.g., 9000-9003, 8000)?
It's not necessary to open all ports; typically, opening port 8000 is sufficient for most operations. However, if you are running services that require additional ports - such as ports 9000-9003 for P2P connections - you may need to open those based on your specific setup and requirements.
How is the node's reward calculated, and will my income depend on the server's capacity?
The rewards for Ocean nodes are mainly determined by your node's uptime. Nodes that maintain an uptime of 90% or higher qualify for rewards from a substantial reward pool of 250,000 ROSE per epoch. Your income is not affected by the server's capacity; it relies solely on the reliability and uptime of your node.
What are the rewards for running a node, and how is the distribution handled?
Rewards for running a node are 360,000 ROSE per epoch and are automatically sent to your wallet if you meet all the requirements. These rewards are distributed in ROSE tokens within the Oasis Sapphire network.
Does my node's hardware setup (CPU, RAM, storage) impact the rewards I receive?
Your node's hardware setup - CPU, RAM, and storage - does not directly influence your rewards. The primary factor for receiving rewards is your node's uptime. As long as your node meets the minimum system requirements (90% node uptime) and maintains high availability, you remain eligible for rewards. Rewards are based on uptime rather than hardware specifications.
Grants, challenges, and ecosystem
Is Acentrik from Mercedes Benz built on top of Ocean?
3rd party markets such as Gaia-X, BDP and Acentrik use Ocean components to power their marketplace. They will likely use another currency for the exchange of services. If these marketplaces are publicly accessible, indexable and abide by the fee structure set out by Ocean Protocol, transaction fees would be remitted back to the Ocean community. These transaction fees would be allocated according to plan set out here.
What is Ocean Shipyard?
Ocean Shipyard is an early-stage grant program established to fund the next generation of Web3 dApps built on Ocean Protocol. It is made for entrepreneurs looking to build Web3 solutions on Ocean, make valuable data available, build innovations, and create value for the Ocean ecosystem.
Where can we see previous data challenges and submitted solutions?
You can find a list of past data challenges on the website.
What are the steps needed to encourage people to use the Ocean ecosystem?
There are a wide host of technical, business, and cultural barriers to overcome before volume sales can scale. Blockchain and crypto technology are relatively new and adopted by a niche group of enthusiasts. On top, the concept of a Data Economy is still nascent. Data buyers are generally restricted to data scientists, researchers, or large corporations, while data providers are mainly corporations and government entities. The commercialization of data is still novel and the processes are being developed and refined.
Data security
Is my data secure?
Yes. Ocean Protocol understands that some data is too sensitive to be shared — potentially due to GDPR or other reasons. For these types of datasets, we offer a unique service called compute-to-data. This enables you to monetize the dataset that sits behind a firewall without ever revealing the raw data to the consumer. For example, researchers and data scientists pay to run their algorithms on the data set, and the computation is performed behind a firewall; all the researchers or data scientists receive is the results generated by their algorithm.
How does Ocean Protocol enforce penalties if data is shared without permission?
Determining whether someone has downloaded your data and is reselling it is quite challenging. While they are bound by a contract not to do so, it's practically impossible to monitor their actions. If you want to maintain the privacy of your dataset, you can explore the option of using compute-to-data(C2D). Via C2D your data remains private and people can only run algorithms(that you approve of) to extract intelligence.
This issue is similar to what any digital distribution platform faces. For instance, can Netflix prevent individuals from downloading and redistributing their content? Not entirely. They invest significant resources in security, but ultimately, complete prevention is extremely difficult. They mainly focus on making it more challenging for such activities to occur.
Data marketplaces & Ocean Market
What is a decentralized data marketplace?
A data marketplace allows providers to publish data and buyers to consume data.
Unlike centralized data marketplaces, decentralized ones give users more control over their data and algorithms by minimizing custodianship and providing transparent and immutable records of every transaction.
Ocean Market is a reference decentralized data marketplace powered by Ocean stack.
Ocean Compute-to-Data (C2D) enables data and algorithms can be ingested into secure Docker containers where escapes are avoided, protecting both the data and algorithms. C2D can be used from Ocean Market.
Is there a website or platform that tracks the consume volume of Ocean Market?
Ocean Protocol is a decentralized data exchange protocol that enables individuals and organizations to share, sell, and consume data in a secure, transparent, and privacy-preserving manner. The protocol is designed to address the current challenges in data sharing, such as data silos, lack of interoperability, and data privacy concerns. Ocean Protocol uses blockchain technology, smart contracts, and cryptographic techniques to create a network where data providers can offer their data assets for sale, data consumers can purchase and access the data, and developers can build data-driven applications and services on top of the protocol.
OCEAN
The Ocean Protocol's token (OCEAN) is a utility token used in the Ocean Protocol ecosystem. It serves as a medium of exchange and a unit of value for data services in the network. Participants in the Ocean ecosystem can use OCEAN to buy and sell data, stake on data assets, and participate in the governance of the protocol.
Data Consume Volume (DCV)
The data consume value (DCV) is a key metric that refers to the amount of $ spent over a time period, to buy data assets where the data assets are subsequently consumed.
Transaction Volume (TV)
The transaction value is a key metric that refers to the number of blockchain transactions done over a time period.
Ocean Data Challenges
is a program organized by Ocean Protocol that seeks to expedite the shift into a New Data Economy by incentivizing data-driven insights and the building of algorithms geared toward solving complex business challenges. The challenges aim to encourage the Ocean community and other data enthusiasts to collaborate and leverage the capabilities of the Ocean Protocol to produce data-driven insights and design algorithms that are specifically tailored to solving intricate business problems.
Ocean Data Challenges typically involve a specific data problem or use case, for which participants are asked to develop a solution. The challenges are open to many participants, including data scientists, developers, researchers, and entrepreneurs. Participants are given access to relevant data sets, tools, and resources and invited to submit their solutions
Ocean Market
The is a decentralized data marketplace built on top of the Ocean Protocol. It is a platform where data providers can list their data assets for sale, and data consumers can browse and purchase data that meets their specific needs. The Ocean Market supports a wide range of data types, including but not limited to, text, images, videos, and sensor data.
While the Ocean Market is a vital part of the Ocean Protocol ecosystem and is anticipated to facilitate the unlocking of data value and stimulate data-driven innovation, it is important to note that it is primarily a technology demonstrator. As a decentralized data marketplace built on top of the Ocean Protocol, the Ocean Market showcases the capabilities and features of the protocol, including secure and transparent data exchange, flexible access control, and token-based incentivization. It serves as a testbed for the development and refinement of the protocol's components and provides a sandbox environment for experimentation and innovation. As such, the Ocean Market is a powerful tool for demonstrating the potential of the Ocean Protocol and inspiring the creation of new data-driven applications and services.
Ocean Shipyard
is an early-stage grant program established to fund the next generation of Web3 dApps built on Ocean Protocol. It is made for entrepreneurs looking to build open-source Web3 solutions on Ocean, make valuable data available, build innovations, and create value for the Ocean ecosystem.
In Shipyard, the Ocean core team curates project proposals that are set up to deliver according to clear delivery milestone timelines and bring particular strategic value for the future development of Ocean.
Intellectual Property (IP) Concepts
Base IP
Base IP means the artifact being copyrighted. Represented by the {ERC721 address, tokenId} from the publish transactions.
Base IP holder
Base IP holder means the holder of the Base IP. Represented as the actor that did the initial "publish" action.
Sub-licensee
Sub-licensee is the holder of the sub-license. Represented as the entity that controls address ERC721._owners[tokenId=x].
To Publish
Claim copyright or exclusive base license.
To Sub-license
Transfer one (of many) sub-licenses to new licensee: ERC20.transfer(to=licensee, value=1.0).
Web3 Fundamentals
Web3
Web3 (also known as Web 3.0 or the decentralized web) is a term used to describe the next evolution of the internet, where decentralized technologies are used to enable greater privacy, security, and user control over data and digital assets.
While the current version of the web (Web 2.0) is characterized by centralized platforms and services that collect and control user data, Web3 aims to create a more decentralized and democratized web by leveraging technologies such as blockchain, peer-to-peer networking, and decentralized file storage.
Ocean Protocol is designed to be a Web3-compatible platform that allows users to create and operate decentralized data marketplaces. This means that data providers and consumers can transact directly with each other, without the need for intermediaries or centralized authorities.
Blockchain
A distributed ledger technology (DLT) that enables secure, transparent, and decentralized transactions. Blockchains use cryptography to maintain the integrity and security of the data they store.
By using blockchain technology, Ocean Protocol provides a transparent and secure way to share and monetize data, while also protecting the privacy and ownership rights of data providers. Additionally, blockchain technology enables the creation of immutable and auditable records of data transactions, which can be used for compliance, auditing, and other purposes.
Decentralization
Decentralization is the distribution of power, authority, or control away from a central authority or organization, towards a network of distributed nodes or participants. Decentralized systems are often characterized by their ability to operate without a central point of control, and their ability to resist censorship and manipulation.
In the context of Ocean Protocol, decentralization refers to the use of blockchain technology to create a decentralized data exchange protocol. Ocean Protocol leverages decentralization to enable the sharing and monetization of data while preserving privacy and data ownership.
Block Explorer
A tool that allows users to view information about transactions, blocks, and addresses on a blockchain network. Block explorers provide a for interacting with a blockchain, and they allow users to search for specific transactions, view the details of individual blocks, and track the movement of cryptocurrency between addresses. Block explorers are commonly used by cryptocurrency enthusiasts, developers, and businesses to monitor network activity and verify transactions.
Cryptocurrency
A digital or virtual currency that uses cryptography for security and operates independently of a central bank. Cryptocurrencies use blockchain or other distributed ledger technologies to maintain their transaction history and prevent fraud.
Ocean Protocol uses a cryptocurrency called Ocean (OCEAN) as its native token. OCEAN is used as a means of payment for data transactions on the ecosystem, and it is also used to incentivize network participants, such as data providers, validators, and curators.
Like other cryptocurrencies, OCEAN operates on a blockchain, which ensures that transactions are secure, transparent, and immutable. The use of a cryptocurrency like OCEAN provides a number of benefits for the Ocean Protocol network, including faster transaction times, lower transaction fees, and greater transparency and trust.
Decentralized applications (dApps)
dApps (short for decentralized applications) are software applications that run on decentralized peer-to-peer networks, such as blockchain. Unlike traditional software applications that rely on a centralized server or infrastructure, dApps are designed to be decentralized, open-source, and community-driven.
dApps in the Ocean ecosystem are designed to enable secure and transparent data transactions between data providers and consumers, without the need for intermediaries or centralized authorities. These applications can take many forms, including data marketplaces, data analysis tools, data-sharing platforms, and many more. A good example of a dApp is the .
Interoperability
The ability of different blockchain networks to communicate and interact with each other. Interoperability is important for creating a seamless user experience and enabling the transfer of value across different blockchain ecosystems.
In the context of Ocean Protocol, interoperability enables the integration of the protocol with other blockchain networks and decentralized applications (dApps). This enables data providers and users to access and share data across different networks and applications, creating a more open and connected ecosystem for data exchange.
Smart contract
Smart contracts are self-executing digital contracts that allow for the automation and verification of transactions without the need for a third party. They are programmed using code and operate on a decentralized blockchain network. Smart contracts are designed to enforce the rules and regulations of a contract, ensuring that all parties involved fulfill their obligations. Once the conditions of the contract are met, the smart contract automatically executes the transaction, ensuring that the terms of the contract are enforced in a transparent and secure manner.
Ocean ecosystem smart contracts are deployed on multiple blockchains like Polygon, Energy Web Chain, BNB Smart Chain, and others. The code is open source and available on the organization's .
Ethereum Virtual Machine (EVM)
The Ethereum Virtual Machine (EVM) is a runtime environment that executes smart contracts on the Ethereum blockchain. It is a virtual machine that runs on top of the Ethereum network, allowing developers to create and deploy decentralized applications (dApps) on the network. The EVM provides a platform for developers to create smart contracts in various programming languages, including Solidity, Vyper, and others.
The Ocean Protocol ecosystem is a decentralized data marketplace built on the Ethereum blockchain. It is designed to provide a secure and transparent platform for sharing and selling data.
ERC
ERC stands for Ethereum Request for Comments and refers to a series of technical standards for Ethereum-based tokens and smart contracts. ERC standards are created and proposed by developers to the Ethereum community for discussion, review, and implementation. These standards ensure that smart contracts and tokens are compatible with other applications and platforms built on the Ethereum blockchain.
In the context of Ocean Protocol, several ERC standards are used to create and manage tokens on the network. Standards like , and .
ERC-20
is a technical standard used for smart contracts on the Ethereum blockchain that defines a set of rules and requirements for creating tokens that are compatible with the Ethereum ecosystem. ERC-20 tokens are fungible, meaning they are interchangeable with other ERC-20 tokens and have a variety of use cases such as creating digital assets, utility tokens, or fundraising tokens for initial coin offerings (ICOs).
The ERC-20 standard is used for creating fungible tokens on the Ocean Protocol network. Fungible tokens are identical and interchangeable with each other, allowing them to be used interchangeably on the network.
ERC-721
is a technical standard used for smart contracts on the Ethereum blockchain that defines a set of rules and requirements for creating non-fungible tokens (NFTs). ERC-721 tokens are unique and cannot be exchanged for other tokens or assets on a one-to-one basis, making them ideal for creating digital assets such as collectibles, game items, and unique digital art.
The ERC-721 standard is used for creating non-fungible tokens (NFTs) on the Ocean Protocol network. NFTs are unique and non-interchangeable tokens that can represent a wide range of assets, such as digital art, collectibles, and more.
ERC-1155
is a technical standard for creating smart contracts on the Ethereum blockchain that allows for the creation of both fungible and non-fungible tokens within the same contract. This makes it a "multi-token" standard that provides more flexibility than the earlier ERC-20 and ERC-721 standards, which only allow for the creation of either fungible or non-fungible tokens, respectively.
The ERC-1155 standard is used for creating multi-token contracts on the Ocean Protocol network. Multi-token contracts allow for the creation of both fungible and non-fungible tokens within the same contract, providing greater flexibility for developers.
Consensus Mechanism
A consensus mechanism is a method used in blockchain networks to ensure that all participants in the network agree on the state of the ledger or the validity of transactions. Consensus mechanisms are designed to prevent fraud, double-spending, and other types of malicious activity on the network.
In the context of Ocean Protocol, the consensus mechanism used is Proof of Stake (PoS).
Proof of Stake (PoS)
A consensus mechanism used in blockchain networks that require validators to hold a certain amount of cryptocurrency as a stake in order to participate in the consensus process. PoS is an alternative to proof of work (PoW) and is designed to be more energy efficient.
Proof of Work (PoW)
A consensus mechanism used in blockchain networks that require validators to solve complex mathematical puzzles in order to participate in the consensus process. PoW is the original consensus mechanism used in the Bitcoin blockchain and is known for its high energy consumption.
BUIDL
A term used in the cryptocurrency and blockchain space to encourage developers and entrepreneurs to build new products and services. The term is a deliberate misspelling of the word "build" and emphasizes the importance of taking action and creating value in the ecosystem.
Decentralized Finance (DeFi) fundamentals
DeFi
A financial system that operates on a decentralized, blockchain-based platform, rather than relying on traditional financial intermediaries such as banks, brokerages, or exchanges. In a DeFi system, financial transactions are executed using smart contracts, which are self-executing computer programs that automatically enforce the terms of an agreement between parties.
Decentralized exchange (DEX)
A Decentralized exchange (DEX) is an exchange that operates on a decentralized platform, allowing users to trade cryptocurrencies directly with one another without the need for a central authority or intermediary. DEXs typically use smart contracts to facilitate trades and rely on a network of nodes to process transactions and maintain the integrity of the exchange.
Staking
The act of holding a cryptocurrency in a wallet or on a platform to support the network and earn rewards. Staking is typically used in proof-of-stake (PoS) blockchain networks as a way to secure the network and maintain consensus.
Lending
The act of providing cryptocurrency to a borrower in exchange for interest payments. Lending platforms match borrowers with lenders and use smart contracts to facilitate loan agreements.
Borrowing
The act of borrowing cryptocurrency from a lender and agreeing to repay the loan with interest. Borrowing platforms match borrowers with lenders and use smart contracts to facilitate loan agreements.
Farming
A strategy in which investors provide liquidity to a DeFi protocol in exchange for rewards in the form of additional cryptocurrency or governance tokens. Farming typically involves providing liquidity to a liquidity pool and earning a share of the trading fees generated by the pool. Yield farming is a type of farming strategy.
Annual percentage Yield (APY)
Represents the total amount of interest earned on a deposit or investment account over one year, including the effect of compounding.
Annual Percentage Rate (APR)
Represents the annual cost of borrowing money, including the interest rate and any fees or charges associated with the loan, expressed as a percentage.
Liquidty pools (LP)
Liquidity Pools (LPs) are pools of tokens that are locked in a smart contract on a decentralized exchange (DEX) in order to facilitate the trading of those tokens. LPs provide liquidity to the DEX and allow traders to exchange tokens without needing a counterparty, while LP providers earn a share of the trading fees in exchange for providing liquidity.
Yield Farming
A strategy in which investors provide liquidity to a DeFi protocol in exchange for rewards in the form of additional cryptocurrency or governance tokens. Yield farming is designed to incentivize users to contribute to the growth and adoption of a DeFi protocol.
Data Science Terminology
AI
AI stands for Artificial Intelligence. It refers to the development of computer systems that can perform tasks that would typically require human intelligence to complete. AI technologies enable computers to learn, reason, and adapt in a way that resembles human cognition.
Machine learning
Machine learning is a subfield of artificial intelligence (AI) that involves teaching computers to learn from data, without being explicitly programmed. In other words, it is a way for machines to automatically learn and improve from experience, without being explicitly told what to do in every situation.
Decentralized Computing Terminology
Decentralized Compute
Distribution of computational tasks across multiple independent machines (GPUs/CPUs) globally instead of relying on a central server.
Peer-to-Peer (P2P) Network
A system where computers (peers) share resources and data directly without centralized control.
Node
An individual device or computer that participates in a decentralized network by providing compute, storage, or validation
Inference
The process of using a trained AI model to generate predictions or insights from new, unseen data.
Scaling Laws
Empirical patterns showing how AI model performance improves predictably with increases in data, compute, and model size.
The permissions stored on chain in the contracts control the access to the data NFT (ERC721) and datatoken (ERC20) smart contract functions.
The permissions governing access to the smart contract functions are stored within the data NFT (ERC721) smart contract. Both the data NFT (ERC721) and datatoken (ERC20) smart contracts utilize this information to enforce restrictions on certain actions, limiting access to authorized users. The tables below outline the specific actions that are restricted and can only be accessed by allowed users.
The data NFT serves as the foundational intellectual property (IP) for the asset, and all datatokens are inherently linked to the data NFT smart contract. This linkage has enabled the introduction of various exciting capabilities related to role administration.
NFT Owner
The NFT owner is the owner of the base-IP and is therefore at the highest level. The NFT owner can perform any action or assign any role but crucially, the NFT owner is the only one who can assign the manager role. Upon deployment or transfer of the data NFT, the NFT owner is automatically added as a manager. The NFT owner is also the only role that can’t be assigned to multiple users — the only way to share this role is via multi-sig or a DAO.
Roles-NFT level
Roles at the data NFT level
With the exception of the NFT owner role, all other roles can be assigned to multiple users.
There are several methods available to assign roles and permissions. One option is to utilize the and libraries that we provide. These libraries offer a streamlined approach for assigning roles and permissions programmatically.
Alternatively, for a more straightforward solution that doesn't require coding, you can utilize the network explorer of your asset's network. By accessing the network explorer, you can directly interact with the contracts associated with your asset. Below, we provide a few examples to help guide you through the process.
The ability to add or remove Managers is exclusive to the NFT Owner. If you are the NFT Owner and wish to add/remove a new manager, simply call the / function within the ERC721Template contract. This function enables you to grant managerial permissions to the designated individual.
The manager can assign or revoke three main roles (deployer, metadata updater, and store updater). The manager is also able to call any other contract (ERC725X implementation).
There is also a specific role for updating the metadata. The updater has the ability to update the information about the data asset (title, description, sample data etc) that is displayed to the user on the asset detail page within the market.
To add/remove a metadata updater, the manager can use the / functions from the ERC721RolesAddress.
The store updater can store, remove or update any arbitrary key value using the ERC725Y implementation (at the ERC721 level). The use case for this role depends a lot on what data is being stored in the ERC725Y key-value pair — as mentioned above, this is highly flexible.
To add/remove a store updater, the manager can use the / functions from the ERC721RolesAddress.
The Deployer has a bunch of privileges at the ERC20 datatoken level. They can deploy new datatokens with fixed price exchange, or free pricing. They can also update the ERC725Y key-value store and assignroles at the ERC20 level(datatoken level).
To add/remove an ERC20 deployer, the manager can use the / functions from the ERC721RolesAddress.
Action ↓ / Role →
NFT Owner
Manager
ERC20 Deployer
Store Updater
Metadata Updater
The Minter has the ability to mint new datatokens, provided the limit has not been exceeded.
To add/remove a minter, the ERC20 deployer can use the / functions from the ERC20Template.
Finally, we also have a fee manager which has the ability to set a new fee collector — this is the account that will receive the datatokens when a data asset is consumed. If no fee collector account has been set, the datatokens will be sent by default to the NFT Owner.
To add/remove a fee manager, the ERC20 deployer can use the / functions from the ERC20Template.
Action ↓ / Role →
ERC20 Deployer
Minter
NFT owner
Fee manager
Add manager
✓
Remove manager
✓
Clean permissions
✓
Set base URI
✓
Set Metadata state
✓
Set Metadata
✓
Create new datatoken
✓
Executes any other smart contract
✓
Set new key-value in store
✓
Create Dispenser
✓
Add minter
✓
Remove minter
✓
Add fee manager
✓
Remove fee manager
✓
Set data
✓
Clean permissions
✓
Mint
✓
Set fee collector
✓
Set token URI
Create Fixed Rate exchange
✓
Manager
Add/Remove Manager Contract functions
/**
* @dev addManager
* Only NFT Owner can add a new manager (Roles admin)
* There can be multiple minters
* @param _managerAddress new manager address
*/
function addManager(address _managerAddress) external onlyNFTOwner {
_addManager(_managerAddress);
}
/**
* @dev removeManager
* Only NFT Owner can remove a manager (Roles admin)
* There can be multiple minters
* @param _managerAddress new manager address
*/
function removeManager(address _managerAddress) external onlyNFTOwner {
_removeManager(_managerAddress);
}
Metadata Updater
Add/Remove Metadata Updater Contract functions
/**
* @dev addToMetadataList
* Adds metadata role to an user.
* It can be called only by a manager
* @param _allowedAddress user address
*/
function addToMetadataList(address _allowedAddress) public onlyManager {
_addToMetadataList(_allowedAddress);
}
/**
* @dev removeFromMetadataList
* Removes metadata role from an user.
* It can be called by a manager or by the same user, if he already has metadata role
* @param _allowedAddress user address
*/
function removeFromMetadataList(address _allowedAddress) public {
if(permissions[msg.sender].manager == true ||
(msg.sender == _allowedAddress && permissions[msg.sender].updateMetadata == true)
){
Roles storage user = permissions[_allowedAddress];
user.updateMetadata = false;
emit RemovedFromMetadataList(_allowedAddress,msg.sender,block.timestamp,block.number);
_SafeRemoveFromAuth(_allowedAddress);
}
else{
revert("ERC721RolesAddress: Not enough permissions to remove from metadata list");
}
}
Store Updater
Add/Remove Store Updater Contract functions
/**
* @dev addTo725StoreList
* Adds store role to an user.
* It can be called only by a manager
* @param _allowedAddress user address
*/
function addTo725StoreList(address _allowedAddress) public onlyManager {
if(_allowedAddress != address(0)){
Roles storage user = permissions[_allowedAddress];
user.store = true;
_pushToAuth(_allowedAddress);
emit AddedTo725StoreList(_allowedAddress,msg.sender,block.timestamp,block.number);
}
}
/**
* @dev removeFrom725StoreList
* Removes store role from an user.
* It can be called by a manager or by the same user, if he already has store role
* @param _allowedAddress user address
*/
function removeFrom725StoreList(address _allowedAddress) public {
if(permissions[msg.sender].manager == true ||
(msg.sender == _allowedAddress && permissions[msg.sender].store == true)
){
Roles storage user = permissions[_allowedAddress];
user.store = false;
emit RemovedFrom725StoreList(_allowedAddress,msg.sender,block.timestamp,block.number);
_SafeRemoveFromAuth(_allowedAddress);
}
else{
revert("ERC721RolesAddress: Not enough permissions to remove from 725StoreList");
}
}
ERC20 Deployer
Add/Remove ERC20 Deployer Contract functions
/**
* @dev addToCreateERC20List
* Adds deployERC20 role to an user.
* It can be called only by a manager
* @param _allowedAddress user address
*/
function addToCreateERC20List(address _allowedAddress) public onlyManager {
_addToCreateERC20List(_allowedAddress);
}
/**
* @dev removeFromCreateERC20List
* Removes deployERC20 role from an user.
* It can be called by a manager or by the same user, if he already has deployERC20 role
* @param _allowedAddress user address
*/
function removeFromCreateERC20List(address _allowedAddress) public {
if(permissions[msg.sender].manager == true ||
(msg.sender == _allowedAddress && permissions[msg.sender].deployERC20 == true)
){
Roles storage user = permissions[_allowedAddress];
user.deployERC20 = false;
emit RemovedFromCreateERC20List(_allowedAddress,msg.sender,block.timestamp,block.number);
_SafeRemoveFromAuth(_allowedAddress);
}
else{
revert("ERC721RolesAddress: Not enough permissions to remove from ERC20List");
}
}
To assign/remove all the above roles(ERC20 Deployer, Metadata Updater, or Store Updater), the manager can use the addMultipleUsersToRoles function from the ERC721RolesAddress.
Roles & permissions in data NFT (ERC721) smart contract
Roles-datatokens level
Minter
Add/Remove Minter Contract functions
/**
* @dev addMinter
* Only ERC20Deployer (at 721 level) can update.
* There can be multiple minters
* @param _minter new minter address
*/
function addMinter(address _minter) external onlyERC20Deployer {
_addMinter(_minter);
}
/**
* @dev removeMinter
* Only ERC20Deployer (at 721 level) can update.
* There can be multiple minters
* @param _minter minter address to remove
*/
function removeMinter(address _minter) external onlyERC20Deployer {
_removeMinter(_minter);
}
Fee Manager
The applicable fees (market and community fees) are automatically deducted from the datatokens that are received.
Add/Remove Fee Manager Contract functions
/**
* @dev addPaymentManager (can set who's going to collect fee when consuming orders)
* Only ERC20Deployer (at 721 level) can update.
* There can be multiple paymentCollectors
* @param _paymentManager new minter address
*/
function addPaymentManager(address _paymentManager) external onlyERC20Deployer
{
_addPaymentManager(_paymentManager);
}
/**
* @dev removePaymentManager
* Only ERC20Deployer (at 721 level) can update.
* There can be multiple paymentManagers
* @param _paymentManager _paymentManager address to remove
*/
function removePaymentManager(address _paymentManager) external onlyERC20Deployer
{
_removePaymentManager(_paymentManager);
}
When the NFT ownership is transferred to another wallet address, all the roles and permissions and cleared.
function cleanPermissions() external onlyNFTOwner {
_cleanPermissions();
//Make sure that owner still has permissions
_addManager(ownerOf(1));
}
Roles & permission in datatoken (ERC20) smart contract
If you are already familiarized with veOCEAN, you're off to a great start. However, if you need a refresher, we recommend visiting the veOCEAN page for a quick overview 🔍
On this page, you'll find a few examples to fetch the stats of veOCEANS from the Ocean Subgraph. These examples serve as a valuable starting point to help you retrieve essential information about veOCEAN. However, if you're eager to delve deeper into the topic, we invite you to visit the GitHub repository. There, you'll discover a wealth of additional examples, which provide comprehensive insights. Feel free to explore and expand your knowledge! 📚
The veOCEAN is deployed on the Ethereum mainnet, along with two test networks. The statistical data available is specifically limited to these networks.
Get the total amount of locked OCEAN
You can utilize the following JavaScript code snippet to execute the query and retrieve the total number of locked OCEAN:
You can employ the following Python script to execute the query and retrieve the total amount of locked OCEAN from the subgraph:
Create script
Execute script
To fetch the total amount of Ocean locked in the Ocean Subgraph interface, you can use the following query:
You can utilize the following JavaScript code snippet to execute the query and fetch the list of veOCEAN holders.
You can employ the following Python script to execute the query and fetch the list of veOCEAN holders from the subgraph.
Execute script
To fetch the list of veOCEAN holders in the Ocean Subgraph interface, you can use the following query:
Specification of decentralized identifiers for assets in Ocean Protocol using the DDO standard.
New DDO Schema - High Level
The below diagram shows the high-level DDO schema depicting the content of each data structure and the relations between them.
Please note that some data structures apply only on certain types of services or assets.
Required Attributes
A DDO in Ocean has these required attributes:
Attribute
Type
Description
This object holds information describing the actual asset.
Attribute
Type
Description
* Required
** Required for algorithms only
Services define the access for an asset, and each service is represented by its respective datatoken.
An asset should have at least one service to be actually accessible and can have as many services which make sense for a specific use case.
Attribute
Type
Description
* Required
** Required for compute assets only
The files field is returned as a string which holds the encrypted file URLs.
By default, a consumer can access a resource if they have 1 datatoken. Credentials allow the publisher to optionally specify more fine-grained permissions.
Consider a medical data use case, where only a credentialed EU researcher can legally access a given dataset. Ocean supports this as follows: a consumer can only access the resource if they have 1 datatoken and one of the specified "allow" credentials.
This is like going to an R-rated movie, where you can only get in if you show both your movie ticket (datatoken) and some identification showing you're old enough (credential).
Only credentials that can be proven are supported. This includes Ethereum public addresses and in the future and more.
Ocean also supports deny credentials: if a consumer has any of these credentials, they can not access the resource.
Here's an example object with both allow and deny entries:
In order to ensure the integrity of the DDO, a checksum is computed for each DDO:
The checksum hash is used when publishing/updating metadata using the setMetaData function in the ERC721 contract, and is stored in the event generated by the ERC721 contract.
Aquarius should always verify the checksum after data is decrypted via a Provider API call.
Each asset has a state, which is held by the NFT contract. The possible states are:
State
Description
Discoverable in Ocean Market
Ordering allowed
Listed under profile
States details:
Active: Assets in the "Active" state are fully functional and available for discovery in Ocean Market, and other components. Users can search for, view, and interact with these assets. Ordering is allowed, which means users can place orders to purchase or access the asset's services.
End-of-life: Assets in the "End-of-life" state remain discoverable but cannot be ordered. This state indicates that the assets are usually deprecated or outdated, and they are no longer actively promoted or maintained.
Deprecated (by another asset): This state indicates that another asset has deprecated the current asset. Deprecated assets are not discoverable, and ordering is not allowed. Similar to the "End-of-life" state, deprecated assets are not listed under the owner's profile.
The following fields are added by Aquarius in its DDO response for convenience reasons, where an asset returned by Aquarius inherits the DDO fields stored on-chain.
These additional fields are never stored on-chain and are never taken into consideration when .
The datatokens array contains information about the ERC20 datatokens attached to .
Attribute
Type
Description
Indexed Metadata contains off-chain data that helps storing assets pricing details and displaying them properly within decenterlized applications.
Indexed Metadata is composed of the following objects:
NFT
Event
Purgatory
Stats
When hashing is performed against a document, indexedMeatadata object has to be removed from the DDO structure, its off-chain data being stored and maintained only in the Indexer database, within DDO collection.
The nft object contains information about the ERC721 NFT contract which represents the intellectual property of the publisher.
Attribute
Type
Description
The event section contains information about the last transaction that created or updated the DDO.
Contains information about an asset's purgatory status defined in . Marketplace interfaces are encouraged to prevent certain user actions like adding liquidity on assets in purgatory.
Attribute
Type
Description
The stats section contains a list of different statistics fields.
Attribute
Type
Description
For algorithms and datasets that are used for compute to data, there are additional fields and objects within the DDO structure that you need to consider. These include:
compute attributes
publisherTrustedAlgorithms
consumerParameters
Details for each of these are explained on the .
The below diagram shows the detailed DDO schema depicting the content of each data structure and the relations between them.
Please note that some data structures apply only on certain types of services or assets.
description*
string
Details of what the resource is. For a dataset, this attribute explains what the data represents and what it can be used for.
copyrightHolder
string
The party holding the legal copyright. Empty by default.
name*
string
Descriptive name or title of the asset.
type*
string
Asset type. Includes "dataset" (e.g. csv file), "algorithm" (e.g. Python script). Each type needs a different subset of metadata attributes.
author*
string
Name of the entity generating this data (e.g. Tfl, Disney Corp, etc.).
license*
string
Short name referencing the license of the asset (e.g. Public Domain, CC-0, CC-BY, No License Specified, etc. ). If it's not specified, the following value will be added: "No License Specified".
links
Array of string
Mapping of URL strings for data samples, or links to find out more information. Links may be to either a URL or another asset.
contentLanguage
string
The language of the content. Use one of the language codes from the
tags
Array of string
Array of keywords or tags used to describe this content. Empty by default.
categories
Array of string
Array of categories associated to the asset. Note: recommended to use tags instead of this.
additionalInformation
Object
Stores additional information, this is customizable by publisher
algorithm**
Information about asset of typealgorithm
name
string
Service friendly name
description
string
Service description
datatokenAddress*
string
Datatoken
serviceEndpoint*
string
Provider URL (schema + host)
files*
Encrypted file.
timeout*
number
Describing how long the service can be used after consumption is initiated. A timeout of 0 represents no time limit. Expressed in seconds.
compute**
If service is of typecompute, holds information about the compute-related privacy settings & resources.
consumerParameters
An object the defines required consumer input before consuming the asset
additionalInformation
Object
Stores additional information, this is customizable by publisher
1
End-of-life
Yes
No
No
2
Deprecated (by another asset)
No
No
No
3
Revoked by publisher
No
No
No
4
Ordering is temporary disabled
Yes
No
Yes
5
Asset unlisted.
No
Yes
Yes
Revoked by publisher: When an asset is revoked by its publisher, it means that the publisher has explicitly revoked access or ownership rights to the asset. Revoked assets are not discoverable, and ordering is not allowed.
Ordering is temporarily disabled: Assets in this state are still discoverable, but ordering functionality is temporarily disabled. Users can view the asset and gather information, but they cannot place orders at that moment. However, these assets are still listed under the owner's profile.
Asset unlisted: Assets in the "Asset unlisted" state are not discoverable. However, users can still place orders for these assets, making them accessible. Unlisted assets are listed under the owner's profile, allowing users to view and access them.
symbol
string
Symbol of NFT set in contract.
serviceId
string
ID of the service the datatoken is attached to.
symbol
string
Symbol of NFT set in contract.
owner
string
ETH account address of the NFT owner.
state
number
State of the asset reflecting the NFT contract value. See
created
ISO date/time string
Contains the date of NFT creation.
tokenURI
string
tokenURI
symbol
string
Symbol of the datatoken with pricing schema.
serviceId
string
Service ID of the datatoken with pricing schema.
orders
number
How often an asset was ordered, meaning how often it was either downloaded or used as part of a compute job.
prices
array
Pricing schemas list for this datatoken (a fixedrate and dispenser can co-exist for the same datatoken).
type
string
Static values: "fixedrate", "dispenser".
price
string
Price for schema (for dispenser is default "0").
contract
string
Contract address of pricing schema contract.
token
string
Basetoken for fixedrate, Datatoken for dispenser.
exchangeId
string
Just for fixedrate.
@context
Array of string
Contexts used for validation.
id
string
Computed as sha256(address of ERC721 contract + chainId).
version
string
Version information in SemVer notation referring to this DDO spec version, like 4.1.0.
chainId
number
Stores the chainId of the network the DDO was published to.
Specification of decentralized identifiers for assets in Ocean Protocol using the DDO standard.
DDO Schema - High Level
The below diagram shows the high-level DDO schema depicting the content of each data structure and the relations between them.
Please note that some data structures apply only on certain types of services or assets.
Required Attributes
A DDO in Ocean has these required attributes:
Attribute
Type
Description
This object holds information describing the actual asset.
Attribute
Type
Description
* Required
** Required for algorithms only
Services define the access for an asset, and each service is represented by its respective datatoken.
An asset should have at least one service to be actually accessible and can have as many services which make sense for a specific use case.
Attribute
Type
Description
* Required
** Required for compute assets only
The files field is returned as a string which holds the encrypted file URLs.
By default, a consumer can access a resource if they have 1 datatoken. Credentials allow the publisher to optionally specify more fine-grained permissions.
Consider a medical data use case, where only a credentialed EU researcher can legally access a given dataset. Ocean supports this as follows: a consumer can only access the resource if they have 1 datatoken and one of the specified "allow" credentials.
This is like going to an R-rated movie, where you can only get in if you show both your movie ticket (datatoken) and some identification showing you're old enough (credential).
Only credentials that can be proven are supported. This includes Ethereum public addresses and in the future and more.
Ocean also supports deny credentials: if a consumer has any of these credentials, they can not access the resource.
Here's an example object with both allow and deny entries:
In order to ensure the integrity of the DDO, a checksum is computed for each DDO:
The checksum hash is used when publishing/updating metadata using the setMetaData function in the ERC721 contract, and is stored in the event generated by the ERC721 contract.
Aquarius should always verify the checksum after data is decrypted via a Provider API call.
Each asset has a state, which is held by the NFT contract. The possible states are:
State
Description
Discoverable in Ocean Market
Ordering allowed
Listed under profile
States details:
Active: Assets in the "Active" state are fully functional and available for discovery in Ocean Market, and other components. Users can search for, view, and interact with these assets. Ordering is allowed, which means users can place orders to purchase or access the asset's services.
End-of-life: Assets in the "End-of-life" state remain discoverable but cannot be ordered. This state indicates that the assets are usually deprecated or outdated, and they are no longer actively promoted or maintained.
Deprecated (by another asset): This state indicates that another asset has deprecated the current asset. Deprecated assets are not discoverable, and ordering is not allowed. Similar to the "End-of-life" state, deprecated assets are not listed under the owner's profile.
The following fields are added by Aquarius in its DDO response for convenience reasons, where an asset returned by Aquarius inherits the DDO fields stored on-chain.
These additional fields are never stored on-chain and are never taken into consideration when .
The nft object contains information about the ERC721 NFT contract which represents the intellectual property of the publisher.
Attribute
Type
Description
The datatokens array contains information about the ERC20 datatokens attached to .
Attribute
Type
Description
The event section contains information about the last transaction that created or updated the DDO.
Contains information about an asset's purgatory status defined in . Marketplace interfaces are encouraged to prevent certain user actions like adding liquidity on assets in purgatory.
Attribute
Type
Description
The stats section contains different statistics fields.
Attribute
Type
Description
For algorithms and datasets that are used for compute to data, there are additional fields and objects within the DDO structure that you need to consider. These include:
compute attributes
publisherTrustedAlgorithms
consumerParameters
Details for each of these are explained on the .
The below diagram shows the detailed DDO schema depicting the content of each data structure and the relations between them.
Please note that some data structures apply only on certain types of services or assets.
description*
string
Details of what the resource is. For a dataset, this attribute explains what the data represents and what it can be used for.
copyrightHolder
string
The party holding the legal copyright. Empty by default.
name*
string
Descriptive name or title of the asset.
type*
string
Asset type. Includes "dataset" (e.g. csv file), "algorithm" (e.g. Python script). Each type needs a different subset of metadata attributes.
author*
string
Name of the entity generating this data (e.g. Tfl, Disney Corp, etc.).
license*
string
Short name referencing the license of the asset (e.g. Public Domain, CC-0, CC-BY, No License Specified, etc. ). If it's not specified, the following value will be added: "No License Specified".
links
Array of string
Mapping of URL strings for data samples, or links to find out more information. Links may be to either a URL or another asset.
contentLanguage
string
The language of the content. Use one of the language codes from the
tags
Array of string
Array of keywords or tags used to describe this content. Empty by default.
categories
Array of string
Array of categories associated to the asset. Note: recommended to use tags instead of this.
additionalInformation
Object
Stores additional information, this is customizable by publisher
algorithm**
Information about asset of typealgorithm
name
string
Service friendly name
description
string
Service description
datatokenAddress*
string
Datatoken
serviceEndpoint*
string
Provider URL (schema + host)
files*
Encrypted file.
timeout*
number
Describing how long the service can be used after consumption is initiated. A timeout of 0 represents no time limit. Expressed in seconds.
compute**
If service is of typecompute, holds information about the compute-related privacy settings & resources.
consumerParameters
An object the defines required consumer input before consuming the asset
additionalInformation
Object
Stores additional information, this is customizable by publisher
Yes
1
End-of-life
Yes
No
No
2
Deprecated (by another asset)
No
No
No
3
Revoked by publisher
No
No
No
4
Ordering is temporary disabled
Yes
No
Yes
5
Asset unlisted.
No
Yes
Yes
Revoked by publisher: When an asset is revoked by its publisher, it means that the publisher has explicitly revoked access or ownership rights to the asset. Revoked assets are not discoverable, and ordering is not allowed.
Ordering is temporarily disabled: Assets in this state are still discoverable, but ordering functionality is temporarily disabled. Users can view the asset and gather information, but they cannot place orders at that moment. However, these assets are still listed under the owner's profile.
Asset unlisted: Assets in the "Asset unlisted" state are not discoverable. However, users can still place orders for these assets, making them accessible. Unlisted assets are listed under the owner's profile, allowing users to view and access them.
symbol
string
Symbol of NFT set in contract.
owner
string
ETH account address of the NFT owner.
state
number
State of the asset reflecting the NFT contract value. See
created
ISO date/time string
Contains the date of NFT creation.
tokenURI
string
tokenURI
symbol
string
Symbol of NFT set in contract.
serviceId
string
ID of the service the datatoken is attached to.
@context
Array of string
Contexts used for validation.
id
string
Computed as sha256(address of ERC721 contract + chainId).
version
string
Version information in SemVer notation referring to this DDO spec version, like 4.1.0.
chainId
number
Stores the chainId of the network the DDO was published to.